Appendix A — Installing Languages and IDEs
The goal is to create the capability on one’s computer to conduct and communicate reproducible data science using modern, open-source, and current software tools.
Learning Outcomes: After completion, students can create functioning R and Python environments for literate programming using Quarto by installing:
- Base R

- The RStudio Integrated Development Environment (IDE)
 , and/or,
 - The Positron Integrated Development Environment (IDE)

- Python
- Select R and Python “packages” of software
A.1 Installing Base R
R is free open-source software with powerful capabilities for statistical programming and data science. It is capable of operating on most computers.
- To install R, use your browser to go to the Comprehensive R Archive Network (CRAN) site: https://cran.r-project.org/
- Choose the appropriate operating system.
- If asked, follow the instructions to “choose your preferred
CRAN mirror”. - Select a site close to your location, e.g., USA Hoobly Classifieds, Pittsburgh, PA, https://cran.mirrors.hoobly.com/
- If asked, follow the instructions to “choose your preferred
- Download the latest version for your computer operating system (OS), e.g. R version 4.5.2 (2025-10-31) – “[Not] Part in a Rumble” (or higher).
- For Macs, download the install file and install as usual for a new application.
- If Windows, choose Base and download the file. For old systems you may need to follow the installation instructions.
- You should now be able to find an R application with the logo on your computer.
- We will not use that interface (except for rare troubleshooting).
- We will use one of Posit’s much more user-friendly and capable Integrated Development Environments (IDEs), RStudio Desktop or Positron. Both are also free.
A.2 Installing the RStudio Desktop 
Posit’s RStudio Desktop is a free highly-capable Integrated Development Environment (IDE) designed to greatly increase the ease and efficiency of programming in R.
- Go to the RStudio download site at: https://posit.co/download/rstudio-desktop/
- Click on
Download RStudio Desktop .... It may auto-detect your type of computer.- If asked, get the free desktop version (not the pro).
- Your version should be at least Version: 2026.01.0 Build 392 (January 2026) or higher.
- Install as usual for your computer.
- You should now see an Application for the RStudio IDE on your computer.
- Add the RStudio Application to your Mac Dock or Windows Task Bar.
A.2.1 Accessing Quarto 
Quarto is a multi-language capability from Posit for creating many types of documents, web sites, presentations etc.. Quarto has many new features and can handle older R Markdown (.Rmd) files.
- See Tutorial: Hello, Quarto! and select the RStudio option.
Recent RStudio versions already include the Command Line Interface (CLI) version of Quarto so it should now be installed on your computer.
- If for some reason you need to re-install Quarto, go to Quarto’s Get Started page or install the {quarto} package.
A.2.2 \(\LaTeX\)
\(\LaTeX\) is a high-quality typesetting system designed for the production of technical and scientific documents that is used in many communities.
You will use \(\LaTeX\) code to create mathematical formulas as required in the text portions of your files.
Quarto comes with the American Mathematical Society (AMS) version of \(\LaTeX\).
For a full \(\LaTeX\) install, see TeX Live and follow the instructions for your platform/operating system.
A.2.3 Installing the R package for R Markdown
Quarto depends on the R Markdown language for describing how to format the output from your documents so you must install the R {rmarkdown} package.
- The {rmarkdown} package is a bundle of software (think of it as an add-in or app) that adds the ability to use the R Markdown language to format your documents.
You can use RStudio to install the {rmarkdown} from CRAN.
Open RStudio by clicking on
 in your dock or task bar.
It should look something like this (with a newer version now):
Go to the RStudio
Packagestab pane, select theInstalltab, enterrmarkdownand selectInstall.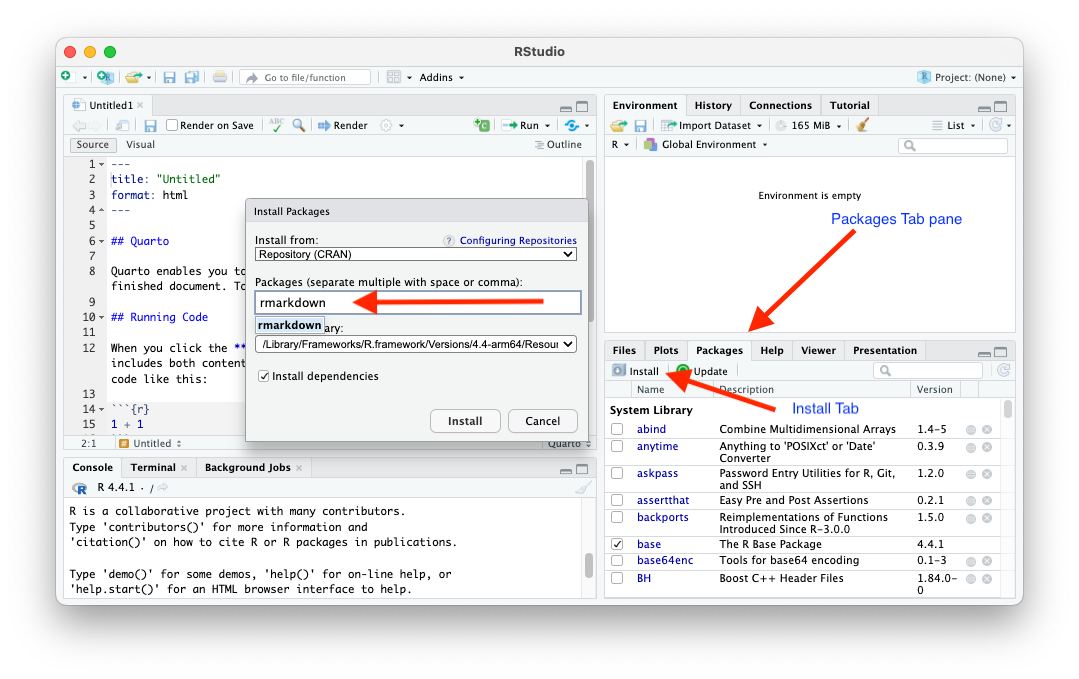
- This will generate the command in the Console pane to install the package.
You can install using the RStudio
Console Pane.The blinking cursor at the bottom left, to the right of the “greater-than” or “right arrow
>, is called the prompt.You can type in R code after the prompt and then hit the enter (return) to execute the code. - If you make a mistake, use the up-arrow key to cycle through previous commands until you get the one you want so you can correct it.
Type
install.packages("rmarkdown")to the right of the cursor and then hit enter or return tell RStudio to execute the command.
- R is case-sensitive so be careful about spelling.
- R is also sensitive about quotes so use the
"or'when required. - If you copy and paste from a document, e.g., a PDF document, into R, the copied code may use “Smart Quotes” which are not the same as the “Straight Quotes” used in R. If there is an error, you may need to edit the file and replace the smart quotes with straight quotes.
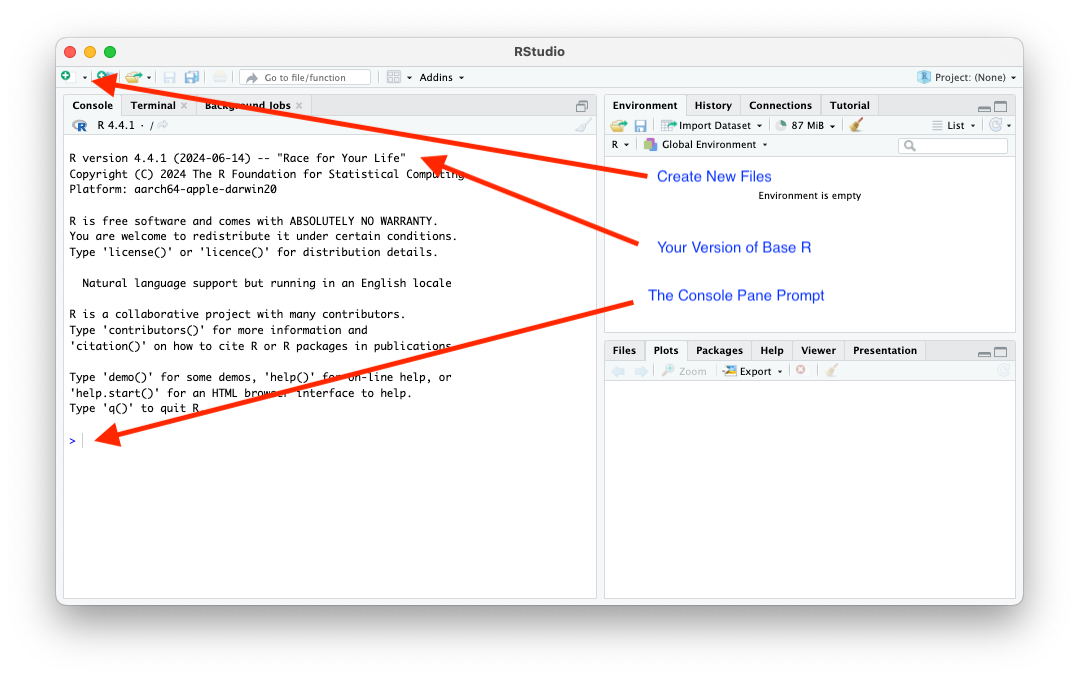
A.2.4 Checking the R, RStudio, and Quarto Software Installations
Open RStudio.
- You should see the version of R in the console pane.
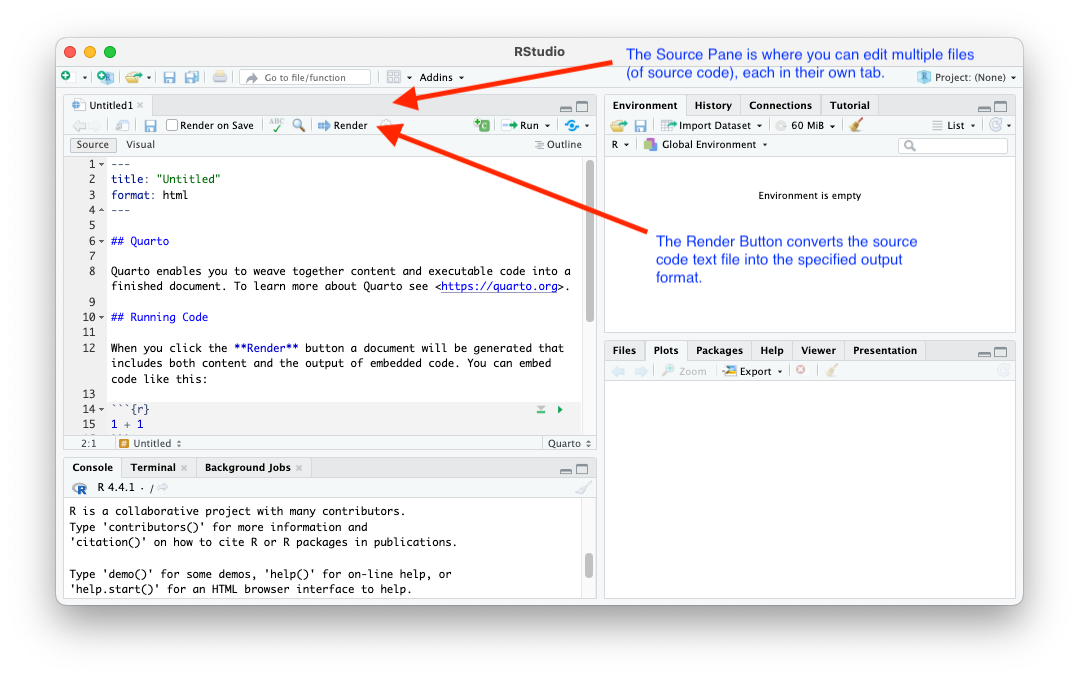
You can create a new file using the New Files button or the File/New File on the top main menu.
- Click on the plus sign and select
Quarto document.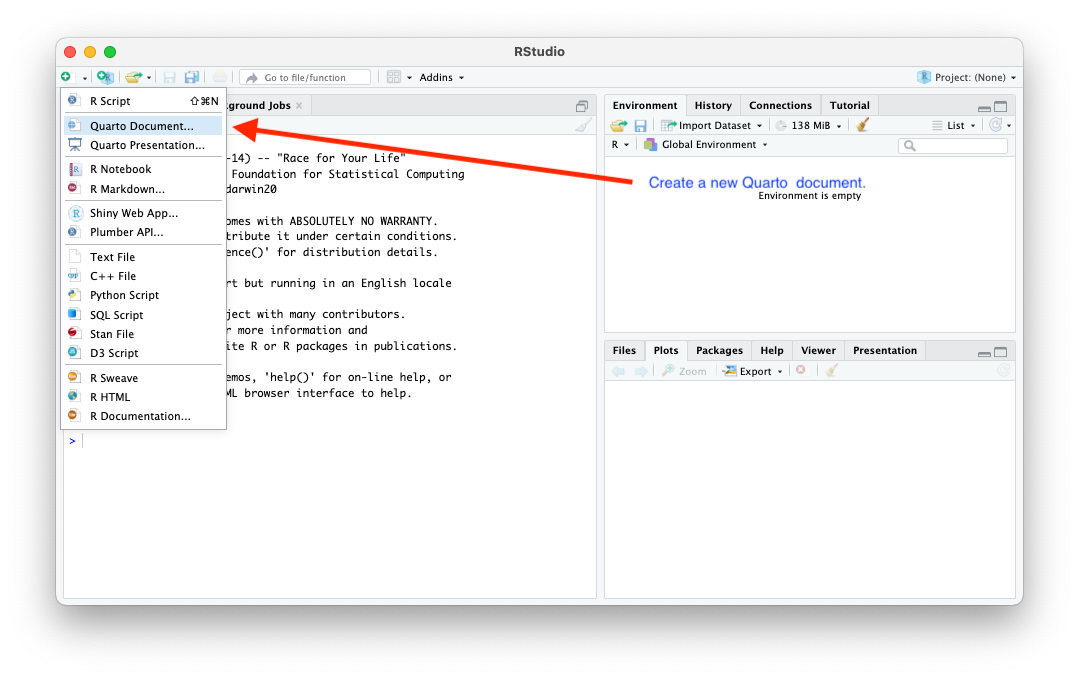
- RStudio creates a new file with a few lines of default code with the extension
.qmdand opens it as a tab in theSourcepane.- The
Sourcepane is where you edit your documents (source code) files.
- The
- To convert your
.qmdfile to the specified output format, click on the Render button and it will start the conversion process.
- You will need to save the file to your computer - you can leave it as
untitled.qmd
- You will need to save the file to your computer - you can leave it as
- You should see some code scrolling by in the
Background Jobstab and then a rendered (converted) document should appear in theViewertab pane.
If the document appears, then your R, RStudio, Quarto, and RMarkdown are working!
- If it does not appear, there should be error messages in the
ConsoleorBackground Jobspanes and you can try re-installing the software.
A.2.5 Configuring RStudio
RStudio is a powerful IDE so there are many options for configuring it to your needs.
You can adjust your configuration using the Main menu item for Tools\ Global Options....
Suggest considering the following:
A.2.5.1 General: Basic Tab
- R Sessions
- If this is the only course or work for which you are using R this semester, change the
Default working directoryto the directory on your computer you have created for this course. If you have not created a director, now is a good time to do so. - Check
Restore most recently opened project at startup.
- If this is the only course or work for which you are using R this semester, change the
- Save Workspace
- By default RStudio will automatically save your workspace (a bunch of leftover stuff) when you exit it and restore it when you reopen.
- This might streamline your work but it is bad for reproducibility as you might unintentionally be using the results from code you ran in a previous session (which you no longer can view and may not remember so you can’t reproduce).
- To change this option.
- Uncheck
Restore .RData into workspace at startup. - Change
Save workspace to .RData on exittoNever.
- Uncheck
- By default RStudio will automatically save your workspace (a bunch of leftover stuff) when you exit it and restore it when you reopen.
A.2.5.2 Code: Editing Tab
- Check (turn on) the following if not already on:
Insert matching parens/quotesUse native pipe operator
- Un-check (turn off) the following if already on:
- Soft-wrap R Source Files
- Under
ExecutionselectCtrl+Enter executesto beMulti-line R Statement
A.2.5.3 Code: Display Tab
- Check (turn on) the following if not already on:
Use Rainbow Parentheses
A.2.5.4 Appearance
- Change Font Size to one you prefer. You can always adjust on the fly with
CMD +orCMD -(or CTRL on Windows)
A.2.5.5 Pane Layout
- You can adjust the panes and Pane tabs to support your coding preferences.
- Some people prefer to have the source on the left and the Console on the right
- Others prefer to have the Source on the Left and the Console on the bottom.
- It is purely a personal choice and has no effect on how the IDE operates.
A.2.5.6 R Markdown
- Basic Tab
- Check (turn on) the following if not already on:
Soft-wrap R Markdown files
- Advanced
- Check (turn on) the following if not already on:
Use rainbow fenced divs
- Visual: General
- Check
Use visual editor by default for new documentsif you like using the visual editor as your default.
- Check
You can adjust your configuration at any time although you may need to restart RStudio for the new configuration to take effect.
A.2.6 Using RStudio Projects
RStudio Projects are a wonderful feature of the RStudio IDE to simplify organizing and working with multiple files in a defined piece of work, e.g., the data and source code files for a homework assignment.
An RStudio Project consists of the chosen project folder (directory) on your computer and all of the folders underneath it in the directory tree structure.
When you create a Homework folder, turn it into an RStudio project.
When you open an RStudio Project, RStudio will automatically set up your console working directory, your files pane working directory, and your terminal pane prompt to be the folder of the RStudio project.
- If you are working with a Git Repository, RStudio Projects should align with the repository and can help you do common Git and GitHub functions using the Git Pane.
You can create new projects or turn an existing directory into a project using RStudio.
See RStudio Projects for more help on creating and using RStudio Projects for more efficient operation with R.
A.2.7 Summary
- You should now be able to install the software you need to:
- Start an RStudio session by clicking on
 .
. - Use RStudio to create and save a Quarto file to a folder on your computer.
- Use RStudio to render/convert your file to PDF or HTML formatted output document in a folder on your computer.
- Start an RStudio session by clicking on
A.3 Installing the Positron IDE
Positron is a free, next-generation IDE built by Posit PBC to support “code-first” Data Science work.
- Positron supports both R and Python (and many other languages) through the use of multiple language “interpreters.”
- Unlike RStudio, which is tightly integrated with the R software process, Positron is a completely new architecture that treats R as one of the many possible runtime processes.
- It is built on the same non-proprietary open source code (“Code - OSS”)) as Microsoft’s Visual Studio Code (VSCode) so has similar look and feel without the Microsoft proprietary pieces.
- Positron has “out-of-the-box” support for Quarto/\(\LaTeX\) and Python interpreters managed by the R {reticulate} package.
- You will have to install the languages you want such as R and Python separately as usual, but Positron allows you to learn one IDE instead of two.
References:
- Positron Getting Started.
- Positron Guides
- Positron CheatSheet
- Introducing Positron at Posit Conf 2024
Installing Positron is easy.
- Go to Positron Getting Started, download, and install.
- Assuming you have already installed R, open Positron and use an R console pane to
install.packages("rmarkdown"). - Assuming you have already installed Python, open Positron and use a terminal pane to
python3 -m pip install jupyter.
A.3.1 Switching to Positron from RStudio?
RStudio is well-known, well-supported and has extensive documentation. If you only work in R, you may not be interested in switching yet. RStudio is not going away any time soon.
If you split your time between R and Python, especially if you currently use VSCode for python, you may want to try switch so you have one multiple-language IDE instead of two.
The following tables provide some more ideas for consideration.
| Feature / Capability | Positron (New / Improved) | RStudio (Current) | Impact for Users |
|---|---|---|---|
| Data Editor | Spreadsheet-like, interactive editor for R & Python data frames; live editing updates objects in memory. | Basic R data viewer; read-only, no in-place editing. | Faster data cleaning and exploration without round trips or workarounds. |
| Cross-Language Support | Native multi-language (R, Python, Julia, SQL, etc.) without special packages like reticulate. |
Primarily R-focused; Python via reticulate; no Julia or multi-runtime support. |
Seamlessly combine languages in one project; better polyglot workflows. |
| Notebook-Style Cells | Inline execution cells with outputs embedded directly; supports mixed-language cells. | R Markdown/Quarto chunks; less interactive and less flexible. | More natural exploratory coding; faster iteration with visible results. |
| Debugging Tools | Visual debugger with breakpoints, step-through, call stack, and variable inspection for multiple languages. | Limited R debugging (via browser()); no GUI debugger for Python or Julia. |
Easier bug tracking and fixing with intuitive, GUI-driven debugging. |
| VS Code Extensions | Full access to VS Code marketplace: themes, linters, AI tools, Git integrations, etc. | Only R addins; smaller ecosystem. | Extend IDE functionality far beyond RStudio’s native capabilities. |
| Multi-Tab / Split Editing | Multiple split views, drag-and-drop tabs, modern file navigation. | Basic tab support; limited split views. | Improved multitasking and context switching for complex projects. |
| Unified Variable Explorer | Works across languages; filter, sort, inspect large datasets interactively. | Environment pane only for R objects. | Better insight into all project variables; useful for polyglot data science. |
| Search & Navigation | Fuzzy search for files, symbols, variables across all languages in workspace. | Mostly limited to R files/functions. | Faster code navigation and productivity in multi-language projects. |
| Git & GitHub Integration | Rich Git UI with branch management, merge tools, GitHub authentication. | Simpler Git integration with fewer visual tools. | Smoother version control and collaboration workflow. |
| Cross-Platform Consistency | Identical UI and shortcuts on macOS, Windows, Linux. | Mostly consistent but some platform differences. | Same experience on any OS, reducing context switching costs. |
| Feature / Aspect | RStudio (Current) | Positron (Early Release) | Why Switch Now | Why Wait |
|---|---|---|---|---|
| Maturity & Stability | Battle-tested, stable, production-ready for R users. | Still in active development; some features incomplete or missing. | Early adopter advantage; help shape the product with feedback. | Mission-critical work may be disrupted by bugs or missing features. |
| Primary Language Focus | R-centric with limited Python support via reticulate. | Multi-language (R, Python, Julia, SQL, etc.) via LSP and runtime integration. | Ideal if you already work in both R and Python or Julia. | If you work only in R and don’t need other languages, RStudio is more polished for that workflow. |
| Underlying Technology | C++ & Qt; custom integration with R. | Electron + React; uses VS Code extension system. | Access to VS Code extensions ecosystem and modern editor features. | Electron apps can be heavier on memory/CPU; some users prefer RStudio’s native feel. |
| Extensibility | R addins (R packages that integrate with the IDE). | Any VS Code extension; broader community plugins. | Instant access to thousands of VS Code extensions (themes, linters, AI tools, etc.). | If you rely heavily on R-specific addins, not all are available yet in Positron. |
| Interactive Execution Model | One persistent R session; console-centric. | Multiple runtimes; supports notebook-style execution and interactive cells. | More flexible multi-language workflows in a single project. | If you like the traditional single-console R workflow, Positron’s approach may feel unfamiliar. |
| Language Intelligence | Built-in for R; limited for other languages. | Language Server Protocol (LSP) for R, Python, Julia, etc. | Consistent autocompletion, linting, and doc lookup across languages. | LSP-based R support is newer; may lack some deep RStudio integrations (e.g., special object viewers). |
| Data Science Focus | Deep R integration: environment pane, data viewer, plot history, knit/Quarto UI. | Broad DS integration: multi-language data viewers, VS Code-style notebooks, Quarto support. | Single environment for all data science languages. | Some specialized RStudio tools (e.g., certain knit/Quarto panels) may be missing or less polished. |
| Performance | Lightweight compared to Electron apps. | Heavier footprint (Electron) but benefits from modern editor tech. | Gain VS Code-level editing features, multi-tab workspaces. | If your machine is older or resource-limited, RStudio may feel snappier. |
| Community & Ecosystem | Long-established R community; many tutorials/docs are RStudio-specific. | New community, but benefits from VS Code’s huge ecosystem. | Tap into VS Code’s ecosystem and broader developer tools. | Learning curve if you’re used to RStudio-only resources and shortcuts. |
| Upgrade Path | Stable and maintained; Positron is not a direct upgrade but a new product. | Continues to evolve rapidly; frequent updates in preview phase. | Opportunity to adopt a tool that will likely replace or complement RStudio in the future. | Waiting ensures more complete feature parity with RStudio before switching. |
If you switch to Positron, there will be a small learning curve. Review the Positron Guides for additional details.
A.4 Installing Python
Python is a more general purpose software language than R and is widely used across a spectrum of needs (including data science).
Installing Python requires users to choose between two popular frameworks for installing and managing Python environments.
- Standard or vanilla Python is the most common framework for using Python.
- The default package manager is pip.
- Requires manual setup of virtual environments (
venvorvirtualenv) to avoid conflicts between packages. - Lightweight and flexible, allowing full control over package management.
- Anaconda is a company that provides a set of products to facilitate enterprise-level data science.
- They curate a full Anaconda version of Python which installs Python and 300+ packages commonly used in data science work (over 3GB)
- Uses their own package manger,
conda, as an alternative to pip. It simplifies dependency management across the many packages. - The graphical installer includes other elements such as Jupyter Labs, a browser-based IDE.
- The “Mini-conda” version installs python and a small number of packages to provide a smaller install.
Our Class will Use Option 1: Standard Python
- The standard version is a good way to get started with python as it is lighter, more transparent, easier to debug, and better aligned with many real-world workflows.
- It also integrates well with Positron.
- Anaconda is great for large-scale teams using Python where they want to take advantages of its eco-system.
Install Python for your operating system.
macOS: Download Python from from python.org and install.
- Mac users might see Homebrew recommended elsewhere (which is more “mac-native”), but we’re using python.org for consistency across our class since homebrew installs python in a different location on the computer which can inhibit working with the IDE.
Windows: Download Python from python.org and ensure “Add Python to PATH” is checked during installation
The system level install is known as the “base environment”.
A.4.1 Python Installation Locations and Verification
Understanding where Python installs its files helps with troubleshooting and environment management. Here are the standard locations and how to verify your installation is complete.
Run the python verification commands in a terminal pane.
Python.org installation on macOS:
- Python executable:
/usr/local/bin/python3and/usr/local/bin/python3.x(where x is the minor version) - Python framework:
/Library/Frameworks/Python.framework/Versions/3.x/ - Site packages:
/Library/Frameworks/Python.framework/Versions/3.x/lib/python3.x/site-packages/ - Scripts/executables:
/Library/Frameworks/Python.framework/Versions/3.x/bin/
Commands to verify installation on macOS:
Python.org installation on Windows:
- Default installation path:
C:\Users\[Username]\AppData\Local\Programs\Python\Python3x\ - Python executable:
C:\Users\[Username]\AppData\Local\Programs\Python\Python3x\python.exe - Scripts folder:
C:\Users\[Username]\AppData\Local\Programs\Python\Python3x\Scripts\ - Site packages:
C:\Users\[Username]\AppData\Local\Programs\Python\Python3x\Lib\site-packages\
Alternative system-wide installation (if “Add Python to PATH” for all users was selected): - C:\Program Files\Python3x\ or C:\Program Files (x86)\Python3x\
Commands to verify installation on Windows:
A.4.2 Complete Installation Verification Checklist
Run these commands in the terminal pane to ensure your Python installation is working correctly:
Expected result: Should show Python 3.14 or higher (e.g., Python 3.11.5)
Expected result: Should show the installation path (not system Python on macOS)
Expected result: Should show pip version and list of installed packages
Expected result: Command prompt should show (test-env) at the beginning
Expected result: Should install successfully and show in package list
A.4.3 Troubleshooting Common Issues
- “Python not found”: Check if
/usr/local/binis in your PATH - Permission errors: Don’t use
sudowith pip; use virtual environments instead - Multiple Python versions: Use
python3explicitly, notpython
- “Python not recognized”: Reinstall Python and check “Add Python to PATH” during installation
- Long path errors: Enable long paths in Windows settings or use shorter directory names
- Permission errors: Run Command Prompt as administrator only if necessary
A.4.4 Platform-Specific Notes
- Uses framework installation for better organization
- Multiple version support through symlinks (see Section A.8)
- Never modify system Python (if present)
- User-specific installation by default (recommended)
- Scripts folder contains pip and other tools
- PATH management is handled during installation
For Virtual Environments: Once you create virtual environments, packages install in the environment’s site-packages directory, not the base Python installation. This is the recommended approach for all projects.
A.5 Managing Python Packages and Virtual Environments
The Python Package Index (PyPI) is a repository of open-source software for the Python programming language with over 400,000 packages available for installation.
- See the Python Packaging User Guide for details about the Python package life cycle.
You could install many of these packages into the base environment. However, that leads to a bloated install and makes managing dependencies across packages more complicated.
While you may be tempted to just install all the packages into the base, you may run into several challenges:
- Dependency Conflicts: Installing packages with incompatible version requirements breaks existing projects (e.g., Package A needs numpy >= 1.20 while Package B needs numpy < 1.19), forcing you to choose which project works.
- Performance Degradation: A bloated base environment with hundreds of packages slows down import times, pip operations, and IDE performance as Python searches through extensive package directories and resolves complex dependency trees.
- Project Maintenance Issues: All projects share the same package versions, making it impossible to reproduce specific project environments, collaborate effectively with teammates, or maintain multiple projects with different requirements over time.
Follow Python’s “best practices” which recommend creating virtual environments for each project.
- When you want to work on a project, you “activate” the virtual environment for the project and install only the packages and versions needed for that project.
- Use
pip freeze > requirements.txtto document the environment. - When you are finished working with the project you “deactivate” the project.
- Your virtual environment remains in place, ready for when you activate it again.
A.5.1 Why Virtual Environments Matter - Some Examples
Managing dependencies across packages and their versions is a common problem in python
Machine learning packages are particularly prone to version conflicts because they:
- Update frequently with breaking changes
- Have complex interdependencies
- Are often very large (hundreds of megabytes)
- Require specific versions for reproducible results
Here are some concrete examples from data science work:
Example: Machine Learning Version Conflicts with Scikit-learn
Imagine you’re working on two different machine learning projects:
- Project A: A production project using scikit-learn 0.24 for reproducible results
- Project B: A research project exploring scikit-learn 1.4’s latest clustering algorithms
# Without virtual environments - this causes problems:
pip install scikit-learn==0.24  # For Project A's reproducible results
# Later...
pip install scikit-learn==1.4   # This overwrites 0.24, breaking Project A!

# Now your old project fails:
# "AttributeError: 'KMeans' object has no attribute 'n_features_in_'"
# Or worse: different results with same code due to changed defaults
Example: Deep Learning Framework Conflicts
# Project A: Computer vision with TensorFlow
pip install tensorflow==2.10 opencv-python pillow

# Project B: NLP research with PyTorch
pip install torch==2.0 transformers datasets
# Now you have both TensorFlow AND PyTorch (3GB+) for simple projects!

# Project C: Classic ML only
pip install pandas numpy scikit-learn matplotlib
# Why does this need TensorFlow and PyTorch too?
Other Common ML Package Conflicts:
- NumPy Version Dependencies:
- pandas 1.5 needs numpy >= 1.21
- TensorFlow 2.10 needs numpy >= 1.19, < 1.24
- scikit-learn 1.0 needs numpy >= 1.17.3
- Python Version Requirements:
- TensorFlow 2.13: Python 3.8-3.11 only
- PyTorch 2.0: Python 3.8-3.11 only
- Some research packages: Python 3.9-3.10 only
- Competing ML Libraries:
- TensorFlow vs PyTorch (both are 500MB+)
- Different versions of transformers, datasets, tokenizers
- GPU vs CPU versions of same packages
WarningAvoid Dependency Hell: Never install both TensorFlow and PyTorch in the same environment unless your project specifically requires both. They have different dependency requirements and can conflict.
A.5.2 What is a Virtual Environment?
A virtual environment is like having separate, specialized labs for different research projects:
- Each lab (environment) contains only the equipment (packages) needed for that specific project.
- Equipment in one lab doesn’t interfere with equipment in another.
- You can have different versions of the same tool in different labs.
- Your main storage room (base Python) stays organized and minimal.
Technical Definition:
- A virtual environment creates an isolated Python installation for a specific project.
- It has its own package directory, separate from your systems base Python installation.
- Packages installed in the virtual environment only affect that project.
- The base Python installation remains unchanged.
A.5.3 How Virtual Environments Work
When you create a virtual environment:
- Python creates a new directory with its own copy of the Python interpreter.
- It gets its own
site-packagesfolder for installing libraries. - It has its own
pipthat installs packages locally, not globally.
When you activate an environment:
- Your terminal’s
PATHtemporarily changes to use the environment’s Python. - Any
pip installcommands affect only this environment. - Your prompt shows which environment is active:
(.venv) $.
When you deactivate:
- You return to your base Python installation as the active environment.
- Packages from the environment are no longer available.
- Your prompt returns to normal.
A.5.4 The Life Cycle of a Virtual Environment
Here are the best practices for creating and managing virtual environments using venv and pip for project-based development.
A.5.4.1 Creating a New Virtual Environment
Navigate to your project directory first:
- Open the terminal (in RStudio or Positron) or navigate to your project’s root directory
- This should be the same directory where your project files (and
.gitif using version control) are located
Choose an environment name:
- Recommended: Use
.venv(this makes it a hidden directory which reduces visual clutter in your project and is an industry standard) - Alternative: Use
venv(visible directory, also common) - Why
.venv? You can name the environment whatever you want but.venvkeeps project directories clean and follows professional conventions.
The virtual environment name venv can be reused across projects as python always includes the project folder name in the environment identifier.
Workflow for Creating a New Virtual Environment
# 1. Navigate to your project directory
cd my-project/

# 2. Create the virtual environment (hidden)
python3 -m venv .venv

# 3. IMPORTANT: If a git repository, add .venv to .gitignore immediately
echo ".venv/" >> .gitignore

# 4. IMPORTANT: If a git repository, verify .gitignore contains .venv
cat .gitignore  # Should show .venv/ in the list

# 5. Activate the environment
source .venv/bin/activate # macOS/Linux:
#.venv\Scripts\activate   # Windows:

# 6. Verify activation (terminal prompt should show (.venv))
which python  # Should point to .venv/bin/python

# 7. Upgrade pip (recommended)
pip install --upgrade pip

# 8. Install desired packages
pip install pandas numpy matplotlib jupyter

# 9. Save package requirements
pip freeze > requirements.txt
You are now ready to work in the new project.
A.5.4.2 Working with an Existing Environment
To resume work on a project:
- You should see the correct prompt and the list of packages you expect for this project.
To install packages from requirements.txt:
A.5.4.3 Virtual Environments and Git
- Never commit virtual environments to Git.
- Always commit the requirements.txt file to git
Always add the name (.venv0 to .gitignore:
Why virtual environments shouldn’t be in Git:
- Large file sizes (hundreds of MB)
- Platform-specific (won’t work across operating systems)
- Unnecessary (can be recreated from
requirements.txt)
A.5.4.5 Managing Multiple Projects
Each project should have its own environment:
~/Projects/
├── data-analysis/
│   ├── .venv/              # Environment for this project
│   ├── requirements.txt    # Package list for this project
│   └── analysis.py
├── web-scraper/
│   ├── .venv/              # Different environment
│   ├── requirements.txt    # Different package list
│   └── scraper.py
└── ml-project/
    ├── .venv/              # Another separate environment
    ├── requirements.txt
    └── model.py
Benefits of this approach: - Each project has exactly the packages it needs - No conflicts between project requirements - Easy to reproduce and share - Clean separation of concerns
A.5.4.6 Verification and Best Practices
Check that you’re in the right environment:
When finished working:
Update requirements when adding packages:
Quick Setup for New Projects: 1. cd my-new-project/ 2. python3 -m venv .venv 3. source .venv/bin/activate 4. pip install --upgrade pip 5. echo ".venv/" >> .gitignore 6. Start installing packages and coding!
IDE Integration: Positron automatically detects .venv folders in your project directory. When you open a project, it will offer to use the local virtual environment as your Python interpreter.
This workflow ensures each project has an isolated, reproducible Python environment that can be easily shared and maintained.
A.5.5 Virtual Environments in Positron
Positron provides excellent integration with Python virtual environments, making the workflow even smoother for data science projects. Here’s how to leverage Positron’s features when working with virtual environments.
A.5.5.1 Creating and Configuring Virtual Environments in Positron
Step 1: Use Positron’s Integrated Terminal
Instead of using an external terminal, use Positron’s built-in terminal for better integration:
- Open Terminal:
View→Terminalor `Ctrl+`` (backtick) - Navigate to project:
cd my-project/ - Create environment:
python3 -m venv .venv
Step 2: Let Positron Detect Your Environment
Positron automatically scans for virtual environments. After creating .venv:
- Command Palette:
Ctrl+Shift+P/Cmd+Shift+P - Type: “Python: Select Interpreter”
- Choose: Your project’s
.venv/bin/python(should appear automatically) - Alternative: Click “Enter interpreter path…” and browse to
.venv/bin/python
A.5.5.2 Visual Verification in Positron
Confirm Positron is using your virtual environment:
Status Bar (Bottom of Screen):
Python 3.11.5 (.venv: my-project) 🐍- Shows Python version
- Shows environment name in parentheses
- Indicates active interpreter
Python Console:
- View → Console → Python Console
- Verify path: Console should show it’s using
.venv/bin/python - Test packages:
import pandasshould work if installed in this environment
Variables Pane:
- Only shows variables from the active environment
- Package imports reflect the virtual environment’s packages
A.5.5.3 Installing Jupyter for Quarto Integration
This is an essential step for using Python in Quarto documents:
Why this matters:
- Quarto needs Jupyter to execute Python code blocks
- Must be installed in each virtual environment
- Positron’s Quarto integration depends on this
A.5.5.4 Workspace-Specific Settings
Positron remembers your interpreter choice per project:
When you select an interpreter, Positron creates:
my-project/
├── .vscode/
│   └── settings.json    # Stores Python interpreter path
├── .venv/               # Your virtual environment
└── requirements.txt     # Your packages
The settings.json contains:
For Git users:
A.5.5.5 Working with Virtual Environments in Positron
Activating from Positron Terminal:
Running Code:
- Python files: Right-click → “Run Python File” (uses selected interpreter)
- Code cells:
Ctrl+Enter/Cmd+Entersends to Python Console - Quarto documents: Render button uses the configured environment
Package Management:
A.5.5.6 Troubleshooting Common Positron + Virtual Environment Issues
Problem 1: “Python not found” or wrong Python version
Solution: 1. Command Palette → “Python: Select Interpreter” 2. Choose correct .venv path 3. Restart Positron if needed
Problem 2: Quarto Python code blocks hanging
Solution:
Problem 3: Import errors in Python Console
Solution: 1. Check status bar - is correct environment selected? 2. Restart Python Console: Ctrl+Shift+P → “Python: Restart” 3. Verify packages: pip list in terminal
Problem 4: Packages installed globally instead of in .venv
Solution: 1. Always activate first: source .venv/bin/activate 2. Check prompt: Should show (.venv) 3. Verify with: which python (should point to .venv)
A.5.5.7 Best Practices for Positron + Virtual Environments
Project Setup Workflow: 1. Create project folder and open in Positron 2. Create .venv using integrated terminal 3. Select interpreter immediately via Command Palette 4. Install Jupyter for Quarto compatibility 5. Verify status bar shows correct environment 6. Add to .gitignore if using Git
Daily Workflow: 1. Open project in Positron (remembers interpreter) 2. Activate in terminal if using command line 3. Work in Python Console (automatically uses correct environment) 4. Run Quarto documents (automatically uses correct environment)
Collaboration Workflow:
# Team member receives project
git clone https://github.com/team/project.git
cd project/

# Create their own virtual environment
python3 -m venv .venv

# In Positron: Select interpreter (.venv/bin/python)
# Install packages
source .venv/bin/activate
pip install -r requirements.txt
pip install jupyter  # For Quarto

# Ready to collaborate!
A.5.5.8 Advanced Positron Features
Multiple Python Environments: - Positron can work with multiple environments simultaneously - Each terminal can have a different activated environment - Switch interpreters per file if needed
Environment Information: - Command Palette → “Python: Show Interpreter Path” - Command Palette → “Python: Configure Settings” - View current environment details in status bar
Positron Pro Tip: When you open a project folder that contains a .venv directory, Positron automatically suggests using that environment as your Python interpreter. Accept this suggestion for seamless integration!
Quarto + Virtual Environments: Always install Jupyter in your virtual environment, even if you have it globally. Positron’s Quarto integration needs access to Jupyter in the same environment as your project packages.
This integration makes Positron particularly powerful for data science work - you get the isolation of virtual environments with the convenience of an IDE that understands and works with them seamlessly.
A.5.6 Benefits of Virtual Environments
- Dependency Isolation: e.g., keeps TensorFlow projects separate from PyTorch projects
- Version Control: e.g., uses different versions of scikit-learn for different research papers
- Reproducibility: Maintain exact package versions for reproducible work.
- Resource Management: No need to install 3GB of packages for simple data cleaning
- Experimentation Safety: Try new packages without breaking existing projects
- Project Integrity: You can share your exact environment with your self or with
requirements.txt
A.5.7 Summary
Virtual environments are essential for data science work because many packages are large, frequently updated, and have complex dependencies. They solve fundamental problems of package conflicts, reproducibility, and resource management.
Project Quick Start:
python3 -m venv .venv(create).source .venv/bin/activate(activate).pip install scikit-learn pandas matplotlib jupyter(install core ML stack).- Add frameworks as needed:
pip install tensorflowORpip install torch. pip freeze > requirements.txt(save exact versions).deactivate(when done).
A.6 UV: A Fast Python Package Manager”
UV(Astral 2025b) is a modern, extremely fast Python package manager and project manager written in Rust.
- Developed by Astral (the creators of Ruff) (Astral 2025a), UV aims to replace pip, pip-tools, pipx, poetry, pyenv, twine, virtualenv, and more with a single, unified tool.
Key advantages of UV:
- Speed: 10-100x faster in common dependency-resolution and installation scenarios.
- Unified tooling: Manages Python versions, virtual environments, and packages.
- pip-compatible: Drop-in replacement for pip with the same CLI.
- Cross-platform: Works seamlessly on macOS, Windows, and Linux.
References:
A.6.1 Installation
To verify installation, check the version
A.6.2 Creating a New Python Project
UV encourages project-based workflows using pyproject.toml and a lockfile.
- To create a new Python project ready for a virtual environment, use the terminal with
uv init:
- This creates a project structure with:
pyproject.toml: Project configuration and dependenciesREADME.md: Placeholder for project documentation.python-version: usually generated indicating the interpreter version that UV will use
- It also initiates the directory as a git repository including the hidden
.gitdirectory and a.gitignorefile with common Python exclusions.
- UV automatically manages virtual environments for your projects.
Use the terminal to run
uv syncwhich is the high-level, project-based workflow command to create the initial virtual environment for the project.This command:
- Reads your
pyproject.toml. - Creates a
.venvautomatically (if needed) - Resolves all dependencies.
- Installs all packages into the virtual environment.
- Creates or updates
uv.lock. - Ensures your environment matches the lockfile exactly
- Reads your
Your project is ready for additional packages/dependencies and coding.
A.6.3 Managing Dependencies
UV provides several ways to manage dependencies.
For many data-science projects, a conservative and widely-compatible base stack is:
numpy,pandas,matplotlib,seaborn, andstatsmodels.
This combination covers data wrangling, visualization, and both linear and logistic regression, with relatively simple dependencies compared to heavier ML frameworks like scikit-learn.
- You can always add other packages such as
scikit-learn,XGBoost,beautifulsoup4, ortensorflowlater if you specifically need their capabilities.
Run the following to add the base stack packages
You can also add packages that are useful in development but not needed to run the code. These could include:
pytest: a useful framework for testing coderuff: a very fast and configurable code formatter and linter.
Run the following to add the two common development dependencies:
Using uv add ... automatically updates the pyproject.toml and uv.lock files.
The pyproject.toml is the human-edited file where you declare:
- project metadata: project name, description, authors, version, license, etc..
- the Python version
- the dependencies you want (top-level only)
- optional dev dependencies
- configuration for tools like ruff, pytest, mypy
- project metadata
It Lists only the direct dependencies you requested to keep the project configuration clean and minimal.
The uv.lock file is machine-generated and stores:
- exact versions of every dependency
- all transitive dependencies
- resolved dependency graph
- hashes for reproducibility
- platform-specific metadata
- build artifacts
The uv.lock file can be huge as it is detailed and precise. It is not intended to be edited
- Guarantees exactly the same environment everywhere
- Ensures reproducible installs for students, teammates, or deployments
Anyone who runs uv sync with your uv.lock file in the directory will get exactly the environment in your lockfile, same versions, same hashes, even years later.
Many production systems or legacy workflows still expect a requirements.txt.
uv.lockis the lockfile that guarantees your project installs the exact same dependency versions everywhere.
uv syncnever installs fromrequirements.txt, only frompyproject.tomluv.lock.
A.6.4 Replicating the Environment in a New Project
If you want to recreate the an existing environment in a new project, uv makes it easy.
Create a new directory for the project outside of any existing project or git repository.
Copy both the
pyproject.tomlanduv.lockfiles into the new directory.Run
uv syncto recreate the environment.Run
git initto initialize the git repository.Edit the
pyproject.tomlto update only the metadata such as
A.6.5 Package Management
You can change the environment to add, remove, or update dependencies as follows.
A.6.5.1 Python Version Management
You can change the environment to manage the version of Python in use.
- Instead of running individual commands, edit the
pyproject.tomlto declare the desired version.
- As an example.
- Delete
.python-versionif you want uv to choose automatically.
- Regenerate the lockfile with the new Python version
A.6.6 Running Code in Your Project Environment
Once your environment is set up using uv sync, you can run any Python script, Quarto document, or tool in your project using uv run.
- This ensures that you are always using the correct virtual environment, the pinned package versions, and the correct Python version specified in your project.
The pattern is simple:
uv run <command> runs that command inside your project environment.
Here are the most common examples:
# Run a Python script using the project environment
uv run python script.py

# Run a Quarto document (Python engine will use your uv environment)
uv run quarto render analysis.qmd

# Launch a Jupyter notebook (optional—Positron does not require Jupyter)
uv run jupyter notebook

# Run your test suite
uv run pytest

# Run formatting or linting tools like Ruff
uv run ruff check
uv run ruff format
Using uv run guarantees:
- The correct virtual environment is activated automatically.
- The pinned versions in
uv.lockare used. - You never have to manually “activate” a
.venv. - Commands behave the same on macOS, Windows, and Linux.
This creates a reproducible and consistent workflow for running code, testing, and rendering notebooks or Quarto documents.
A.6.7 Best Practices
- Always use virtual environments: UV makes this seamless with
uv venvanduv run - Commit lock files: Include
uv.lockin version control for reproducible builds - Use pyproject.toml: Modern Python projects should use
pyproject.tomlinstead ofrequirements.txt - Leverage UV’s speed: Take advantage of UV’s parallel downloads and caching
A.6.8 Conclusion
UV represents a significant step forward in Python package management, offering speed, simplicity, and modern tooling. By combining package management, virtual environments, and Python version management in one tool, UV streamlines the Python development workflow while maintaining compatibility with existing tools and workflows.
For data science projects, UV’s fast dependency resolution and unified tooling make it an excellent choice for managing complex dependency graphs common in scientific computing and machine learning workflows.
A.7 Configuring and Verifying Positron Setup
This section assumes you have already installed:
- R from CRAN
- Python from python.org
- The Positron IDE from Posit
Now we’ll verify everything is working correctly and configure Positron to work with both R and Python.
A.7.1 Initial Positron Configuration
- Launch Positron
- Open Positron and confirm it launches successfully
- Check the version: Positron - About Positron
- Ensure you have a recent version (2025.11.0 or later recommended)
- Configure Python Interpreter
- Open Command Palette:
Ctrl+Shift+P(Windows/Linux) orCmd+Shift+P(macOS) - Search for: “Python: Select Interpreter”
- Choose your Python installation:
- macOS: Should show
/usr/local/bin/python3or similar - Windows: Should show
C:\Users\[Username]\AppData\Local\Programs\Python\Python3xx\python.exe
- macOS: Should show
- Verify selection: Bottom status bar should show your Python version
- Configure R Interpreter
-.Open Command Palette: Ctrl+Shift+P (Windows/Linux) or Cmd+Shift+P (macOS) - Search for: “R: Select Interpreter” - Choose your R installation: - macOS: Should show /usr/local/bin/R or /Library/Frameworks/R.framework/Resources/bin/R - Windows: Should show C:\Program Files\R\R-4.x.x\bin\R.exe - Verify selection: You should see R version in the status bar when working with R files
A.7.2 Verification Checklist
Open Positron’s integrated terminal (Terminal → New Terminal) and run these verification commands:
- Verify Python Installation
- Expected result: Should show Python 3.14+ and the correct installation path
- Test Python Virtual Environment
- Expected result: Prompt should change to show
(positron-test-env)
- Verify R Installation
- Expected result: Should show R version 4.0+ and correct installation path
- Test R Functionality
Expected result: Should display R version and library paths
- Verify Quarto Integration
- Expected result: Should show Quarto version and confirm both engines are available
- Verify Git Integration - For DATA 413/613
- Expected result: Should show Git version and your configuration
- Test Positron’s Multi-Language Support
- Create a Test Python File
- New File:
Ctrl+N(Windows/Linux) orCmd+N(macOS) - Save as:
test_python.py - Add test code:
- Run: Right-click and select “Run Python File” or use
Ctrl+F5
Create a Test R File
New File:
Ctrl+N(Windows/Linux) orCmd+N(macOS)
Save as:
test_r.RAdd test code:
# Check R version and capabilities
print(paste("R version:", R.version.string))
print(paste("R home:", R.home()))

# Test if common packages are available
packages_to_check <- c("base", "utils", "stats")
for(pkg in packages_to_check) {
  if(requireNamespace(pkg, quietly = TRUE)) {
    cat("✓", pkg, "available\n")
  } else {
    cat("✗", pkg, "not available\n")
  }
}- Run: Right-click and select “Source R File” or use
Ctrl+F5
- Create a Test Quarto Document
- New File:
Ctrl+N(Windows/Linux) orCmd+N(macOS) - Save as:
test_document.qmd - Add test content:
---
title: "Positron Multi-Language Test"
format: html
---

## Python Code Block

::: {.cell}

```{.python .cell-code}
import sys
print(f"Python version: {sys.version_info.major}.{sys.version_info.minor}")
```

::: {.cell-output .cell-output-stdout}

```
Python version: 3.13
```


:::
:::


## R Code Block

::: {.cell}

```{.r .cell-code}
print(paste("R version:", R.version.string))
```

::: {.cell-output .cell-output-stdout}

```
[1] "R version: R version 4.5.3 (2026-03-11)"
```


:::
:::


## System Information
This document was rendered on 2026-04-20 using Quarto in Positron.- . Render: Use Command Palette → “Quarto: Render Document”
A.7.3 Troubleshooting Common Issues
A.7.3.1 Python Issues:
- “Python not found”: Check that Python is in your PATH and correctly selected in Positron
- Import errors: Create and activate a virtual environment with required packages
- Wrong Python version: Use “Python: Select Interpreter” to choose the correct version
A.7.3.2 R Issues:
- “R not found”: Verify R installation and PATH configuration
- Package errors: Install missing packages with
install.packages("package_name") - Permission errors: Check R library write permissions
A.7.3.3 Quarto Issues:
- “quarto not found”: Ensure Quarto CLI is installed and in PATH
- Render failures: Check that both R and Python engines are properly configured
- Missing dependencies: Run
quarto checkto identify missing components
A.7.4 Positron-Specific Features to Test
- Console Integration
- Python Console: View → Console → Python
- R Console: View → Console → R
- Terminal: View → Terminal
- Variable Explorer
- Run code in Python or R
- Check View → Variables to see active variables
- Verify data structures display correctly
- Plot Output
- Python plotting:
- R plotting:
- Check that plots appear in the Plots pane
- Integrated Help
- Python: Type
help(print)in Python console - R: Type
?plotin R console - Verify help appears in Help pane
A.7.5 Final Verification Checklist
Quick Multi-Language Test: Create a new Quarto document with both Python and R code blocks. If it renders successfully, your Positron setup is working correctly for multi-language data science work.
Pro Tip: Positron automatically detects the language of your current file and switches the appropriate console and interpreter. You can work on Python and R files simultaneously with full language support for each.
If all checks pass, you’re ready to start using Positron for your data science projects with full R, Python, and Quarto integration!
A.8 Understanding Symlinks on macOS for Python
Symlinks (symbolic links) are an important concept for macOS Python users, especially when troubleshooting installation and PATH issues.
A.8.1 What are Symlinks?
A symlink is like a shortcut that points to another file or directory. When you run a command that uses a symlink, the system automatically follows the link to the actual file.
Think of it like this:
- You have a book (the actual Python executable) stored in your library (
/Library/Frameworks/Python.framework/). - You put a bookmark (symlink) on your desk (
/usr/local/bin/python3) that points to that book. - When you need the book, you just look at your desk bookmark instead of going to the library.
A.8.2 How Python.org Uses Symlinks on macOS
When you install Python from python.org, it creates symlinks in /usr/local/bin/ that point to the actual Python installation:
# The symlinks (shortcuts)
/usr/local/bin/python3 -> /Library/Frameworks/Python.framework/Versions/3.11/bin/python3
/usr/local/bin/pip3 -> /Library/Frameworks/Python.framework/Versions/3.11/bin/pip3

# The actual files
/Library/Frameworks/Python.framework/Versions/3.11/bin/python3
/Library/Frameworks/Python.framework/Versions/3.11/bin/pip3
A.8.3 Why Symlinks Matter for Python
- Path Management:
/usr/local/binis typically in your system PATH, so you can typepython3from anywhere. - Version Management: Multiple Python versions can coexist with different symlinks.
- Easy Updates: Installing a new Python version can update symlinks automatically.
- Consistency: Provides predictable command names regardless of the exact installation path.
A.8.4 Checking Your Symlinks
View symlink details:
Example output:
lrwxr-xr-x  1 root  wheel  69 Oct 15 10:30 python3 -> ../../../Library/Frameworks/Python.framework/Versions/3.11/bin/python3
lrwxr-xr-x  1 root  wheel  70 Oct 15 10:30 python3.11 -> ../../../Library/Frameworks/Python.framework/Versions/3.11/bin/python3.11
The l at the start indicates it’s a symlink, and the -> shows where it points.
A.8.5 Common Symlink Issues and Troubleshooting
A.8.5.1 Issue 1: Broken Symlinks
Problem: Symlink points to a file that no longer exists.
Symptoms:
Diagnosis:
Fix:
A.8.5.2 Issue 2: Wrong Python Version
Problem: Symlink points to old Python version.
Symptoms: python3 --version shows unexpected version.
Diagnosis:
Fix:
A.8.5.3 Issue 3: Multiple Conflicting Symlinks.
Problem: Different Python installations created competing symlinks.
Symptoms: Inconsistent behavior, wrong Python version.
Diagnosis:
Fix:
A.8.6 Safe Symlink Management
A.8.6.1 Creating Symlinks
A.8.6.2 Updating Symlinks
A.8.6.3 Checking Symlink Health
A.8.7 Best Practices
Don’t manually modify symlinks unless you understand the consequences.
Reinstall Python from python.org if symlinks get broken.
Use full paths for diagnosis:
/usr/local/bin/python3vspython3.Check your PATH to understand which Python is being used:
A.8.8 When Symlinks Go Wrong: Recovery Steps
Identify the problem:
Clean up broken symlinks:
Reinstall Python from python.org (easiest solution)
Verify the fix:
Never modify system Python: macOS has its own Python installation in /usr/bin/python3. Don’t create symlinks that override this, as it can break system tools.
A.8.9 Understanding the Benefits
Symlinks make Python management easier by:
- Providing consistent command names (
python3) regardless of installation details - Allowing multiple Python versions to coexist
- Simplifying PATH management
- Making updates cleaner (just update the symlink target)
When symlinks work correctly, you don’t need to think about them. When they break, understanding them helps you fix the problem quickly.