2 Git and GitHub
Git, GitHub, Version Control
2.1 Introduction
2.1.1 Learning Outcomes
- Use a terminal pane in RStudio.
- Execute BASH shell commands to navigate among directories and manipulate files.
- Use Git for version control of local repositories and files.
- Use Git with the cloud-hosted GitHub for syncing local and remote repositories.
- Manage class materials and homework assignments using Git and GitHub.
2.1.2 References:
2.1.2.1 Other References
- Git for Scientists.
- Git Cheat Sheet
- Pro Git has more details on Git
- Using Version Control with RStudio
- Happy Git and GitHub for the RUser
- Git for Data Science
- GitHub Classroom for Students(Fiksel 2021)
- The Unix Workbench- Chapter 6
- A Quick Introduction to Version Control with Git and GitHub.
- Software Development Chapter from R Packages.(Wickham and Bryan 2023)
- Oh s**t, git!.(Sylor-Miller 2021)
2.1.3 Configure Your Computing System
- If you have not used R or RStudio or Quarto before, see the Appendix on installing software
- If you have not configured your system, see the Appendix on Git and GitHub Setup.
2.2 The Terminal Window
A terminal window provides access to a command line where we can enter commands to the system through a shell.
- The easiest way to open a terminal window is within RStudio using
Tools → Terminal → New Terminal.
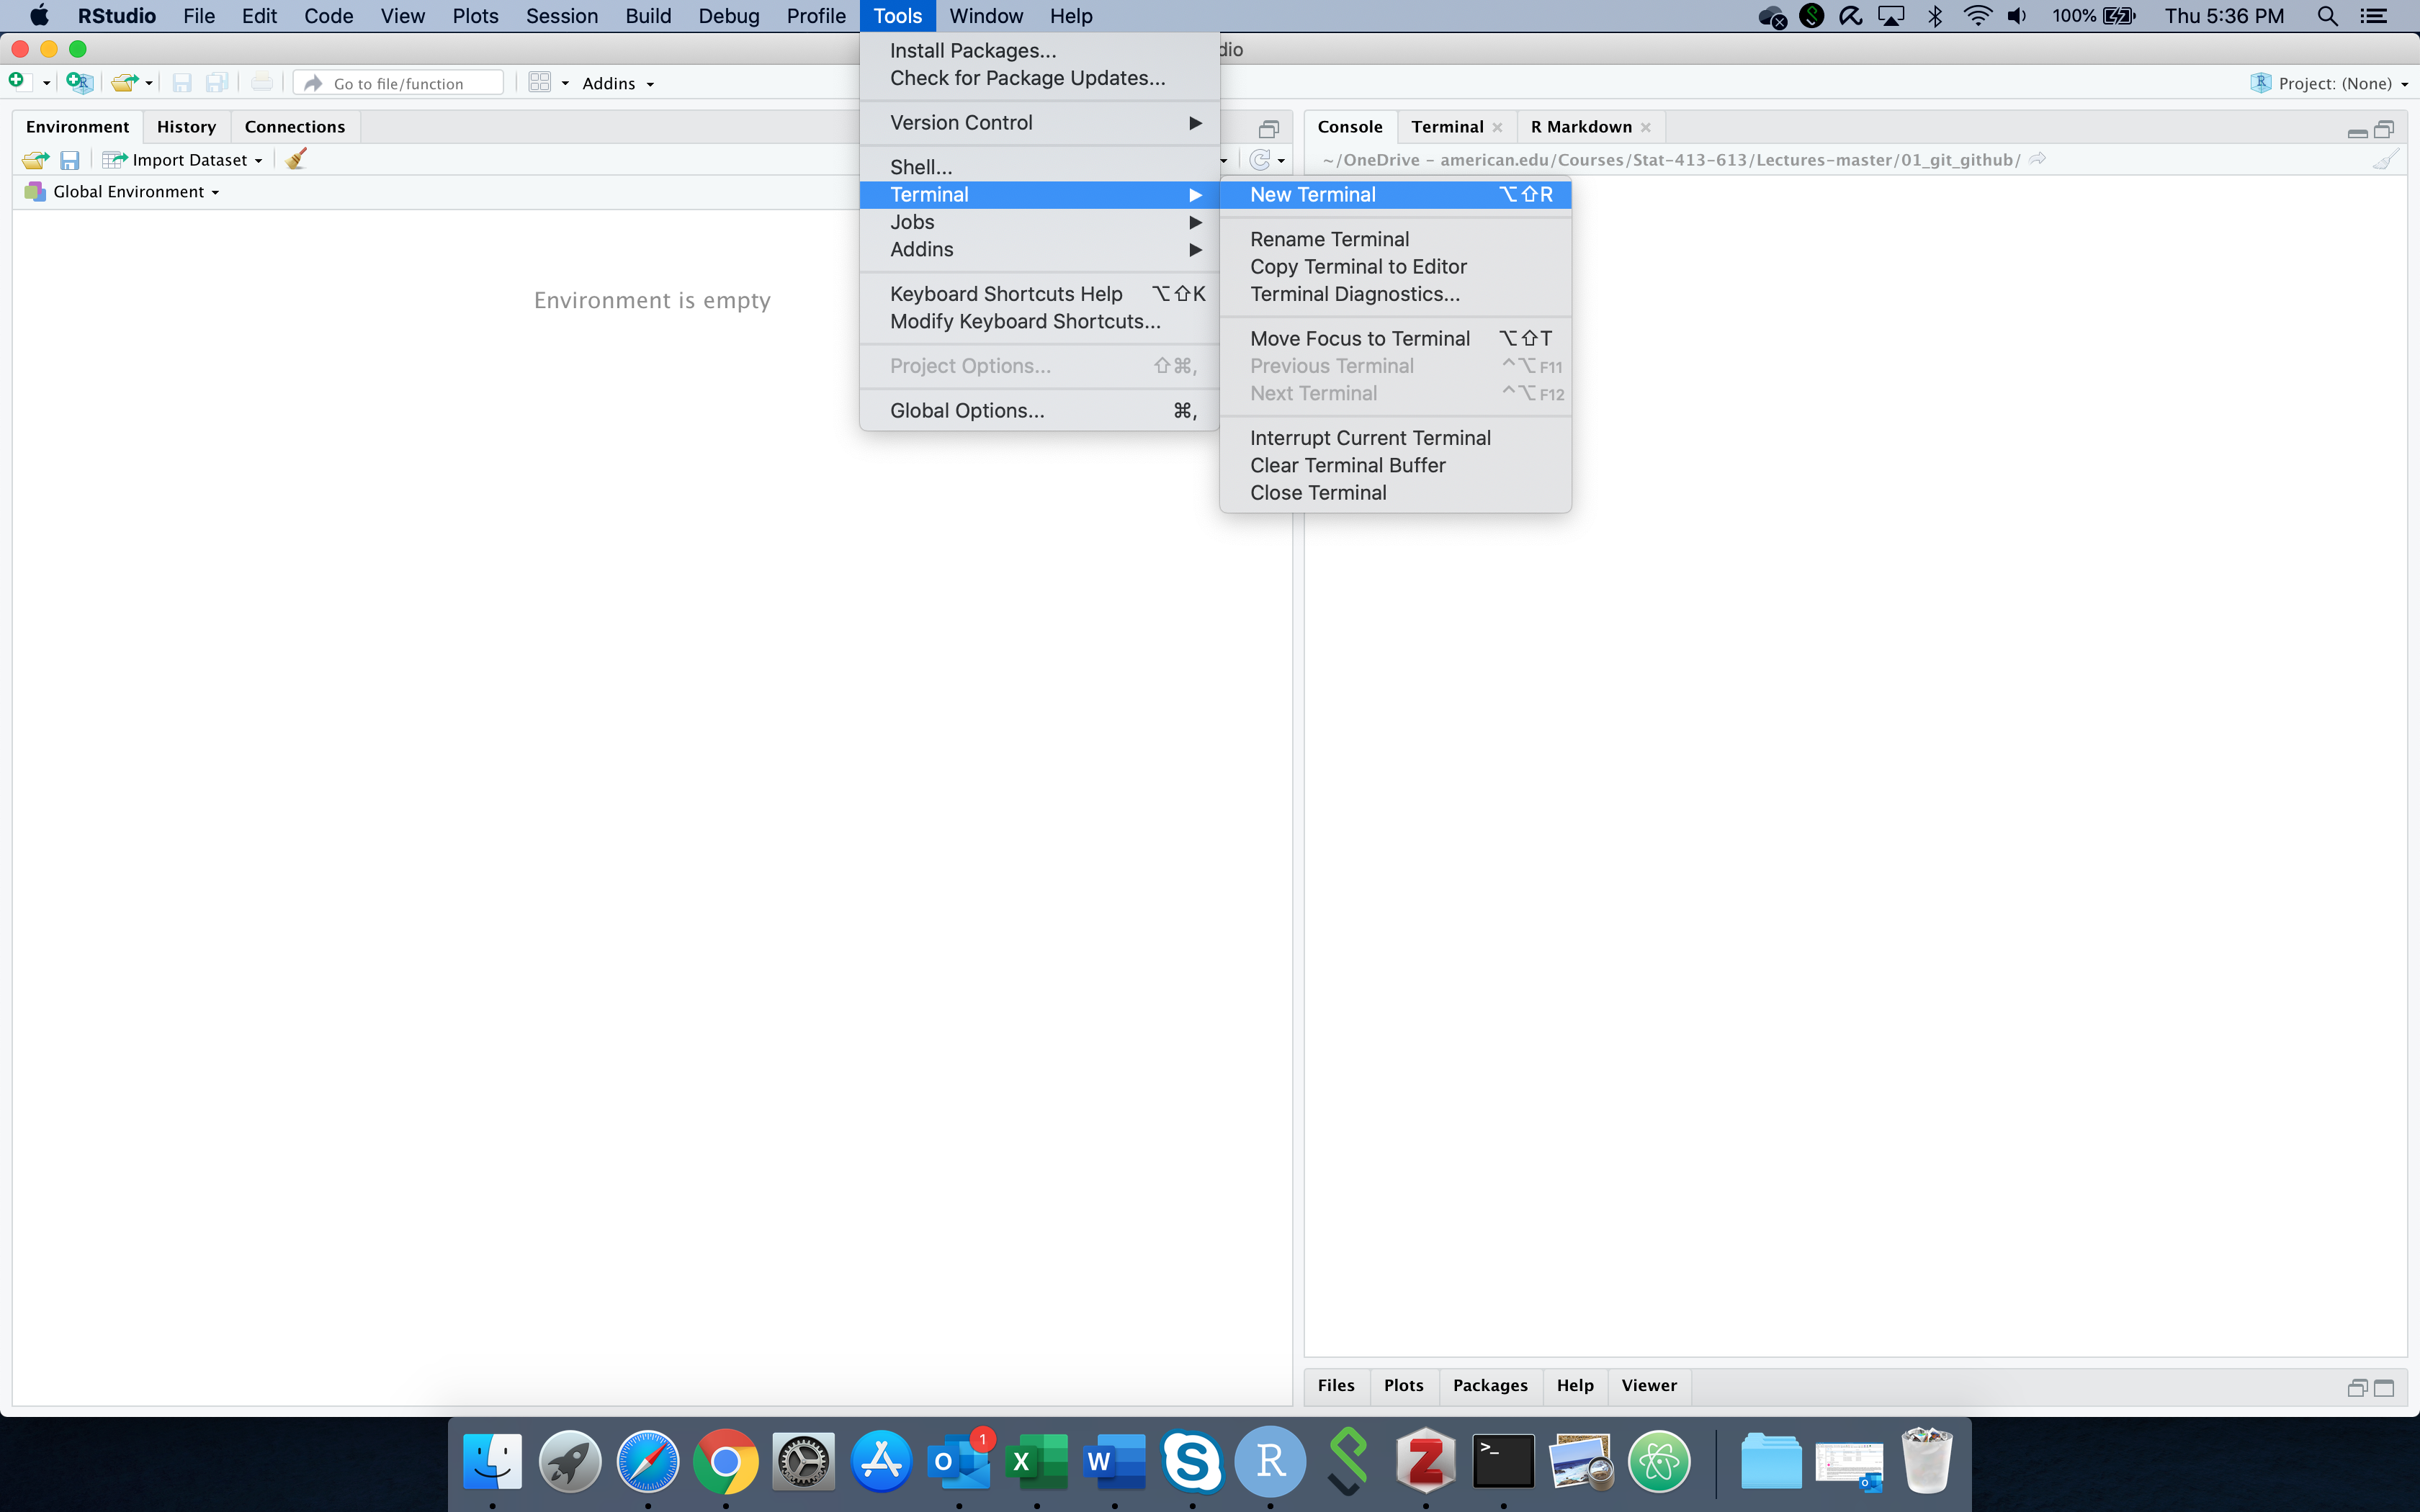
- The terminal window should look like this:
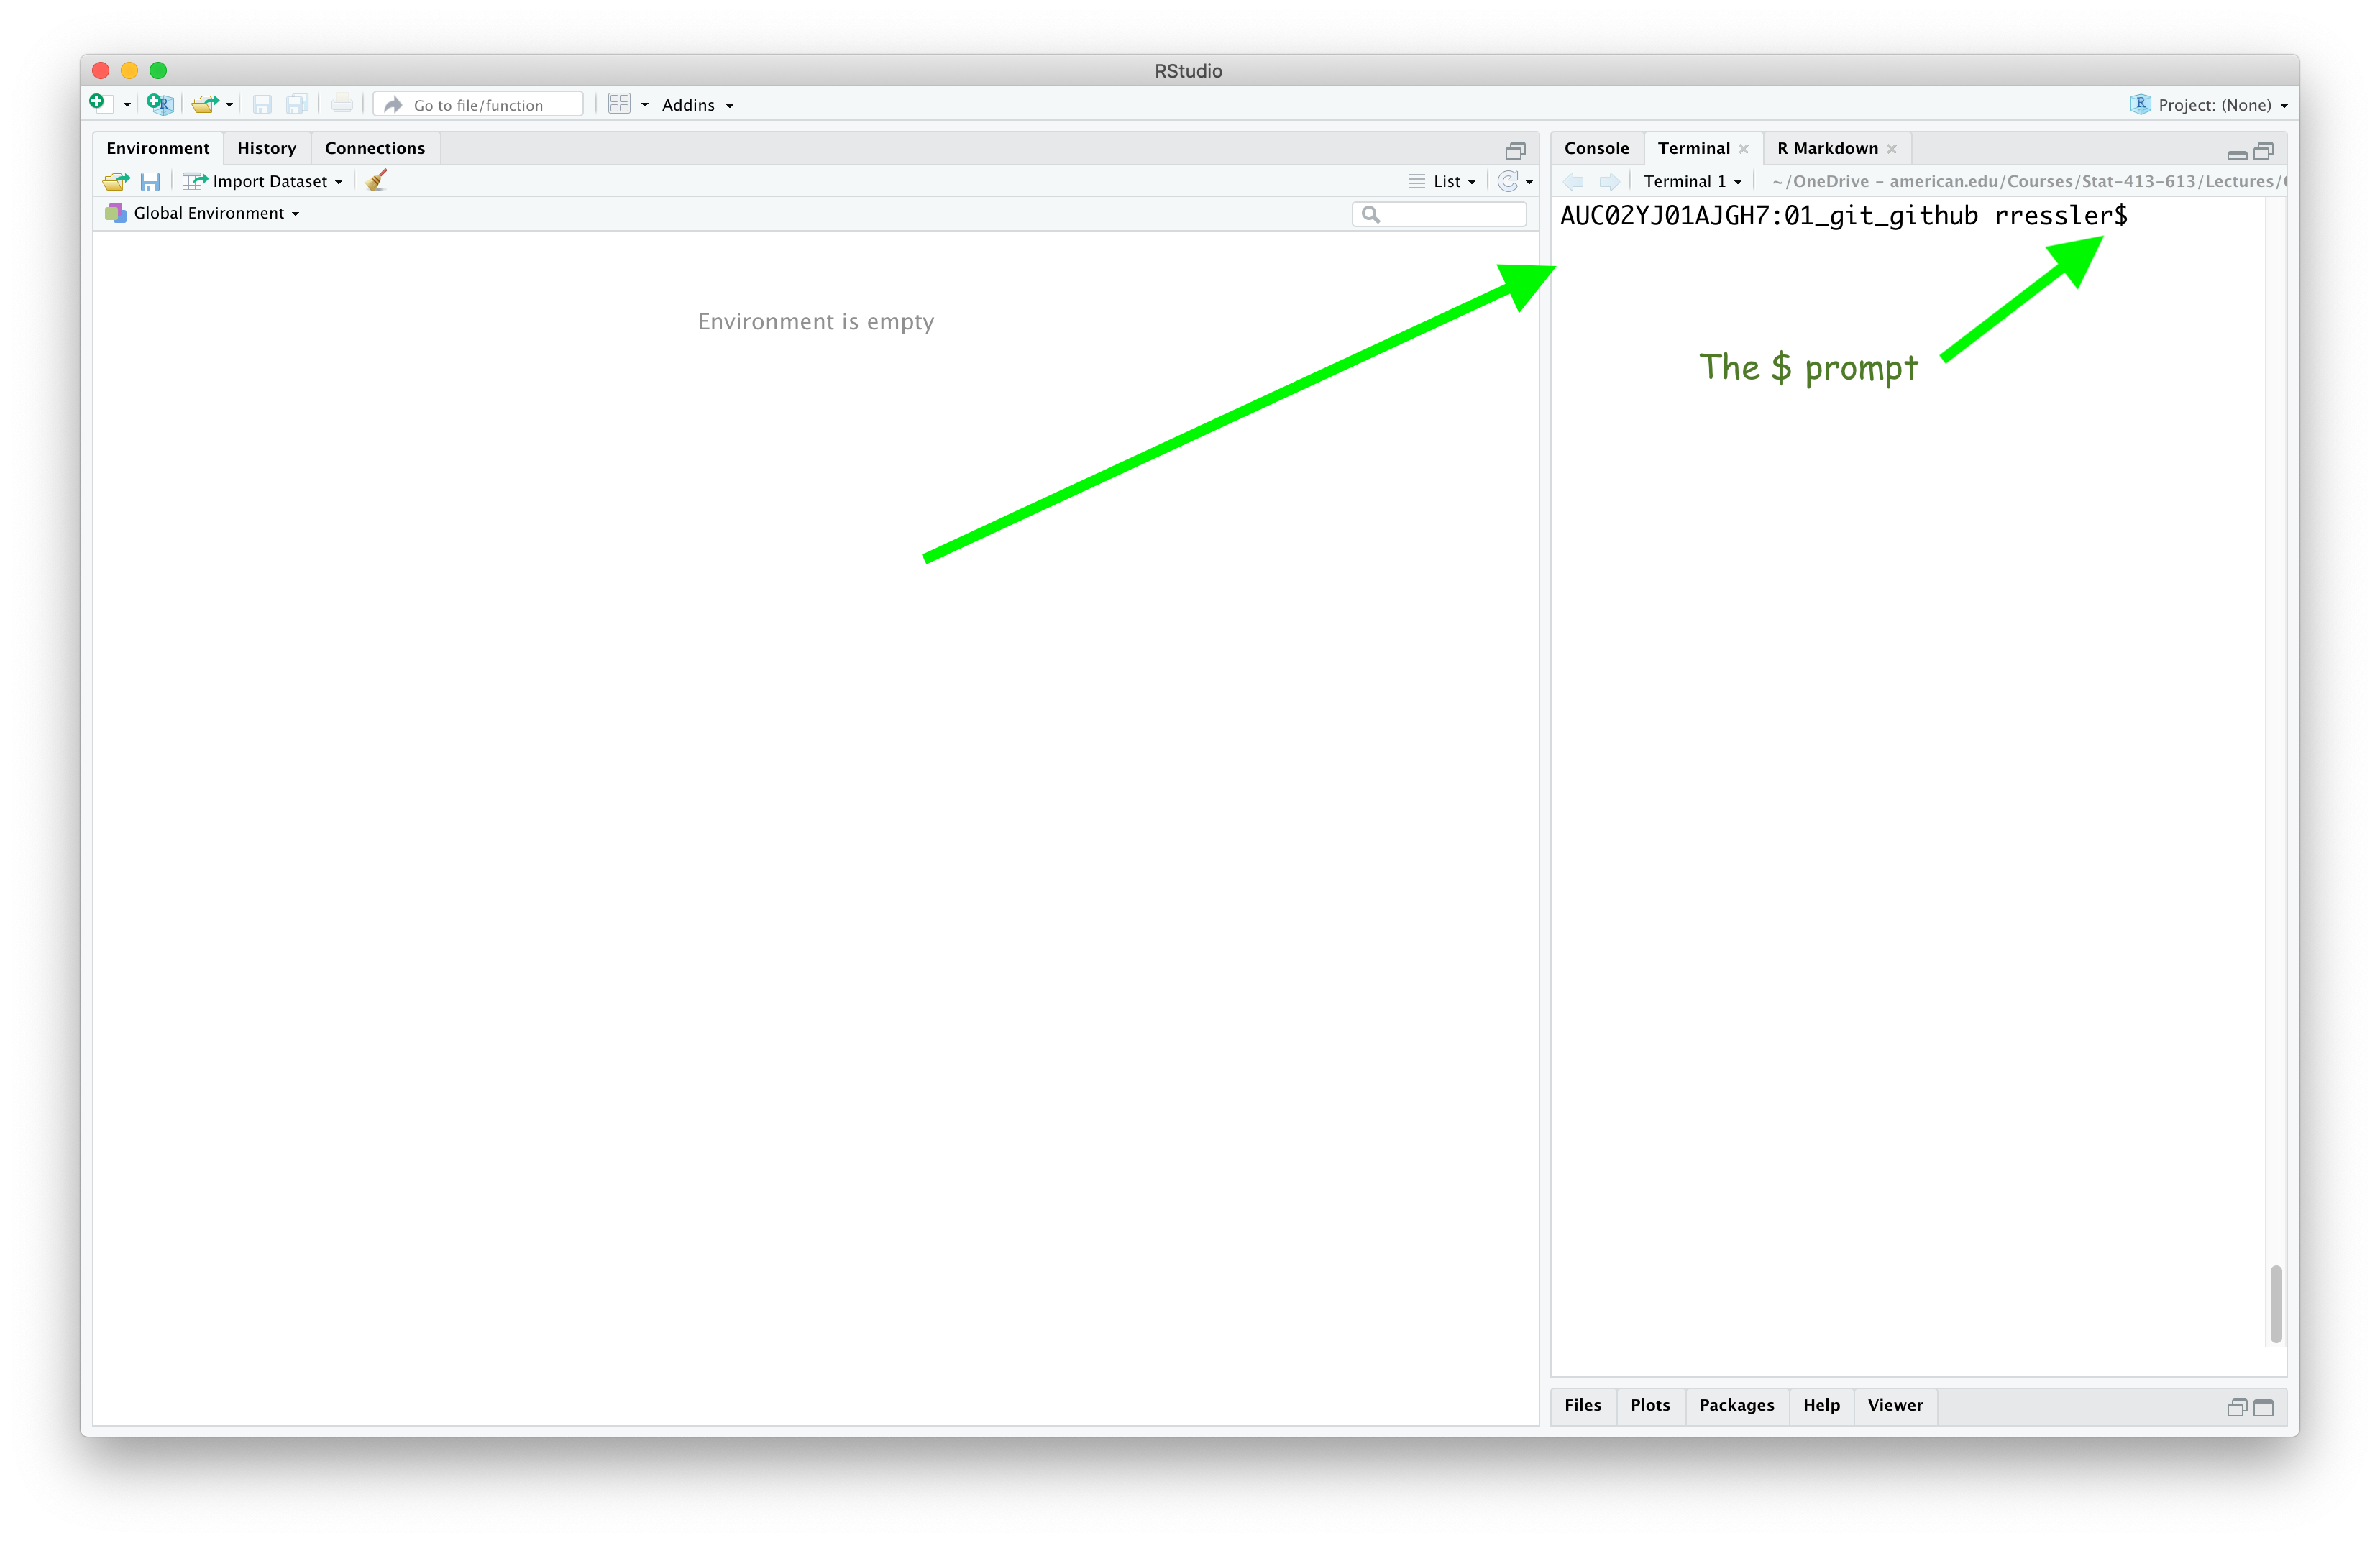
- The path shown before the dollar sign (
$) is the working directory of the terminal window, which is not necessarily the same as the RStudio Console working directory. - It is the directory where the shell will start when looking for files and running commands.
- The tilde (or twiddle),
~, is shorthand for the home directory.- Each computer has a home directory.
- This is usually the default directory for Git.
- On macOS, it is typically
Users/username.
2.2.1 The Shell (zsh on macOS, bash on Windows)
A shell is the program that interprets the commands you type into the terminal.
- There are many types of shells, each with their own scripting languages.
- In this class:
- macOS users will use zsh, the default shell on modern macOS.
- Windows users will use Git Bash, which provides bash.
Although the shell names differ, the commands we use in this class behave the same on both systems.
For simplicity, we will refer to these as bash-style commands, even though macOS users are technically using zsh.
Modern versions of macOS use zsh (Z Shell) as the default shell instead of bash.
Apple made this change for two main reasons:
- Licensing: newer versions of bash use the GPLv3 license, which Apple avoids and zsh uses a more permissive license and is actively maintained.
- User experience: zsh includes features that improve interactive use, such as better tab completion, command correction, and improved history search.
For everyday command-line work, zsh is largely compatible with bash, which is why the same commands work in this course on both macOS and Windows.
Having both shell languages can cause PATH Issues
The most common problems are not caused by command differences, but by configuration files.
- bash reads configuration files like
.bash_profileand.bashrc - zsh reads different files:
.zprofileand.zshrc
When a system switches from bash to zsh (as macOS did), environment settings such as PATH, Git, or Homebrew configuration may exist only in the old bash files and therefore be ignored.
This can lead to situations where:
- Git works in one terminal but not another
- RStudio’s Terminal uses a different Git than the RStudio Git pane
/usr/local/binis used instead of/opt/homebrew/binon Apple Silicon Macs
Practical Takeaway
- macOS users should assume they are using zsh.
- Windows users using Git Bash are using bash.
- The commands in this course work the same in both.
- Most terminal problems are PATH configuration issues, not Git or R problems.
2.2.2 The Command Line
- The command line is similar to the R prompt:
- You type a command
- Press Enter
- The computer executes the command
- Other terms you may see:
- terminal
- shell
- command line interface (CLI)
- console
These terms are related but not identical concepts.
See What is the difference between Terminal, Console, Shell, and Command Line?.
- All commands are entered after the dollar sign (
$). - Instead of typing R code, you type shell commands.
In this class, we will use the command line primarily for:
- Navigating the file system
- Running Git commands
2.2.3 Bash-style Command Syntax
Shell commands use a different syntax than R.
- Commands have arguments or “Flags” that use:
- One dash:
-a - Two dashes:
--all - You will see this frequently when working with Git.
- One dash:
- Shell commands are case sensitive
- Correct:
cd - Incorrect:
CD
- Correct:
2.2.5 Getting Help with Commands
man — Manual Pages (macOS)
- Scroll using arrow keys
- Exit by pressing
q
The man command may not work in Git Bash on windows. If not then use:
2.2.6 Exercises
- Home Directory
What is your home directory?
Navigate to it and list its contents. Then navigate back to your course directory.
- Relative Paths
- Command Help
Read the manual page for ls.
What does the -a flag do? Try it.
- Navigate Back to Your Course Directory
or using the home directory shortcut:
2.2.7 Managing Files and Directories
These commands are used less often, but are still useful.
Copy a File: cp
Move or Rename a File: mv
Remove a File: rm
Create a Directory: mkdir
Remove an Empty Directory: rmdir
For more practice consider playing Terminus, an interactive game for practicing shell navigation.
2.3 Why Bother Using a Version Control System (VCS)
A Version control system is a program which tracks iterative changes of your local files.
- VCS tools have been around for years to support software development projects.
- Popular ones include Git, Azure DevOps, and Subversion.
Git is the most popular VCS at 86.6% market share.
Git allows you (and others) to go back to previous versions of your code/text and compare with the most recent version, or keep the old version and start a new development path.
- You can create copies of your code or files, change them, then merge these copies together later.
2.3.1 Motivation 1: Change code without the fear of breaking the baseline or production version
You want to try out something new, but you aren’t sure if it will work.
Non-Git solution: Copy and rename the files over and over
- analysis.R,
- analysis2.R,
- analysis3.R,
- analysis_final.R,
- analysis_final_final.R,
- analysis_absolute_final.R,
- analysis7.R
- analysis8.R
Issues:
- Difficult to remember differences among files.
- Which files produced specific results?
- Requires a lot of careful documentation and user bookkeeping (not likely to happen)!
Git lets you change files while automatically keeping track of all older versions. It is easy to revert back to older versions if you decide the new changes don’t work or you want to try a different approach.
2.3.2 Motivation 2: Easy collaboration. Everyone can see exactly what changes have been made and who made them and why. This can reduce code (and people) conflicts.
In a group setting, your collaborators might (will) suggest or drive changes to your analysis/code as they make changes to their code, e.g., creating new data or renaming variables and functions.
A first non-Git solution: Email files back/forth.
- Issues:
- You have to manually incorporate changes across the team.
- Only one person can work on integrating the code at a time (otherwise multiple changes might be incompatible).
- Issues:
A second non-Git solution: Share a Dropbox or Google Docs folder (a “centralized” version control system).
- Issues:
- Again, only one person can work on the code at a time.
- Difficult to see the history of changes.
- Less user-friendly for tracking changes.
- Difficult to run excursions.
- Even the R {trackdown} Package for working with GoogleDrive says use Git to manage code.
- Issues:
Git lets each individual work on their own local repository and offer their changes to others for review before integrating into the code.
It allows you to control which changes get approved to be incorporated into the baseline and then automatically incorporates those changes and identifies any conflicts.
Documentation of changes is built into the workflow (so it actually happens!).
2.3.3 Motivation 3: High demand skill for future employment
The Data Science Council of America states “As а data scientist, understanding how to use Git and leverage version control is crucial for seamlessly collaborating with others and tracking changes to code, data, and models over time.”,
Per KDNuggets, Git is #2 of the Top 5 Data Science Skills for 2020.
#12 in Top 20 Skills Required to Become a Data Scientist [2025 Updated]
2.3.4 Motivation 4 - Git is the Foundation for GitHub.
GitHub is a popular forum for creating, collaborating on, and sharing Git-based repositories.
- You will see many R packages that are not ready for CRAN, or don’t want to be on CRAN, hosted and accessible on GitHub.
As examples:
- You can make your course group-project repo public so everyone can see it or or just share it with select individuals.
- Prospective employers can see your work.
- Provides evidence for your your resume.
- If you build a personal website (e.g., using Quarto), you can use Git and GitHub for version control of your website.
- You can then use GitHub actions so you make changes and commit to GitHub, it automatically updates your website hosted on GitHub or elsewhere, e.g., quarto.pub or netlify.com.
In short, version control is a best practice for any project involving software as it provides transparency and reproducibility and enables collaboration across teams.
- Employers expect it.
- Your future you will appreciate it.
- Git, GitHub, and RStudio IDE make it easy to integrate into your workflows.
2.4 Git Overview
![]()
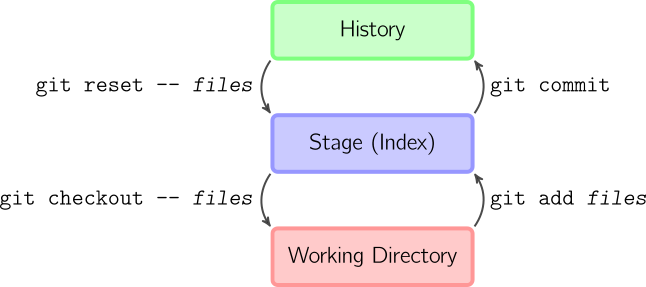
Git works by managing file status using three levels 1:
We are starting by learning how to work with Git and GitHub in the terminal window as opposed to using integrated software (RStudio Git) or desktop applications (GitHub Desktop).
- Understanding how to use Git in the terminal window makes it easier to use the other approaches.
- It also provides access to all Git commands that may not be present in an integrated application.
- As an example, if you need to fix an error, like committing a very large (>100MB file) into Git that will be rejected by GitHub for being too large, you must use commands only available in the terminal window.
You may use the terminal window or RStudio functionality for this course as long as you commit and push regularly.
2.4.1 The Git Workflow for Versioning Files.
The workflow consists of actions to move files across the three levels.
Files start at the lowest level, the working directory. Users advanced files into the history or out of the history.
Working Directory: Git uses the terminal working directory as its working directory.
- This is the folder where your terminal pane shell tries to execute commands and where it looks for files.
- It is not necessarily the same as your RStudio Console working directory!
- Any changes to files you have saved but not staged or committed to Git only exist in the working directory and are not yet indexed or saved in the Git history.
Stage: Files that are staged (added) are prepared (scheduled) to be committed to the history, but are not yet committed. Only files in the stage will be committed to the history.
History: The timeline of file versions (snapshots). You commit a file to the history and then, even if you modify it later, you can always go back to that same file version.
We’ll focus on the right-hand-side of Figure 2.1 for now.
Here the workflow is typically:
- Modify files in your working directory as normal until you want to take a snapshot of one or more files. Save the files.
- Add these modified files to the staging area.
- Commit staged files to history, where they will be kept forever (on your computer).
The workflow on the left-hand side of Figure 2.1 is used to undo actions from the right side.
- Usually only when you need to undo mistakes or have changed your mind.
Git does not save complete versions of the file each time.
It tracks the differences that occur in each line of a text file and it can recreate the version at any point in the file’s commit history.
The tracking of “differences” in text-based files allows for very efficient storage and processing.
Git is not as efficient at tracking non-text (binary) files such as PDF or .xlsx where changes can only be identified at the whole file level.
2.4.2 Common Git Commands
All Git commands begin with git followed immediately by space and then an argument for the type of command you want to execute.
- Most everything you will do is moving up the right side of the picture.
We will be using the following Git commands most often:
git init: Initialize (or create) a Git repository. Only do this once per project/repository.git status: Show which files are staged in your working directory, and which are modified but not staged.git add: Add modified files from your working directory to the stage.git commit -m "descriptive message": commit your staged content as a new commit snapshot.git push: create a copy or update a copy of your repository on GitHub,
If you want to see the “differences” between the previous version and the current saved version, you can use
git diff: Look at how files in the working directory have been modified.git diff --staged: Look at how files in the stage have been modified.
2.4.3 Repositories and Folder Structure (Housekeeping)
A repository (or repo, for short) is a collection of files (in a folder and its sub-folders) being version controlled (configuration managed) as a set.
- The repo also contains the local version control data, in a hidden
.gitfolder and files.- You can use the RStudio IDE to see hidden files and folders by using the
Moreoption in theFilespane.
- You can use the RStudio IDE to see hidden files and folders by using the
In data science, each repository is typically one project (like an analysis, a model, a homework, or a collection of code that performs a similar task).
- Users often turn a Git repo into an RStudio project as well. While Git does not care about whether a repo is an RStudio project, the RStudio IDE has features which make it easier to use Git with RStudio projects as we will see.
It is not a good practice to nest repos or RStudio projects inside each another repo or project!
- Before you create a new repo, take care that the terminal working directory is not already under a Git repo.
Before you create a new repo in the working directory of the terminal window, enter git status in the terminal window to see if it generates an error that the folder is not a git repository.
- If generates the error, that is good, it is not already in a repo so it is safe to create a new repo.
- If it does not generate an error, then you should navigate to a new folder before creating the repo.
- If you think it should not be a repo, you can navigate up the directory structure to see where the hidden
.gitfolder is located. - If it should not be a repo (created in error), you can delete the
.gitfolder and go back to the original location to try to create your new repo again. Be sure to check again withgit status.
Recommend the following structure for this course:
- Create a folder somewhere on your computer called
DATA_613(orDATA_413).- Do not recommend a Google Drive or OneDrive locations, and especially not Downloads.
- Create a folder under
DATA_XXXcalledHomeworkwhere you will clone each week’s assignment as an individual repo in its own folder.- Each assignment will come as an individual repository with its own set of folders.
- These repositories will constitute your local repositories within which you will manage your files with Git and sync between Git and GitHub.
- Note, your
DATA_XXXfolder should NOT be a repo. It is just the top-level folder you use to organize multiple repos. - The folder
Homeworkshould not be a repo either. It will have multiple repos underneath it.
2.5 Git Basics
2.5.1 Intro
We’ll practice with the common Git commands as we examine a topic from the famous paper of Oeppen and Vaupel (Oeppen and Vaupel (2002)).
They found perhaps the strongest association in social science: a linear relationship between year of birth and the maximum life expectancy where the maximum is taken over countries. We’ll examine this relationship for ourselves.
We’ll use the
gapminder_unfiltereddata frame from the {gapminder} package. The variables in this data frame are:country: The name of the country.continent: The continent of the country.year: The year of the measurement. From 1952 to 2007.lifeExp: The life-expectancy of at birth, in years, of an individual.pop: Population.gdpPercap: GDP per capita (US$, inflation-adjusted).
Create a folder called
life_exp, e.g., directly underDATA_XXX.Create a new quarto document called
life_exp_analysis.qmdwithin thelife_expfolder. Your .qmd might look something like this:
---
title: "Examine Life Expectancy"
editor: visual
date: today
format: html
---
# Abstract

Here, I re-examine the analysis of Oeppen and Vaupel (2002).

# Analysis
- Save
life_exp_analysis.qmd.
2.5.2 Initialize (Create) a Local Git Repository
Open up a terminal window and use the cd command to navigate so the terminal window working directory is DATA_XXX/life_exp/.
Track progress by looking at the prompt
Your RStudio should look something like:

Use the command git init to turn the folder into a Git repository. Type it in the terminal
- You’ve just created a Git repository!
There is a .git hidden folder tracking all of the changes you make for the files you tell it about.
- Use
ls -ato show hidden files and folders
- Recall from Figure 2.1, Git won’t track any files in the working directory until they are saved and you tell it do so.
2.5.3 Git Status
Use git_status to see what files Git is tracking and which are untracked.
- The output should tell you that
life_exp_analysis.qmdis not tracked. In fact, you should have no tracked files.
2.5.3.1 Branch Names: Master vs Main
Git (and GitHub) use branches to manage multiple different versions of the same code. We will discuss branches in a later class. For now, you have one branch in your repo - one set of code.
When you created your new repo, you may have noticed some lines starting with “hint:”
Using 'master' as the name for the initial branch. This default branch name
hint: is subject to change. To configure the initial branch name to use in all
hint: of your new repositories, which will suppress this warning, call:
hint:
hint:   git config --global init.defaultBranch <name>
hint:
hint: Names commonly chosen instead of 'master' are 'main', 'trunk' and
hint: 'development'. The just-created branch can be renamed via this command:
hint:
hint:   git branch -m <name>
For years, Git and GitHub named the baseline set of code with the working/production baseline as the “master” branch.
In the past few years both Git and GitHub established a preference for using terms other than “master”.
At the top of your
git statusyou might see a line that says:on branch masterTo rename the current repo enter the following:
git branch -m mainTo change to use “main” as the default for new repositories, enter the following:
git config --global init.defaultBranch mainNow all new git repos on your machine will use “main” as the name of the baseline (top) branch.
We will update your GitHub settings in a few minutes.
Note: many earlier references on Google search results will reference the “master” branch and they mean the baseline or top-level branch in the repo we now call “main.”
2.5.4 Stage Files
Use git add filename to add files to the staged level.
- It’s good practice to always check which files have been added:
Useful Arguments for git add:
-Aor--allwill stage all modified and untracked files.-uor--updatewill stage all modified files, but only if they are already being tracked.- Try
git help addin the terminal window and use Enter or Return to scroll down to see all the options and thenqto exit.
- You can also use the up-arrow key to go back through the previous commands.
- Unfortunately, on some shells, you cannot click into a middle of a command to edit, you have to delete from the end and retype but you can use auto-complete.
Use the .gitignore file to streamline your adding of files.
This file contains the names of files that you do Not want Git to track.
These are usually configuration files or administrative files.
A typical .gitignore file for an R Project looks like the following
2.5.5 Commit Files
Use git commit to create permanent snapshots in the commit history of the staged files.
- The
-margument will allow/require you to make a comment about the commit.
Your message (written after the
-margument) should be concise, and describe what you have changed since the last commit. These often refer to issues or change report numbers as well.If you forget to add a message, Git will open up your default text-editor where you can write down a message, save the file, and exit. The commit will occur after you exit the text editor.
If your default text editor is vim, exit it using “escape” (ESC key) and then type :q.
Note the
:before theq.See how-to-exit-the-vim-editor for more options.
git status should now be clear because there are no modified files:
You can see all of your commits using git log.
Congratulations! You have now completed the workflow on the right side of Figure 2.1.
- As a next step in the analysis of the
gapminder_unfiltereddata frame,
- Add code into
life_exp_analysis.qmdto do the following:- Load the {tidyverse} packages into R with
library() - Access the gapminder data frame in the gapminder library with
gapminder::gapminder_unfiltered. - Find the maximum life expectancy for each year and the country which had the maximum life expectancy.
- Hint: There are multiple ways to do this, but suggest using
group_by()andfilter().
- Hint: There are multiple ways to do this, but suggest using
- Save the year, country and maximum life expectancy into a new data frame called
sumdat.
- Load the {tidyverse} packages into R with
- Edit the .qmd file to change the header from “Analysis” to “Life Expectancy Analysis”.
- Save
life_exp_analysis.qmd.
2.5.6 Looking at Changes
Use git diff to see changes in all modified files.
Git tracks changes based on lines in the text file (not letters or words). Any change in a line tracks the whole line being changed.
- Lines after a “
+” are being added. Lines after a “-” are being removed. - When there are a lot of lines filling your terminal window, you can exit
git diffby enteringq.
Check the status of your modified files.
Stage your modified files with git add, but don’t commit yet.
Recheck your status.
git diffwon’t check for changes in the staged files by default. But you can see the differences usinggit diff --stagedwhere--stagedis an argument.
Commit your changes. Use a short but informative commit message.
2.6 Using GitHub as a Remote Repository for Version Control
![]()

2.6.1 Intro to GitHub
GitHub is a website that hosts Git repositories and allows workflows for collaboration and continuous integration (among other things).
- Don’t confuse Git with GitHub.
- Git is version control system on your local machine
- GitHub is a decentralized cloud-based system for managing and sharing many, many repositories.
- GitHub recommends repositories remain small, ideally less than 1 GB, and less than 5 GB is strongly recommended.
- Smaller repositories are faster to clone and easier to work with and maintain.
- Individual files in a repository are strictly limited to a 100 MB maximum size limit. For more information, see About Git Large File Storage
Once you have an account, you do three things to host a repository on GitHub:
- Create a repo on GitHub.
- Tell Git where GitHub is going to host your repo (the URL).
- Tell Git to move (push) your committed files and commit history to the designated GitHub repo.
2.6.2 Configure Your Settings
2.6.2.1 Set the GitHub Default Branch Name to “main” for New Repositories
- If you set the Git default to
main, it could be confusing unless you set the default for GitHub to be the same. - Go to your GitHub account Settings (click on your profile picture in the top right).
- Select Repositories
- Change the
Repository default branchfor new repos to use “main”.
- Note, you can also change the name of individual repos as well.
2.6.3 Create a Repository on GitHub
- Go to your GitHub account with your GitHub ID
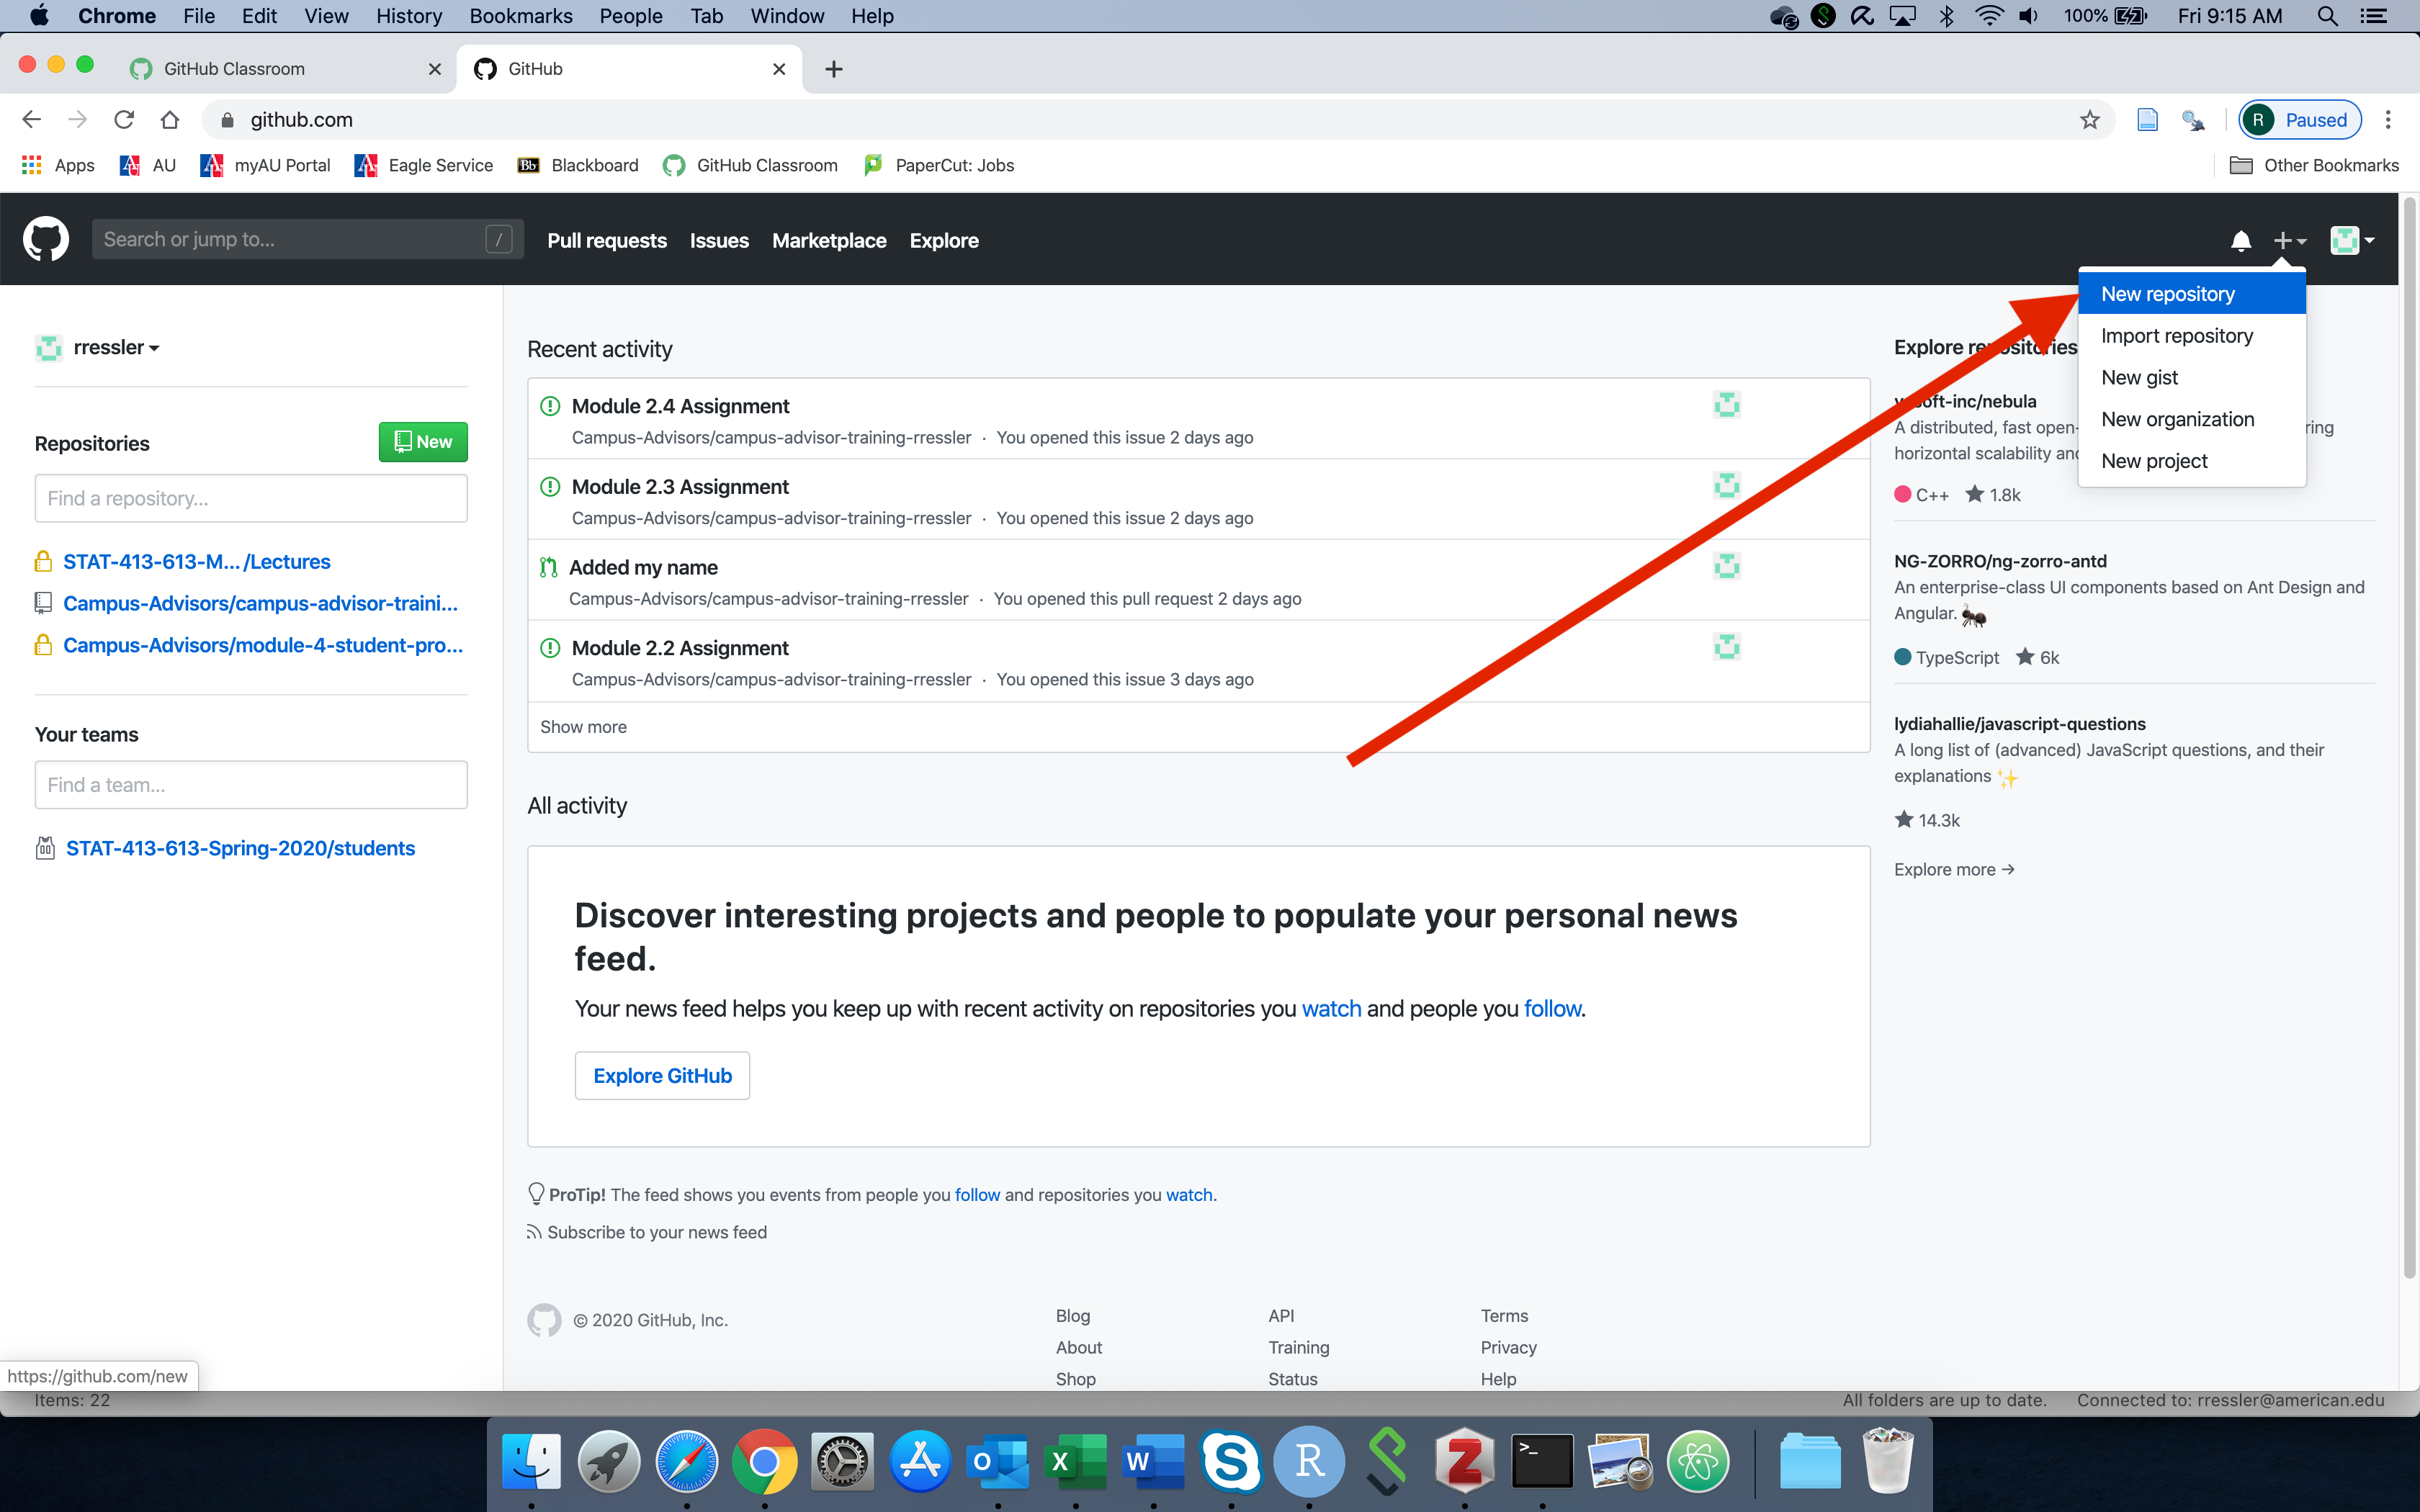
- Create a new repo on GitHub by selecting
Newon the homepage:
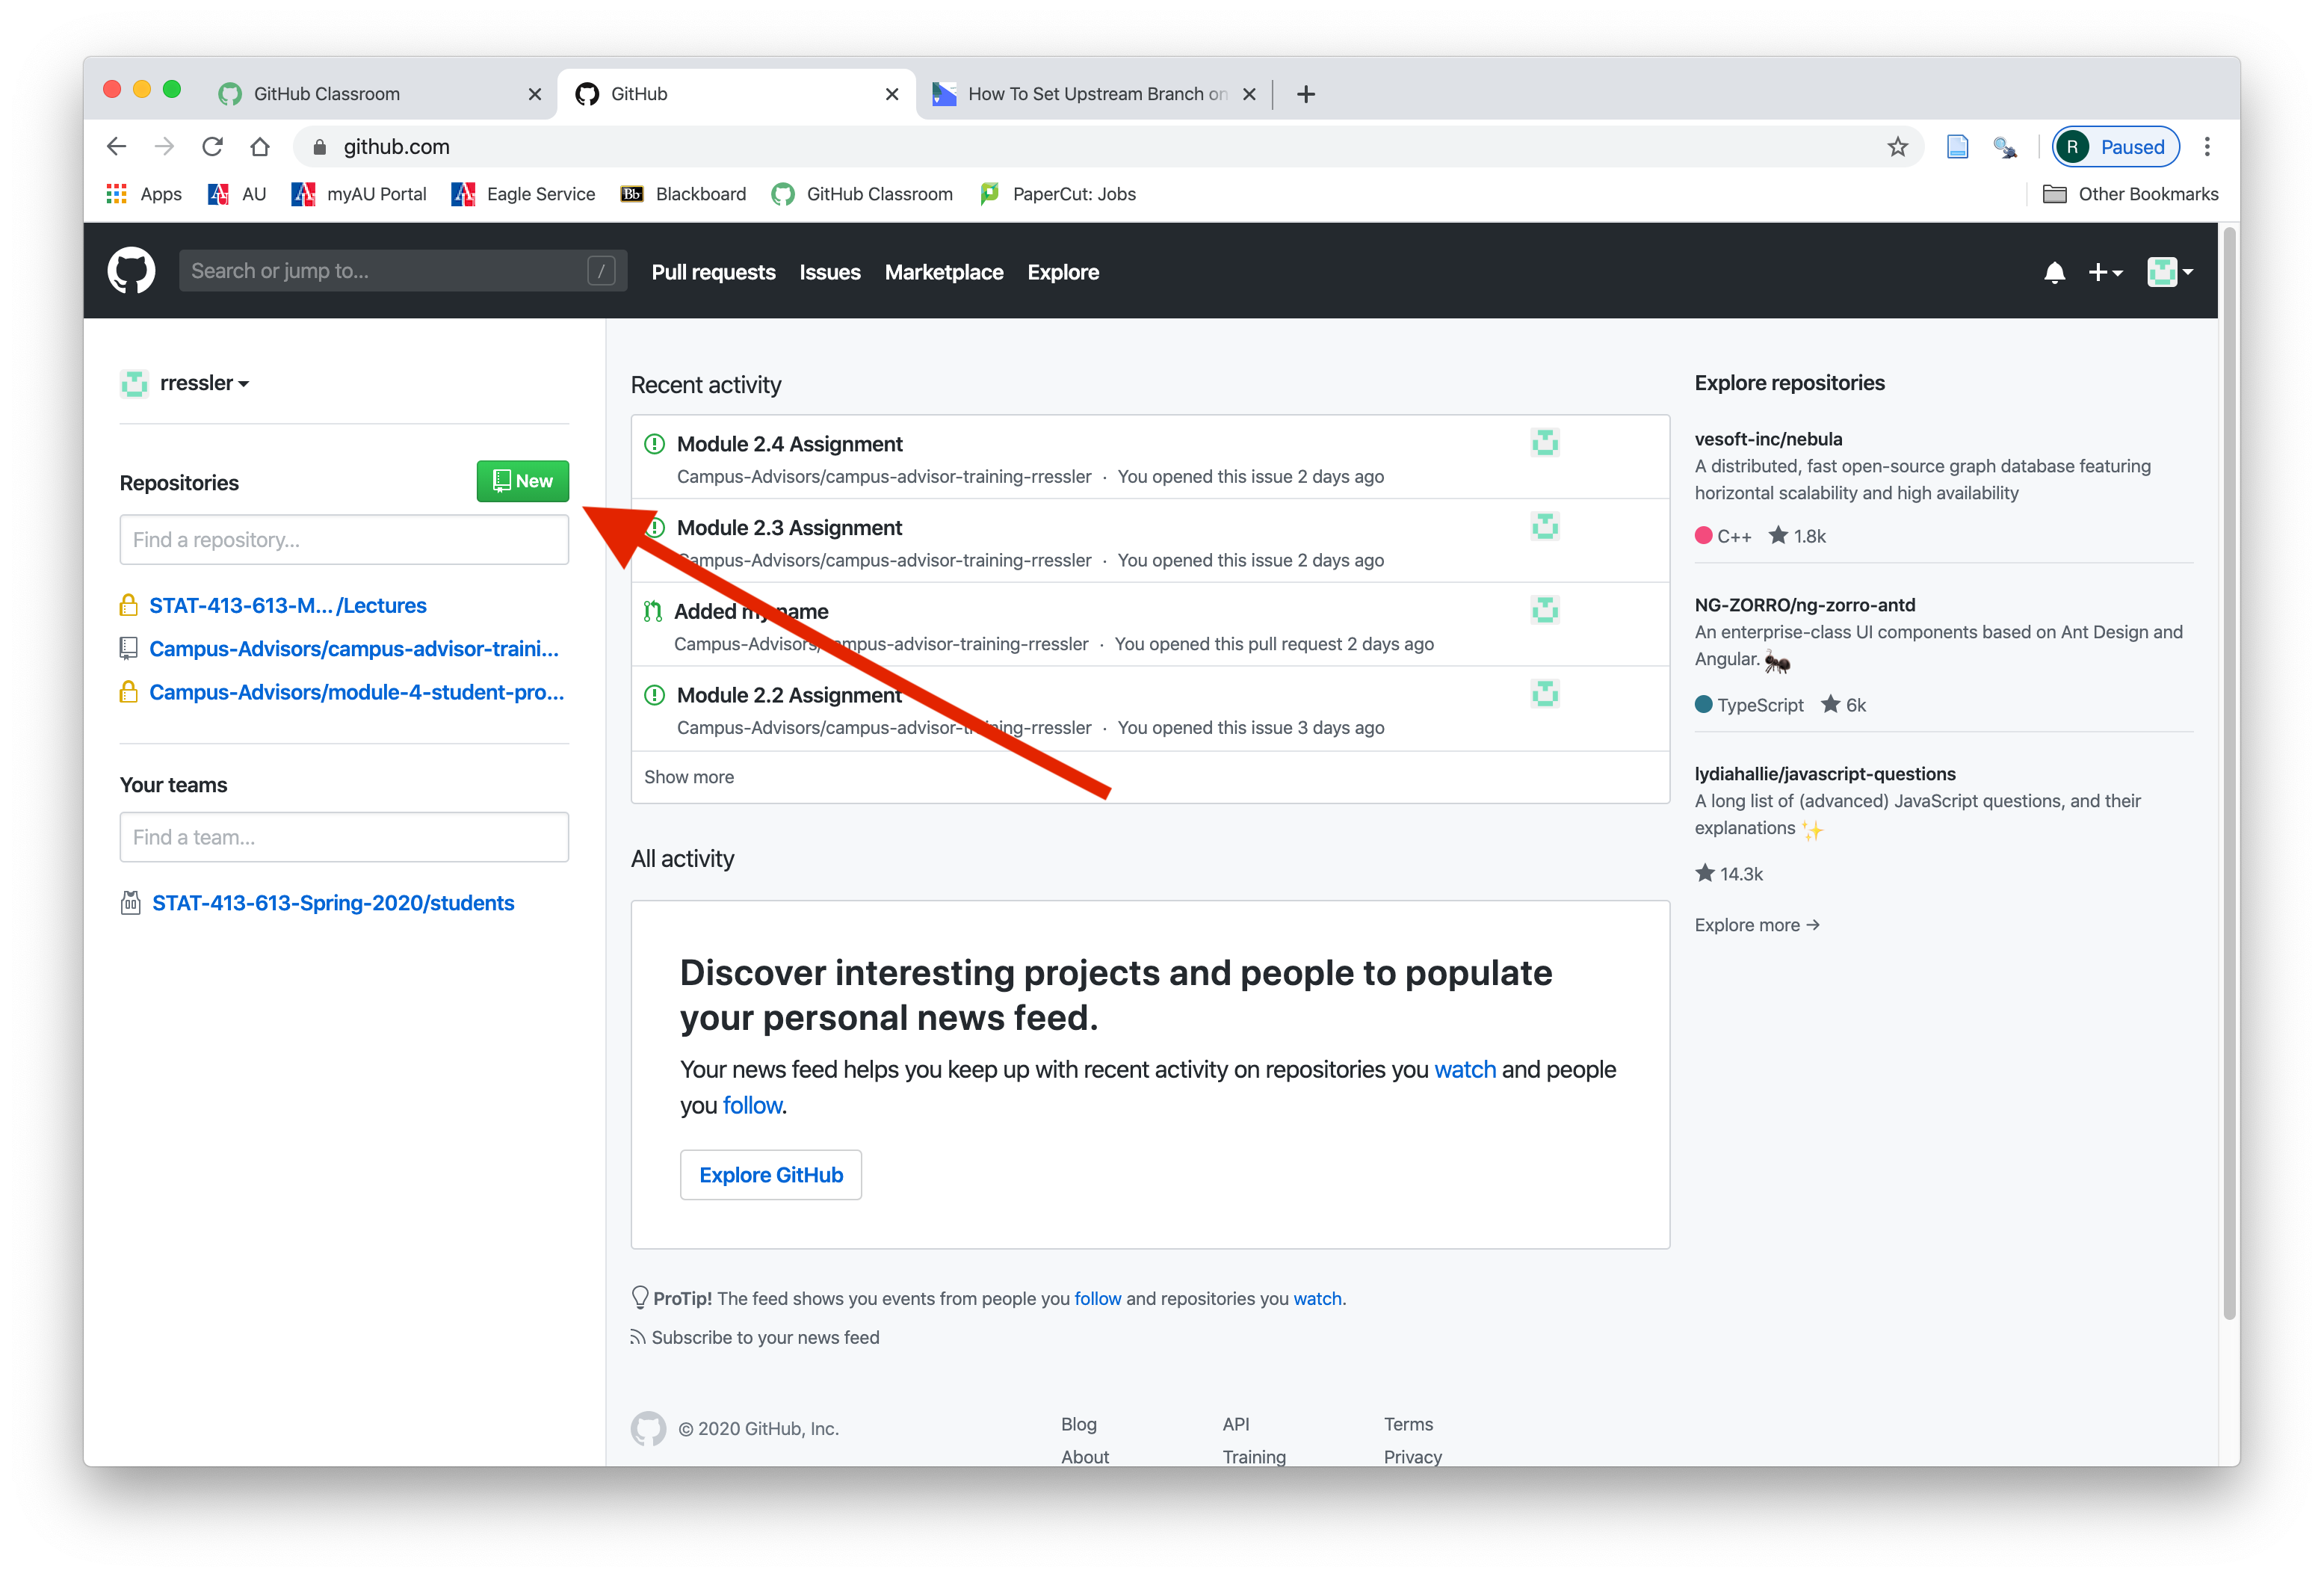
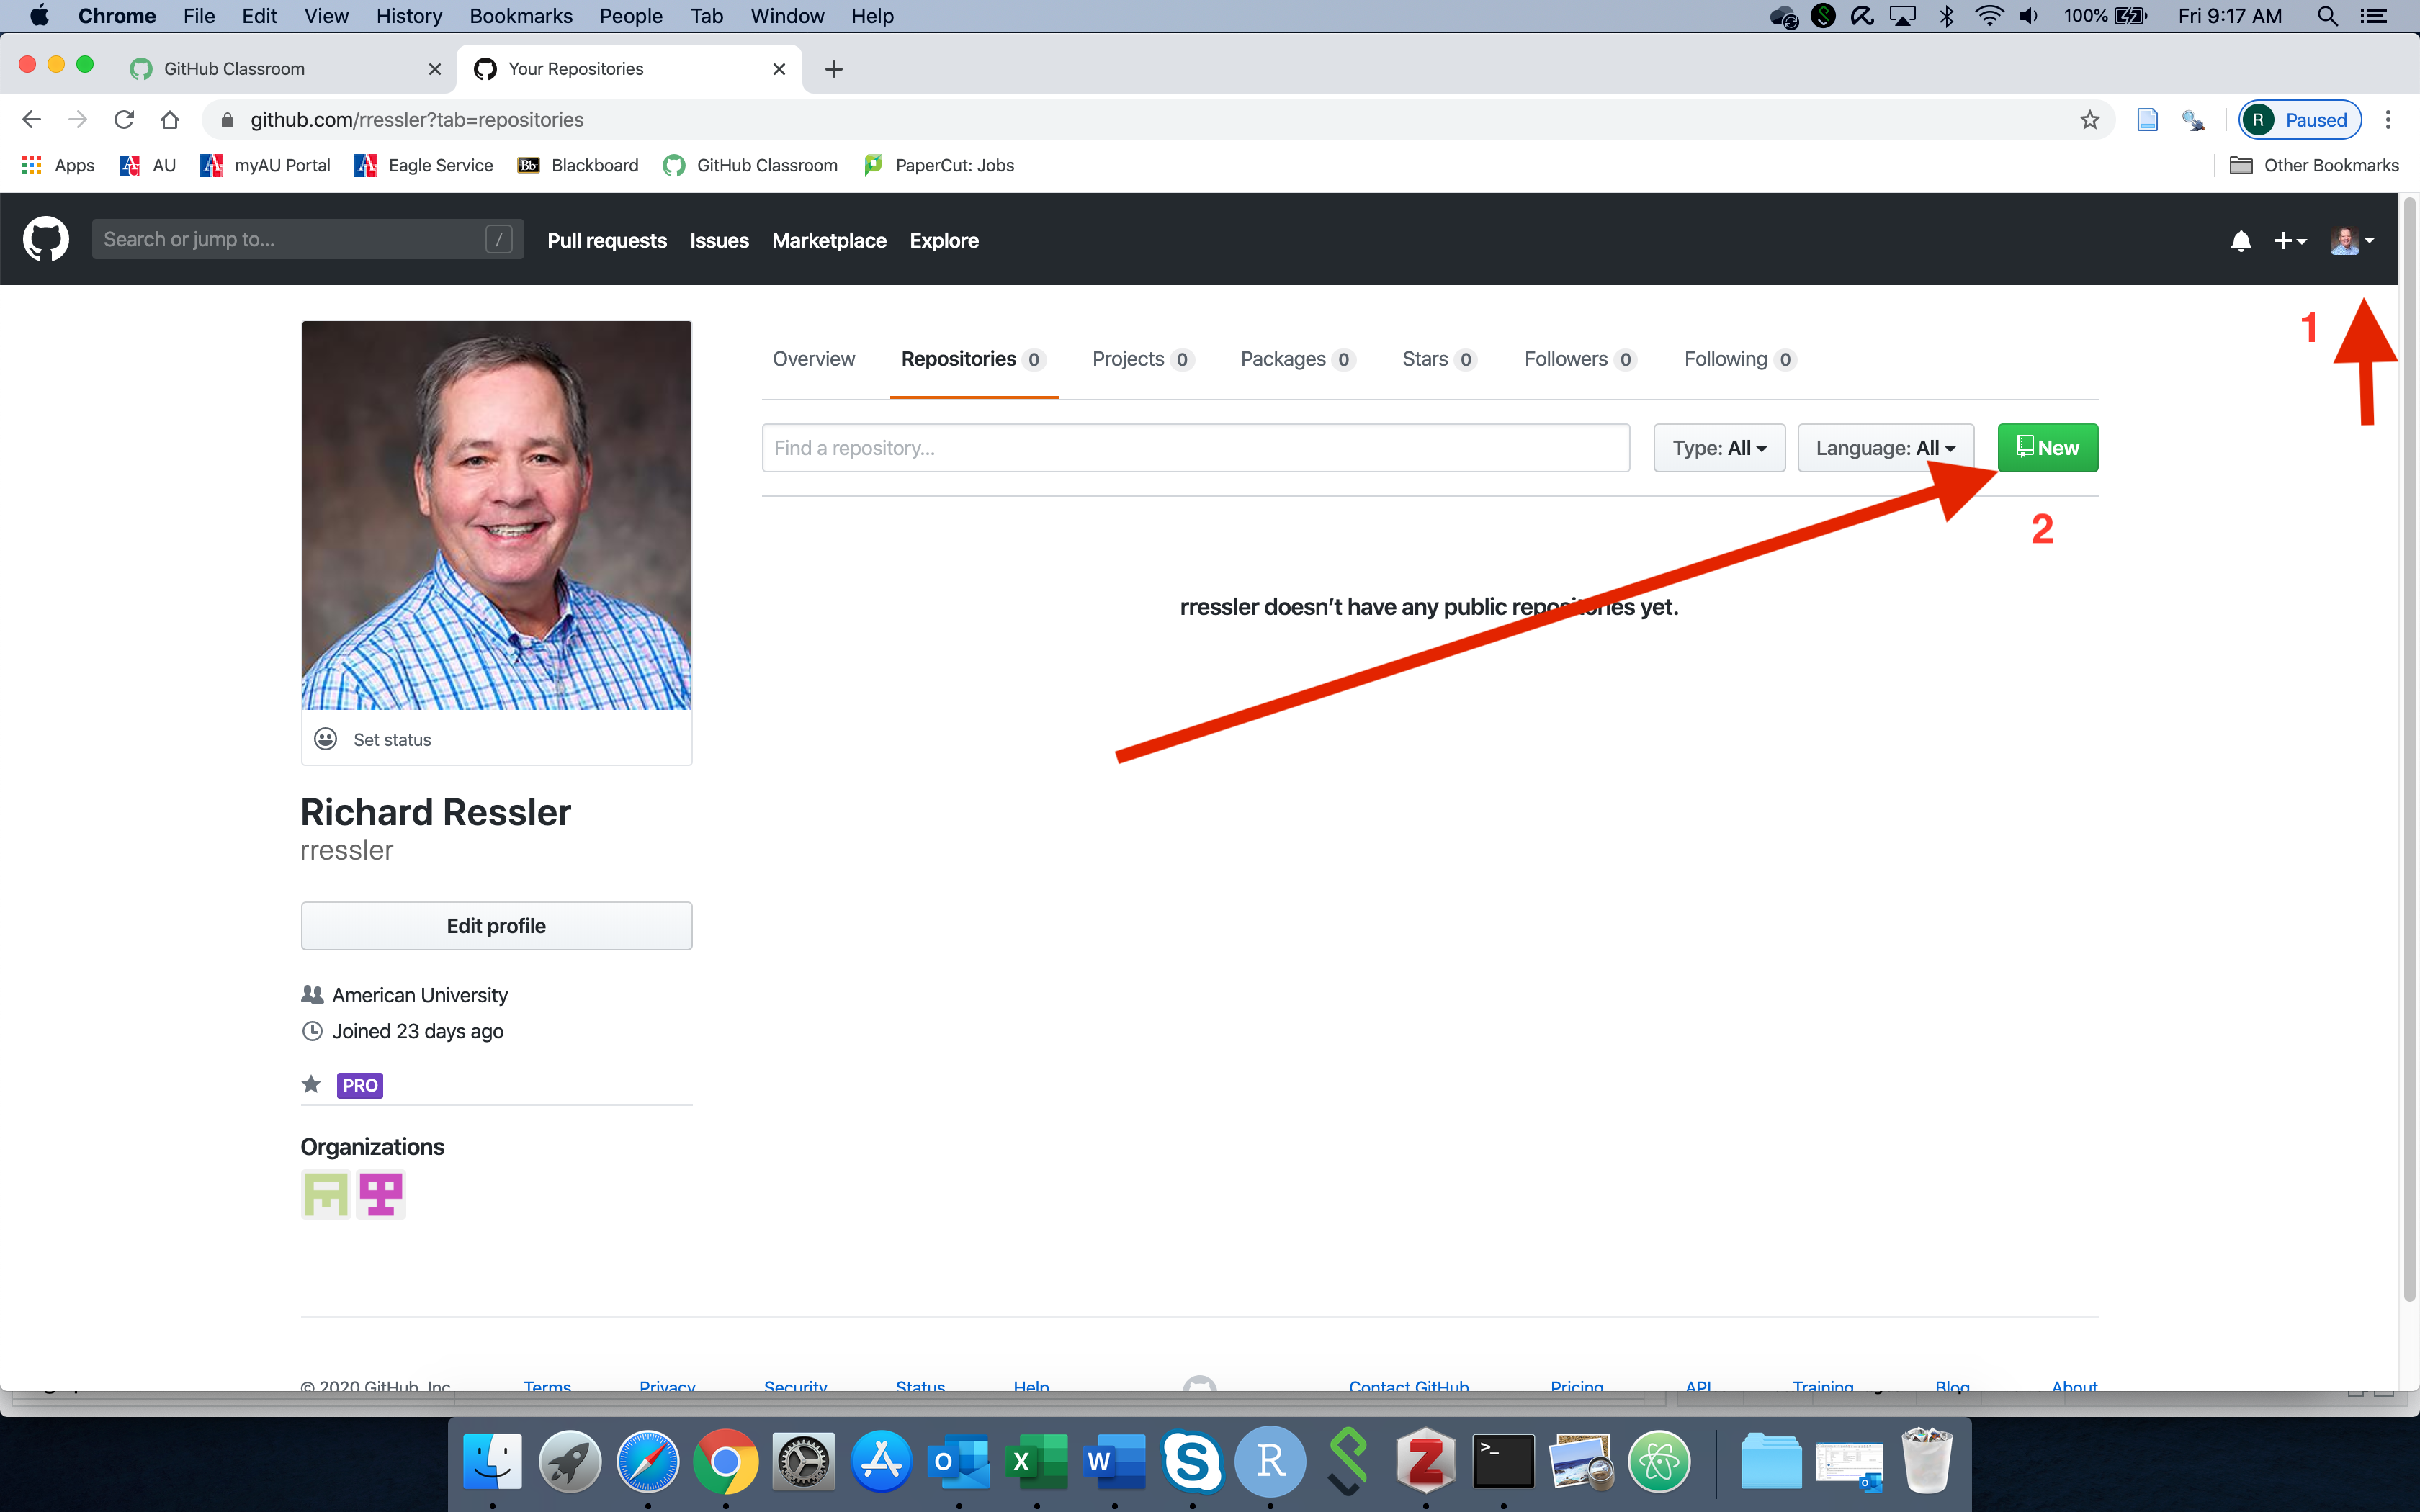
- Or go to the “Repositories” tab and select
New
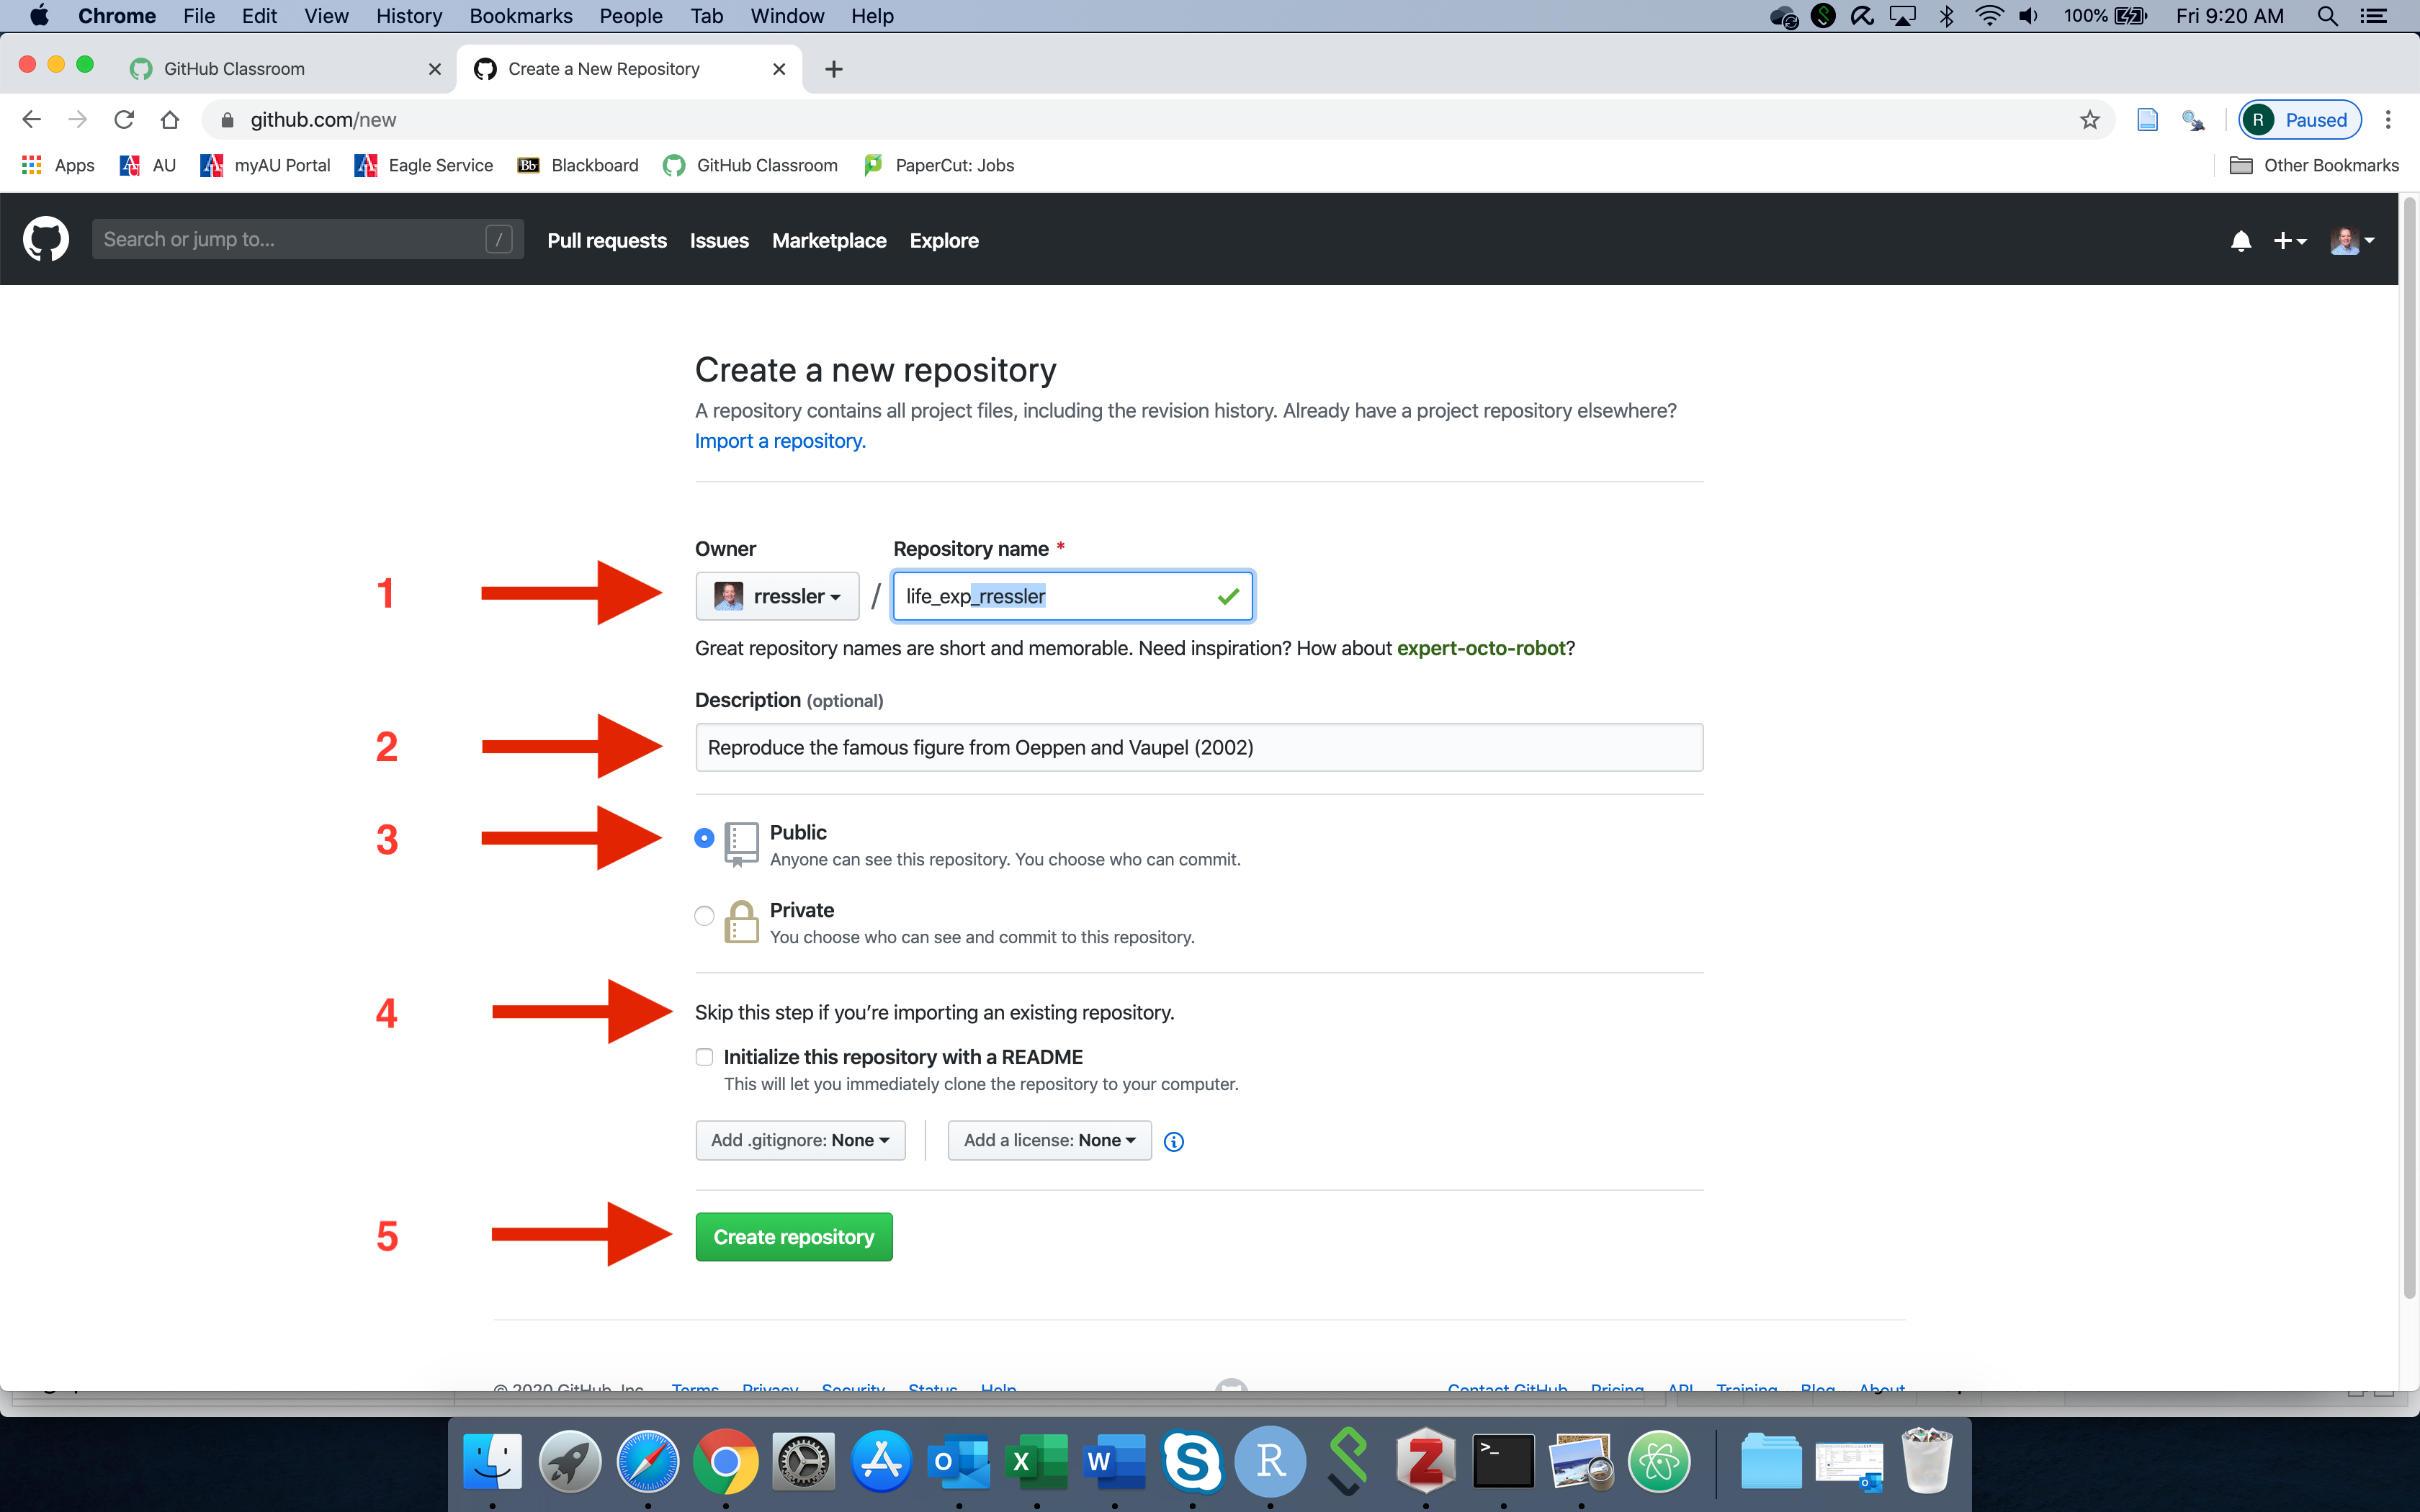
- Tell GitHub the name of your repo. In general, it can be a different name than the repo on your local machine.
- For this class, name it “life_exp_USERNAME” where “USERNAME” is your GitHub username.
- In general, you do not need to include your username in your repo name
- Make a small description.
- Make it Public for now.
- To avoid errors, do not initialize the new repository with README, license, or gitignore files.
- You can add these files after your project has been pushed to GitHub.
- Then, click
Create Repository.
- You will get a new screen with the suggestions for what to do on your computer in the terminal window to add code to your new repo
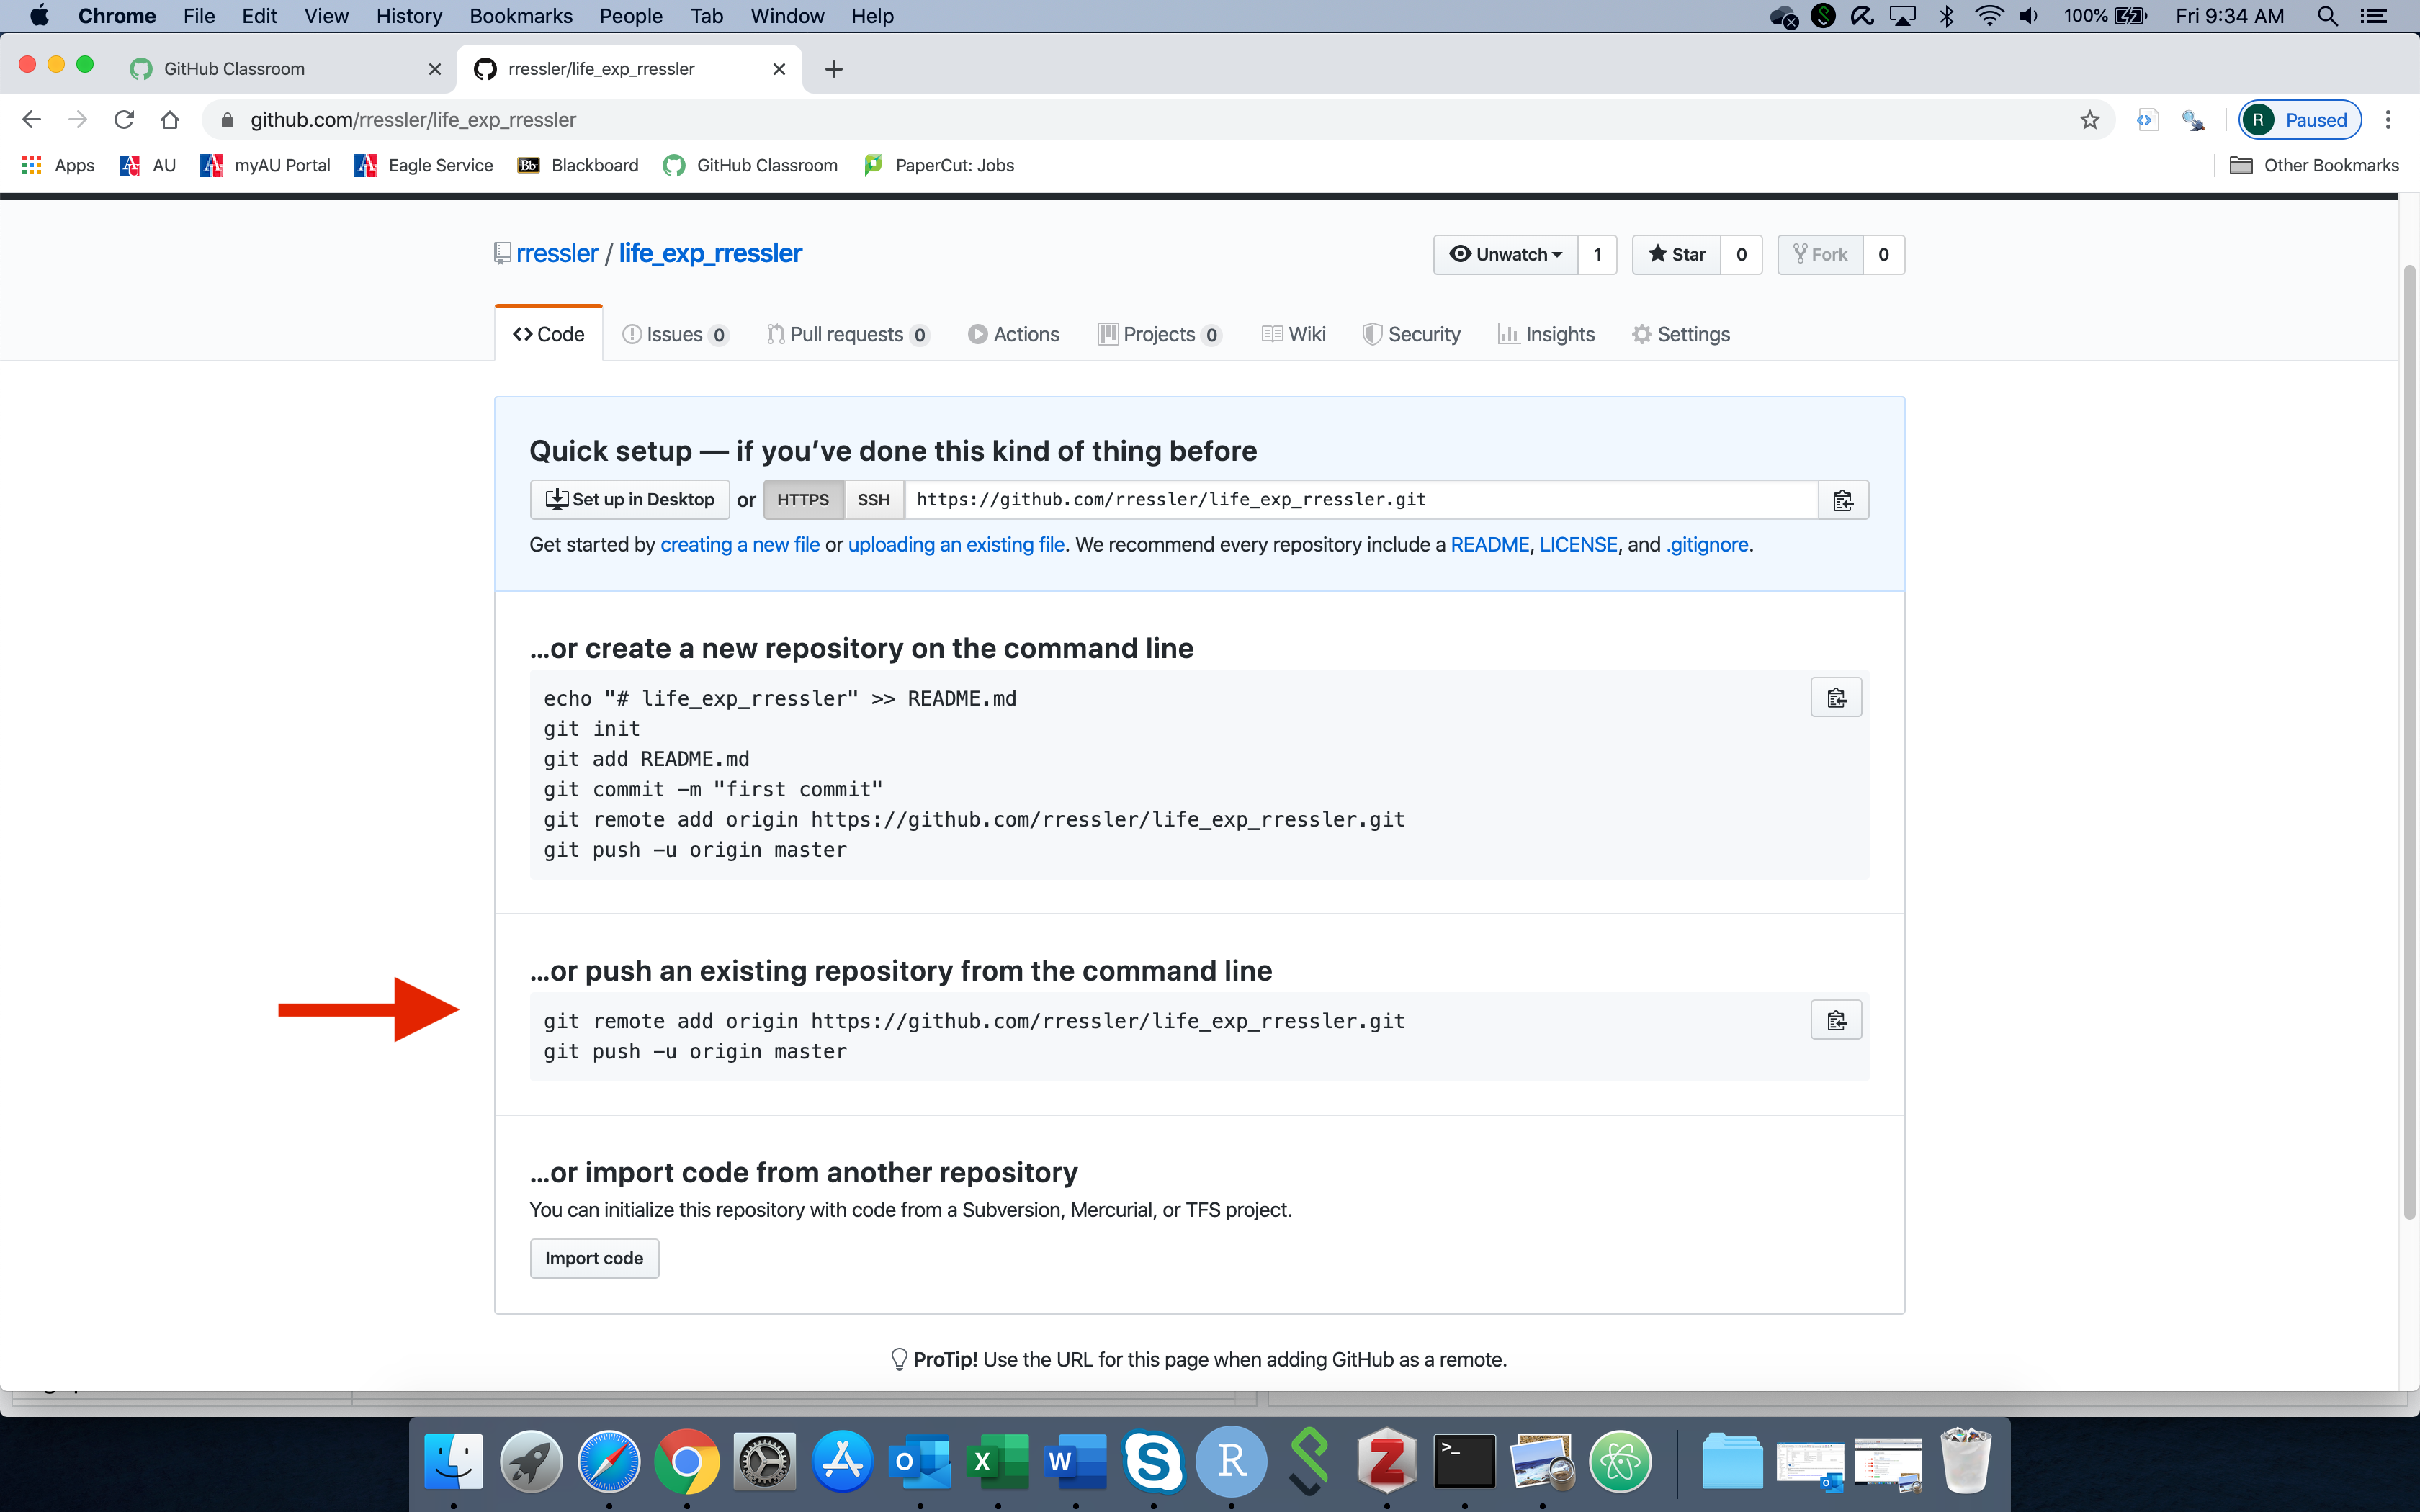
2.6.4 Tell Your Local Git Where GitHub Will Host Your Repository.
The location of a GitHub repository is the URL for the repo.
- It is generally of the form “https://github.com/GHUser/GitHubRepoName.git” where GHUser is the user name of the repo owner and “GitHubRepoName” is whatever the owner chose to name the repo on GitHub.
- Your
GHUsername is your GitHub user name you created for this course.
Use the command git remote to tell Git to do something associated with a remote repository, e.g., on GitHub.
- We want to tell Git to add a new remote repo (on GitHub) to store a copy of our local repo.
- We need to tell Git the name and location of the new remote repository.
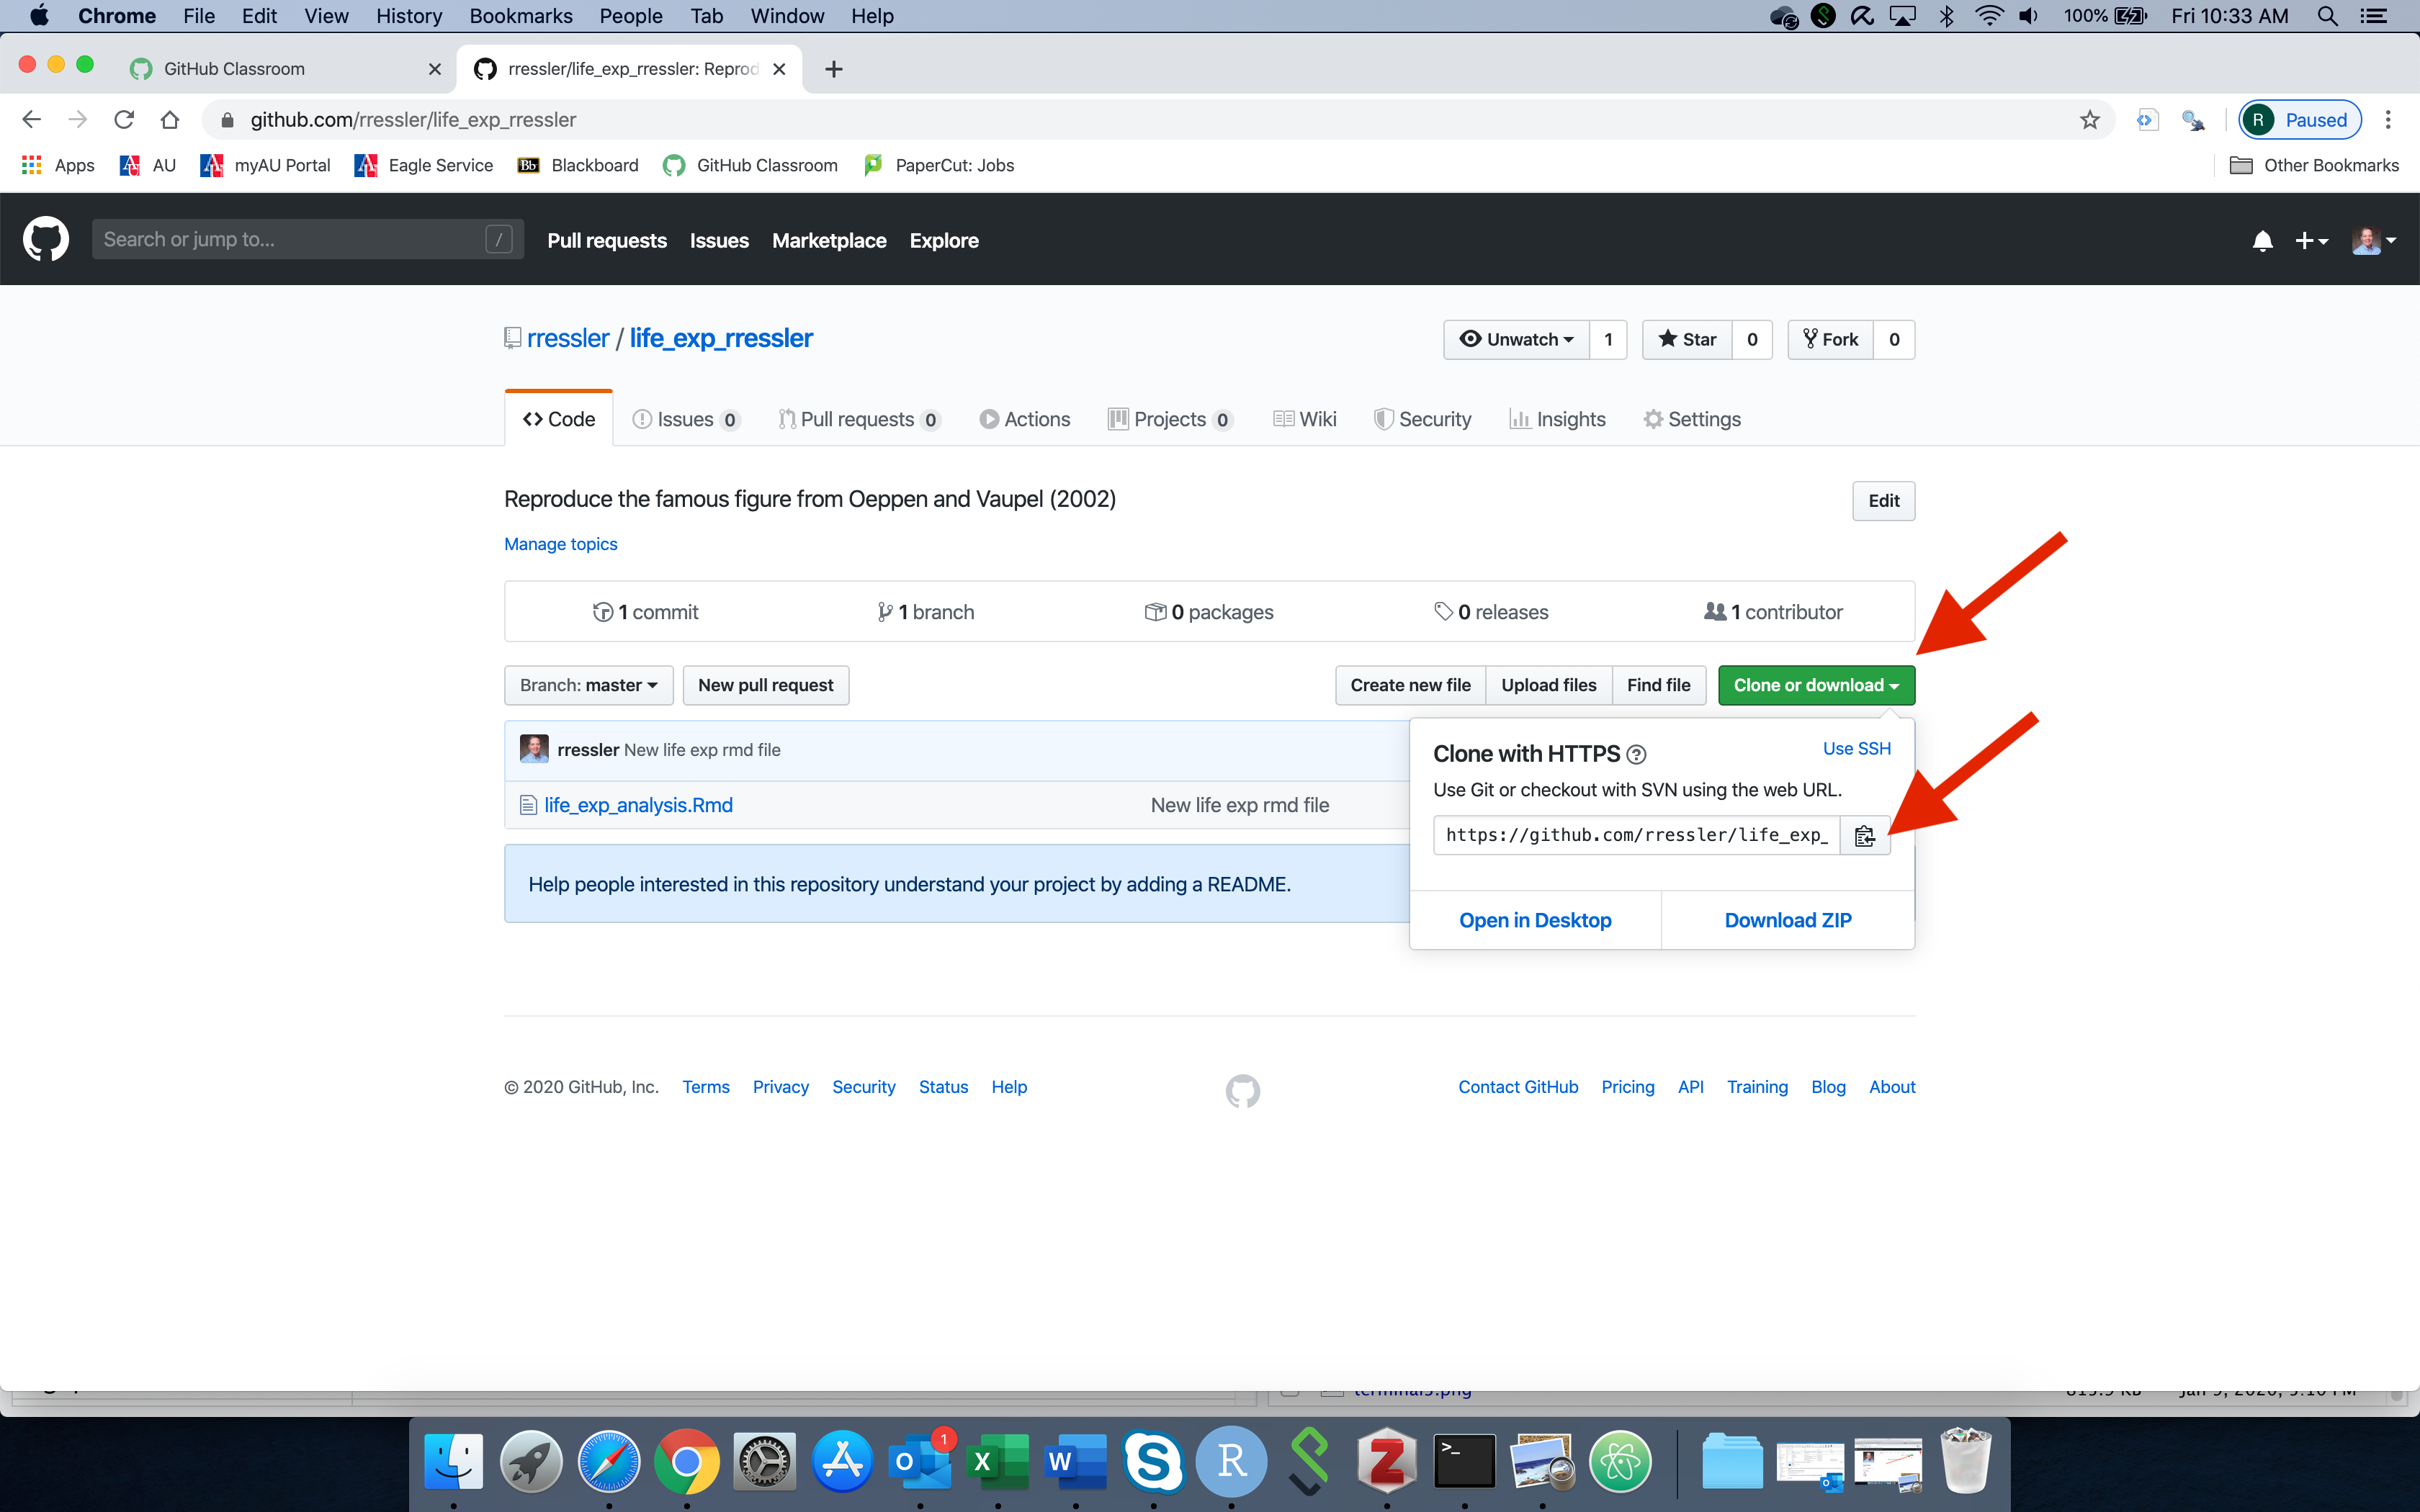
GitHub allows you to copy the URL for your new repository
- You can use the
CloneorDownloadbutton to copy it to your clipboard for pasting into your terminal.- It also gives you suggestions for the commands to use.
- Use
git remote addto tell Git the nickname for the remote repo and where it is hosted. - This example uses the URL for my GHUser name and repo name. Substitute your own repo URL.
- In the above command, “
origin” is just the nickname (or alias) we gave to the location URL that is hosting our repo so we don’t have to type the URL every time.- We could have used “
github” or “deep_space_nine” instead, but “origin” or “upstream” are traditional nicknames you will see in documentation and on-line posts. Think of the “o” in origin as “online”.
- We could have used “
2.6.5 Push Files From Your Local Repo to the Remote GitHub Origin
When you create a new local repo, you are working on the top-level known as the the main branch (used to be called the master branch by default).
The first time you are pushing to a brand new repo on GitHub, you need to use the -u flag (for upstream) and identify the remote nickname and branch:
- Read this as git push (first time) to the upstream online repo with the origin (URL) and merge to its main branch.
- If this is the first time you have pushed code to GitHub on this account from this computer, the GitHub Credential Manager (GCM) you installed earlier will open a window to allow you to authenticate with a credential so you can connect your local Git to upstream GitHub.
- A window will pop up asking you to authenticate using a browser or a code.
- Choose the browser.
- If you are not already logged into GitHub with the same email, it take you through the 2FA process you have established.
- Assuming success, the GCM should take care of future authentication for you.
- The
-uis needed since this is a new repository for GitHub.- It tells Git to connect the behind-the-scenes commit history from the local repo to the upstream repo (GitHub URL) we nicknamed
originand to do it for the main branch of the upstream repo. - It is equivalent to the
–set-upstreamoption where the “upstream” location is the GitHub origin URL. - If for some reason you need to change the URL for the GitHub repo, e.g., you changed your account name or you renamed the repo on GitHUb (uncommon events) so the URL has changed, you could use the
-set-upstreamoption to update Git with the new URL for origin.
- It tells Git to connect the behind-the-scenes commit history from the local repo to the upstream repo (GitHub URL) we nicknamed
You will see code scroll by in the terminal window showing the actions that are happening as part of the push.
When the push is complete, your code is now up on GitHub.
- Once Git knows where to go on GitHub for a given repo, just use
git pushto push new commits to GitHub.- This can be after you have a successful initial
git push -u origin mainfor a new local repo you have pushed to GitHub. - Or, if you have cloned a repo that already existed on GitHub to your local computer as a new repo, the connection is known (as we will see later for an assignment repo).
- This can be after you have a successful initial
- In both cases, for all subsequent pushes for the same repo, you can just use:
2.6.5.1 Exercise
- Add some text before the code chunk in
life_exp.qmddescribing what the code is doing. - Save the file, stage (add) the file, commit the changes (with a comment), and then push the changes to GitHub.
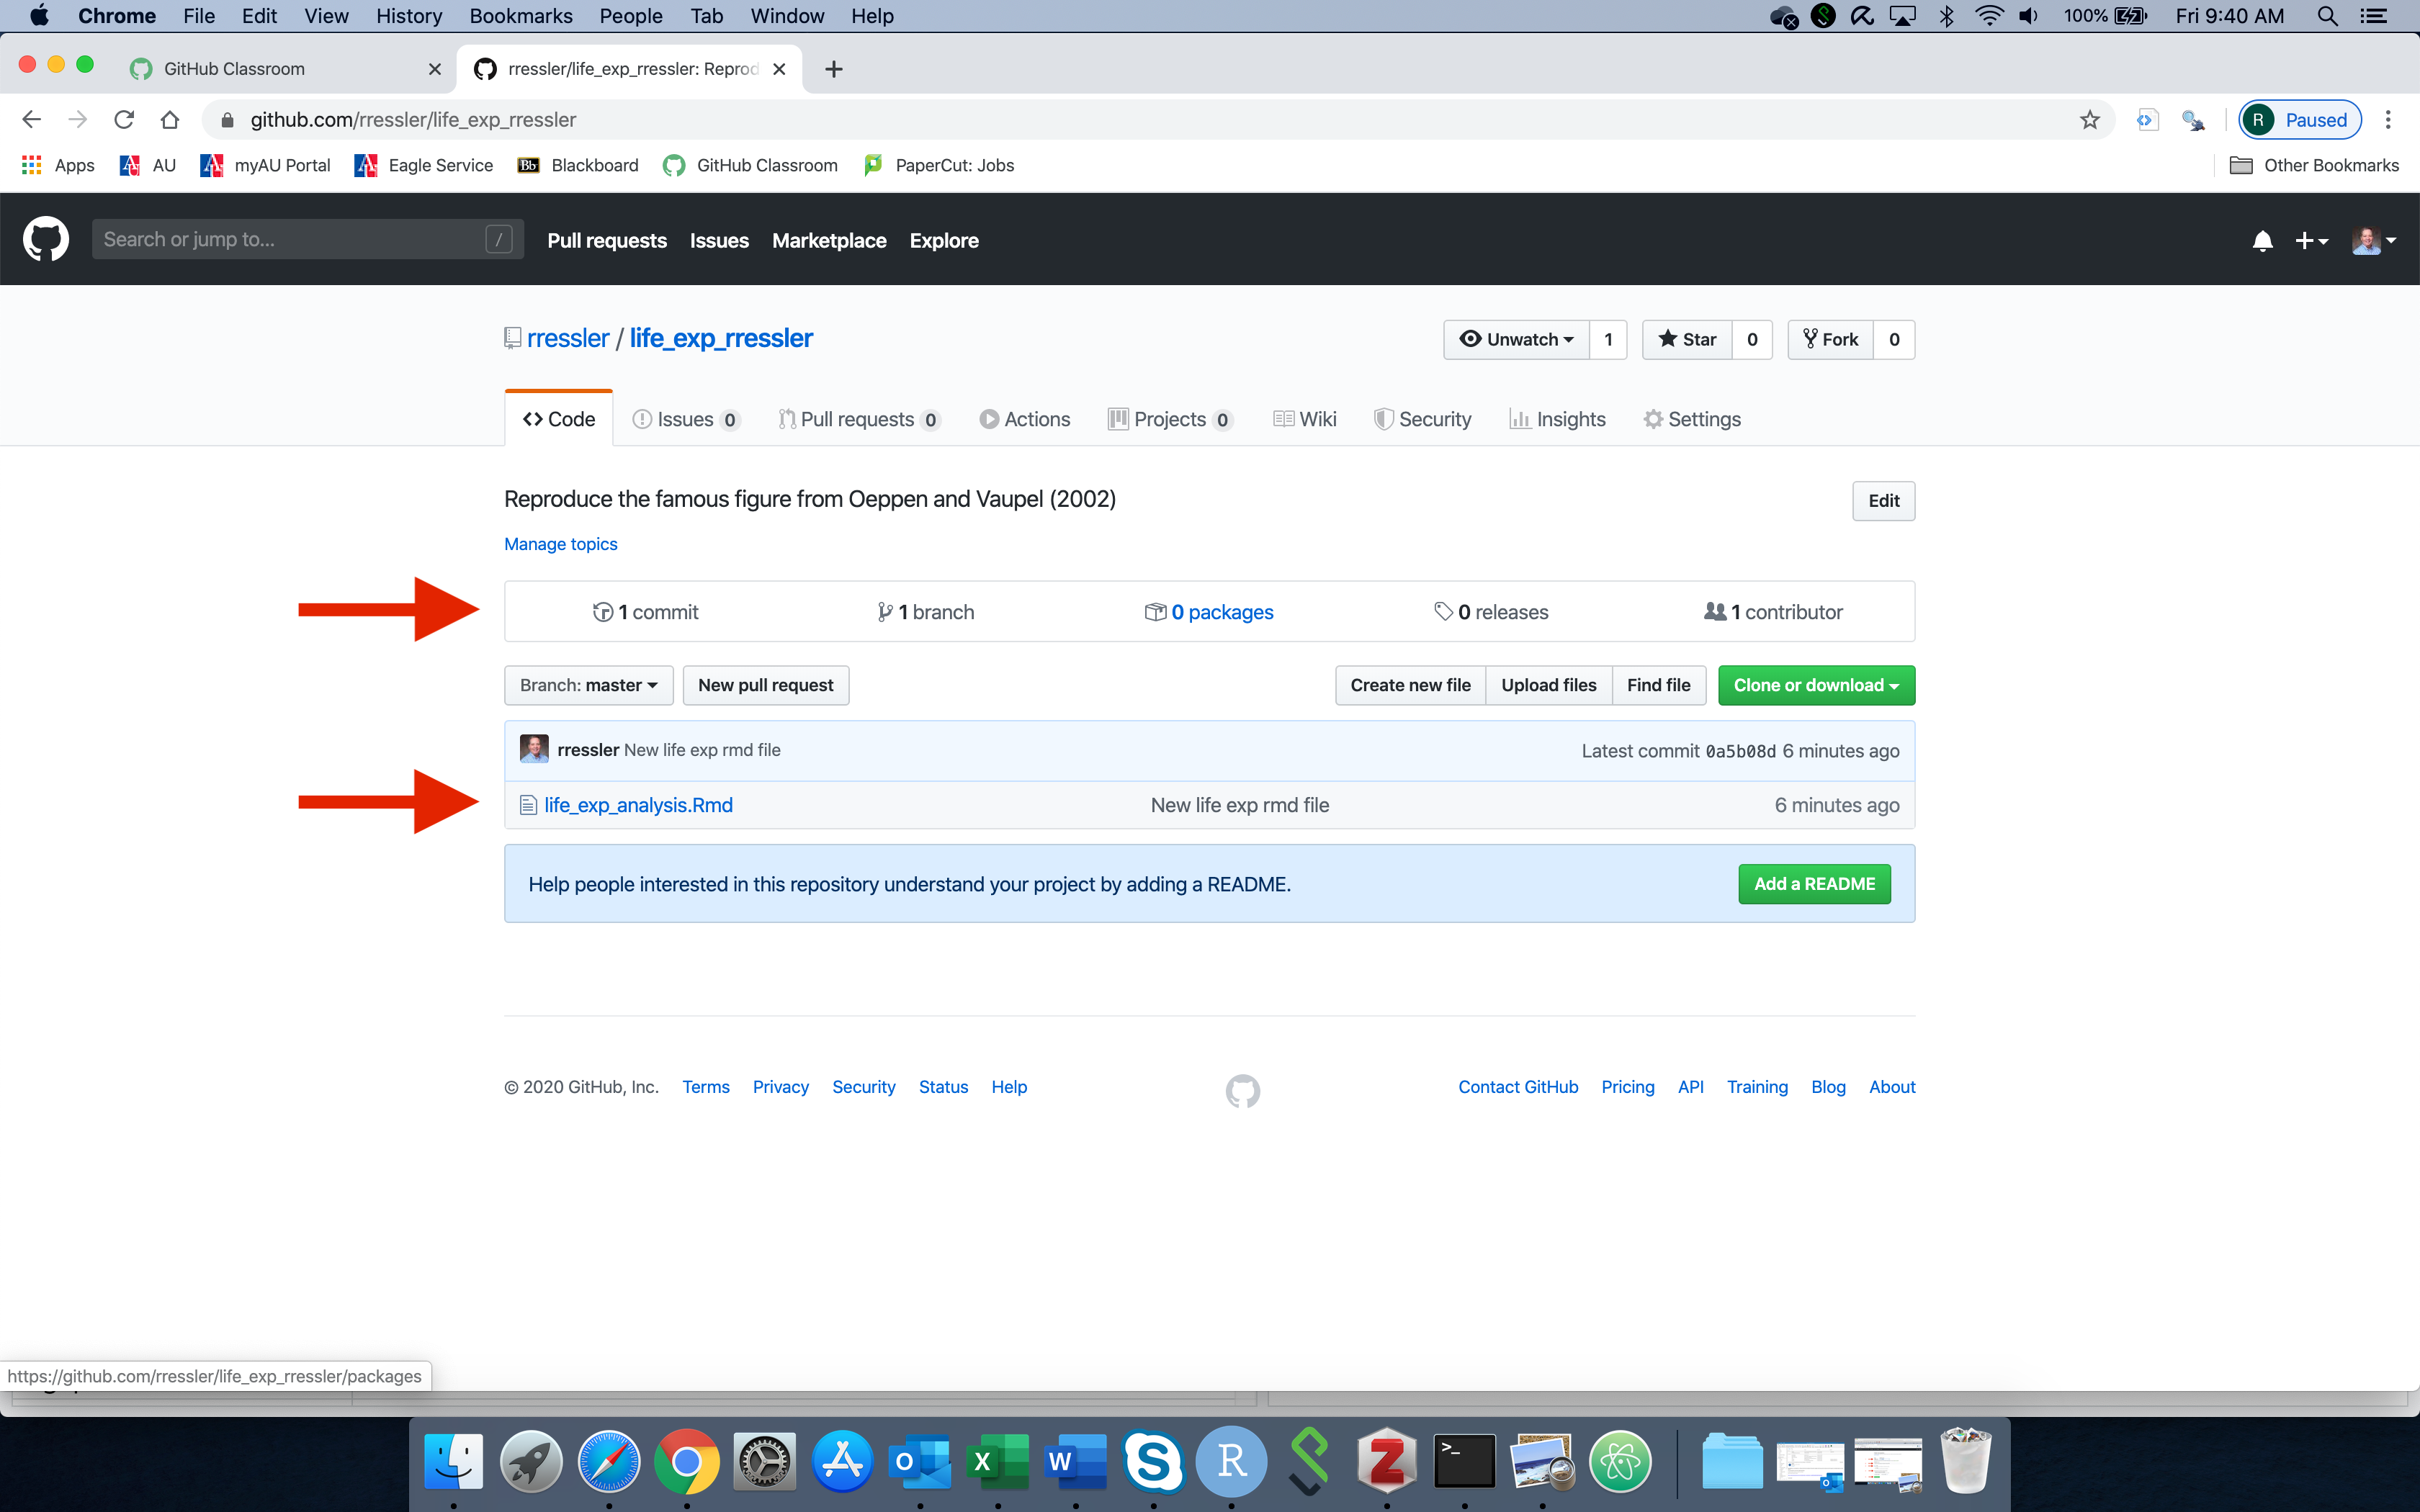
- Go to your GitHub account and confirm it has recorded your latest push - you may need to refresh the browser window.
- You should now have a public repository on GitHub with an updated
life_exp_analysis.qmdfile in it.
2.7 Sharing GitHub Repositories with Others
- GitHub has mechanisms for creating collaboration workflows to help users manage the sharing of repositories.
2.7.1 Access Control and Permissions
- The first mechanism is access control.
- All repos have one or more owners who can set permissions for access
- Owners of a repo can control who can see, read from (pull), and/or write to (push) each of their repos.
- To control who can see a repo, owners choose to make them public or private.
- Public repositories are visible to everyone on the internet.
- If a repository is private, only the owners can see it by default, and they can authorize others to see it.
- I am the owner of our classroom account and all the repositories in it are Private by default.
- Your personal account repositories are Public by default - free accounts are no longer limited in how many private repos they can have (you are limited to only 3 collaborators on a free account).
- As of July 2024, GitHub reports having over 100 million users in 2023 and more than 200 million repositories as of 2022) (including at least 28 million public repositories), making it the largest host of source code in the world (https://expandedramblings.com/index.php/github-statistics/).
2.7.2 GitHub Commands for Sharing Repositories
The whole concept of GitHub is to enable widespread sharing of code while protecting the integrity of the code and the intellectual property rights of the code owners.
- Repo owners set read and write permissions for the public and for authorized users
- By default, you can create a copy of any of the public repositories and any private ones for which you have permission.
If you can see a repo, GitHub allows multiple ways of creating copies:.
forkcopies a repo “horizontally”, from one GitHub account to another GitHub account without direct links or write permissions to the original repo.clonecopies a repo “vertically”, moving a copy of a repo on a GitHub account down to your local machine while maintaining a link to the original (origin) on GitHub so it’s easy to update your copy or even write to the original repo (if authorized).downloadcreates a file you can put on your local machine without any links.
When you have used fork or clone, you can use a pull request or git pull to update your copy with any changes from the original repo.
2.7.3 Fork a Repository
- The GitHub
forkcommand creates a separate and distinct copy of a given GitHub repo on your GitHub Account with no permissions on the original repo. The repo stays in the cloud. - You can make all the changes you want to the files in a forked repo.
- However, the original owner will not see them directly - it is a separate repo on GitHub (and it’s not on your local system - yet).
- If you make a change you think the original repo owner might like, you create a GitHub pull request to ask them to look at (
pull) your code for review. They can comment on it and even decide to merge it into their original baseline. The is the way open source software (and many R packages) are developed.
2.7.4 Clone a Repository
cloneis a Git command you use in your terminal window to copy a GitHub repo on to your machine as a new repo and maintain a link to the original repo.- You can pull updates from a cloned repo at any time using
git pull. - You can
pushupdates to the original if you have write privileges.- If you do not have write privileges and want to push updates to GitHub, you can go through a two step process:
- Fork the repo so you have a copy on your own GitHub account.
- Clone your forked copy to your local machine.
- You can then make as many changes as you want and upload to your forked copy on GitHub.
- You can then create a
pull requestto the original owners as before if you want to share your code with them for review.
- If you do not have write privileges and want to push updates to GitHub, you can go through a two step process:
- To Clone a Repo:
- Go to GitHub and copy the URL for the repo you want to clone to your clipboard.
- Go to your terminal window and create/navigate to the directory under which you want to place the new repo.
- You do NOT need to create a new directory for the repo as it will be in its own directory.
- The directory should NOT be part of a repo already to avoid nesting of repos.
- Run
git statusin your directory to confirm it errors out withfatal: not a git repositoryso none of the parent directories all the way up your computer is a repo with a.gitfolder. - Once you are sure the folder is NOT an existing repo (or under one) then …
- Enter the command
git clone URLwhere instead of typingURLyou paste in theURLyou copied from the GitHub repo. - Look at help with
git clone -hto see all the options
2.7.4.1 Exercise Continued - in Fork and Clone (in groups of 2-3)
Connect with someone else in the class and tell each other your GitHub ID.
The first step is to fork their
life_exp_USERNAMErepository to your account.- Search for the person on GitHub using their GitHub user ID - the repo should be public.
- Go to their “life_exp_USERNAME” repository. The url should be something like “https://github.com/USERNAME/life_exp_USERNAME” where “USERNAME” is their username.
- At the top right, on the level of the repo name, click the “Fork” button.
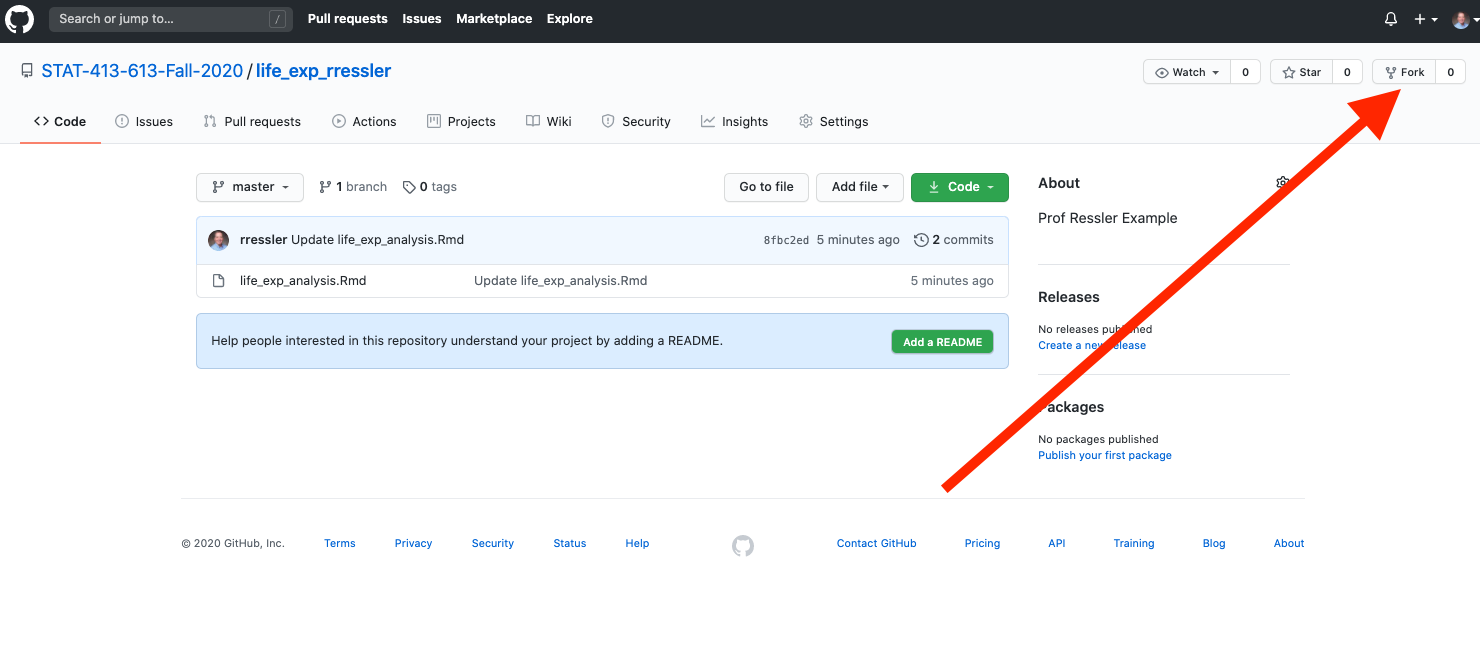
You should now have a copy of their
life_exp_USERNAMErepo on your own GitHub account page.The second step is to clone the repo to your machine so you can make changes to it.
Copy the URL from the newly forked repo - click on the
CodeButton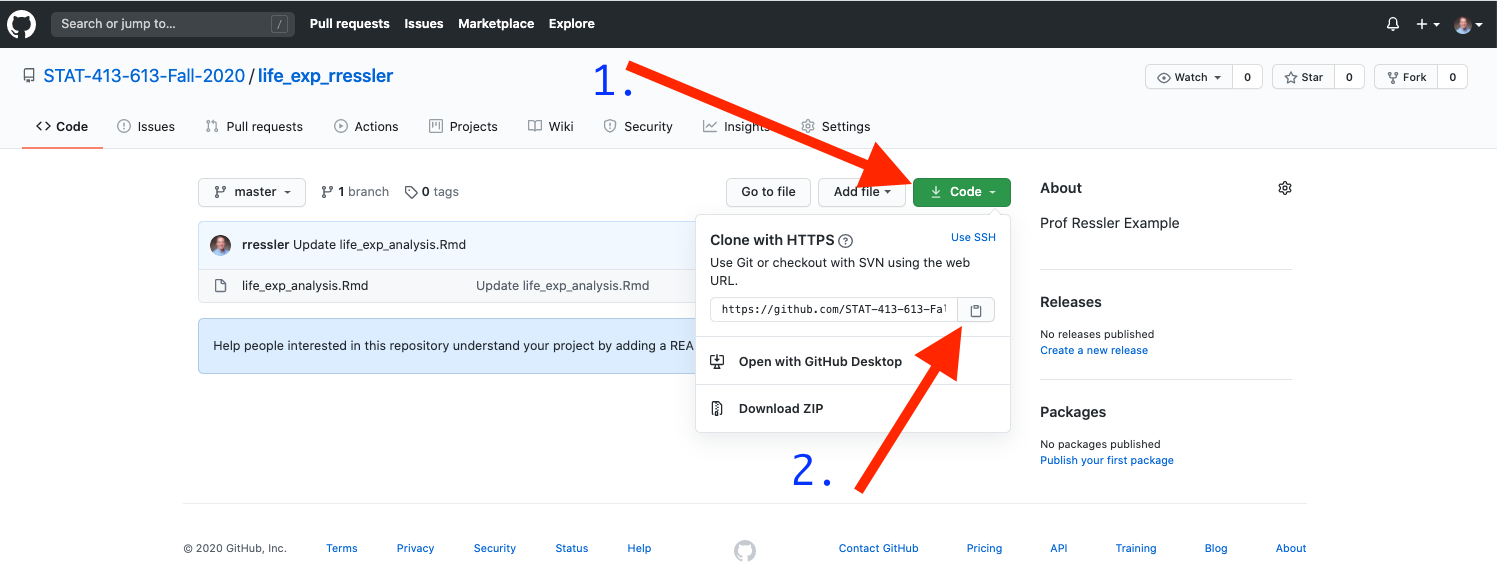
Use your terminal window and navigate to the
DATA_XXX/Homeworkdirectory on your local machine.Clone the forked version of their repo to your local machine:
git clone https://github.com/YOUR_USERNAME/life_exp_PARTNER_USERNAME.gitYou should now be able to see (and edit) the files from the new repo in your local machine directory:
ls
ls -a- You will clone each homework assignment throughout the course onto your local machine.
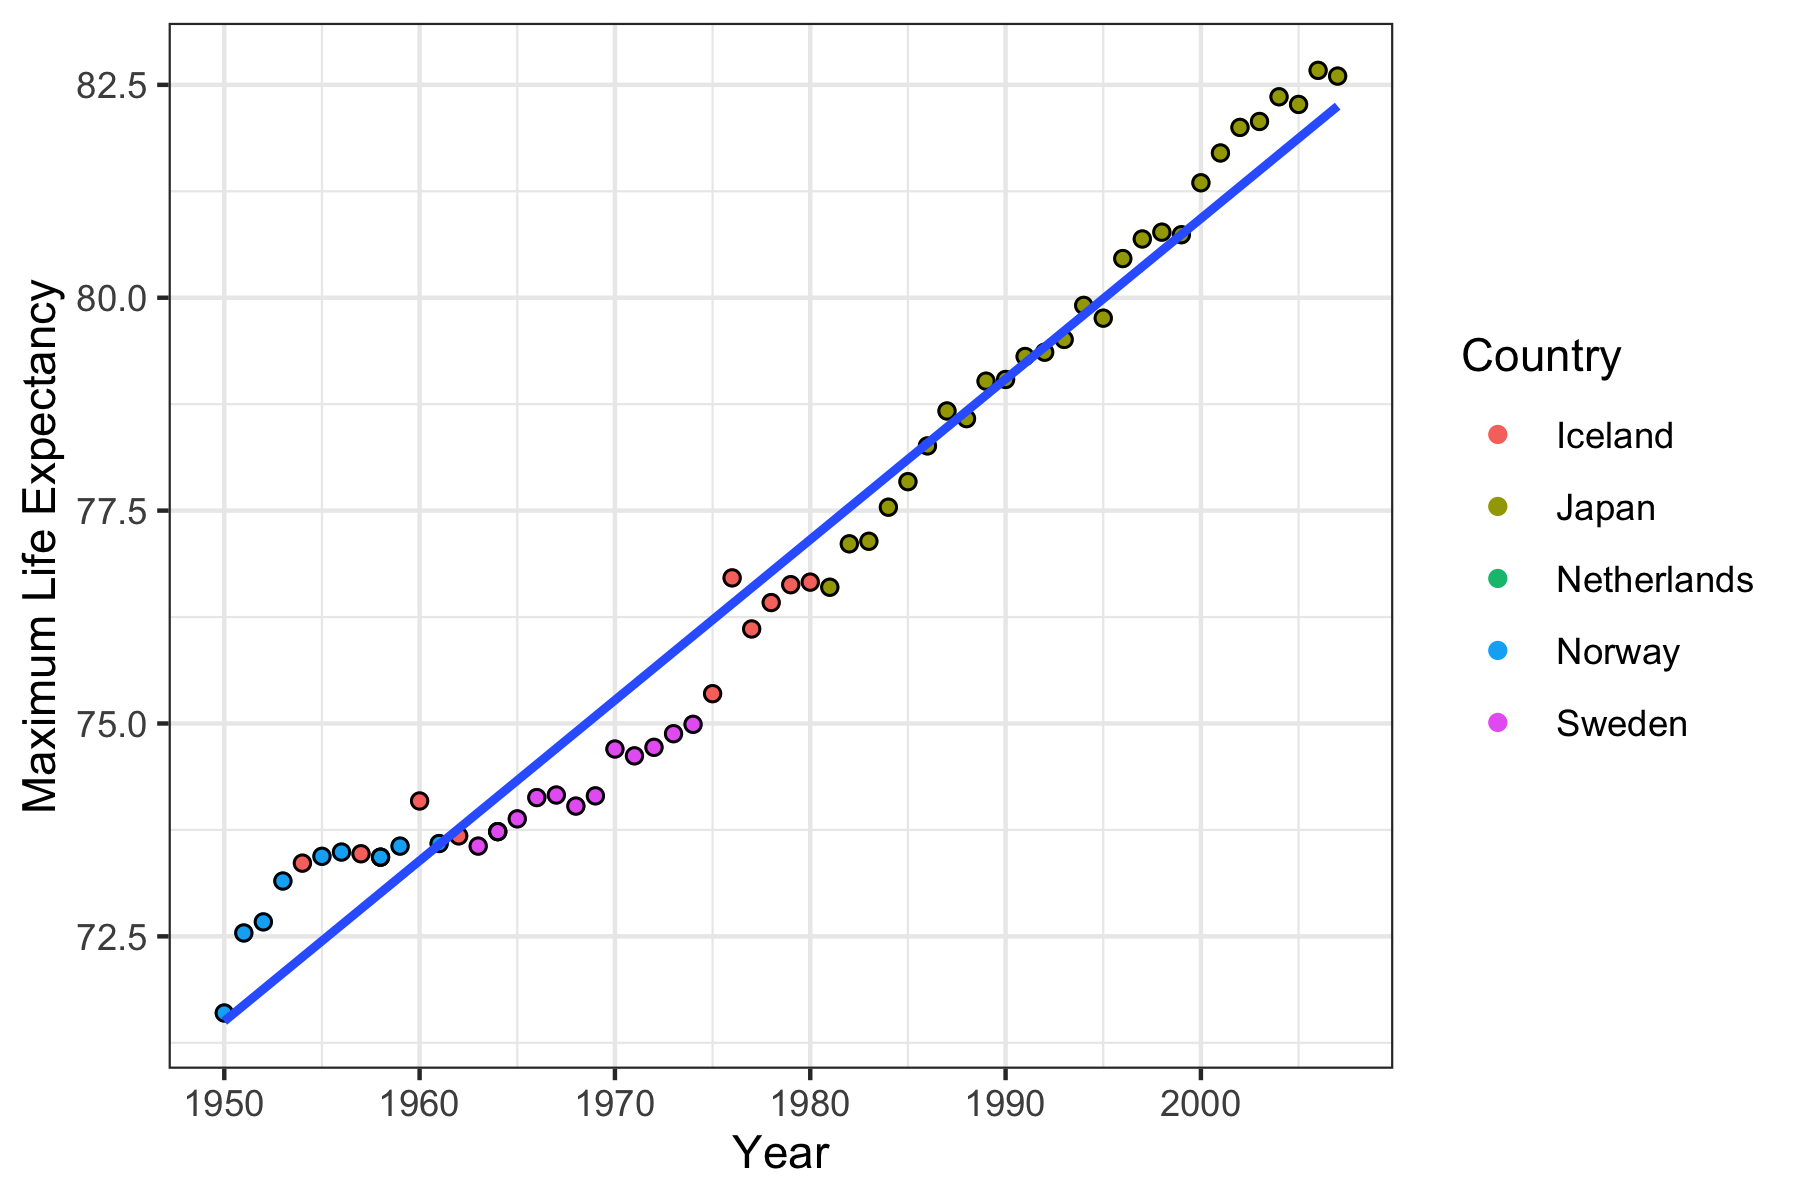
- Edit your partner’s file to add code to create a scatterplot of
yearversusmaximum life expectancy. Color code bycountry, and add a single Least Squares (LS) smoother line.
- Your plot should look like this:
- Save the modified file, then add it (stage), and commit the changes with a comment.
- Push the changes to your forked repo on GitHub.
- You should now see the changes in your repo on GitHub
2.8 Git and GitHub in RStudio
RStudio has built in capabilities for working with Git and GitHub.
RStudio uses the construct of an RStudio “Project” for working with Git and GitHub.
- RStudio Projects are like repos in that they can not be embedded or nested within each other - so each repo can be a project and each project can be a repo.
For each homework assignment, once you have cloned it to your machine, create it as an RStudio Project.
- Open the project each time you work on your homework.
- This will automatically position your console and terminal working directories to the correct folders.
- It will also allow you to use the RStudio Git Pane for routine workflow with Git and GitHub.
2.8.1 Exercise: Turn the life_exp Repo into an RStudio Project
Go to RStudio Tools/Global Options.
- Select Git/SVN
- Ensure “Enable version control interface for RStudio Projects” is checked.
Go to your RStudio window and at the Top Right you see an icon for Project (none) with a down arrow
Click on the arrow and select
New Project.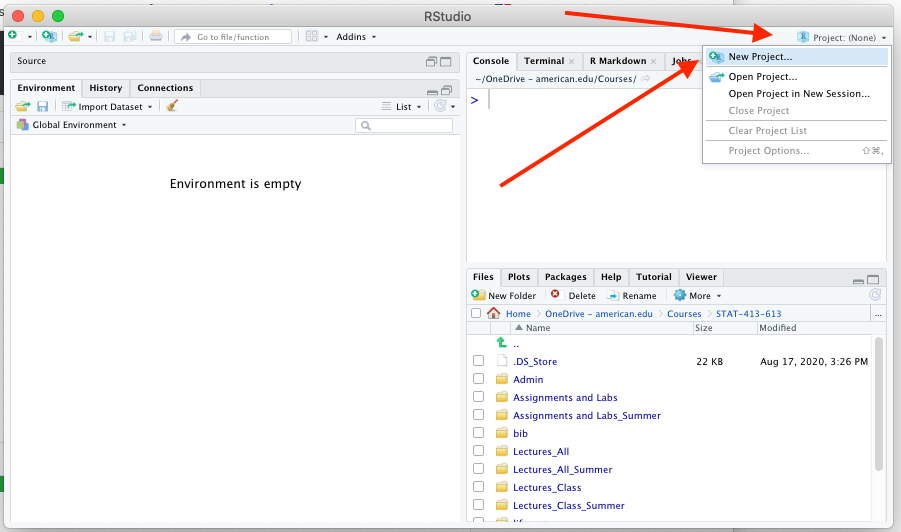
Click on the
Existing Directoryoption.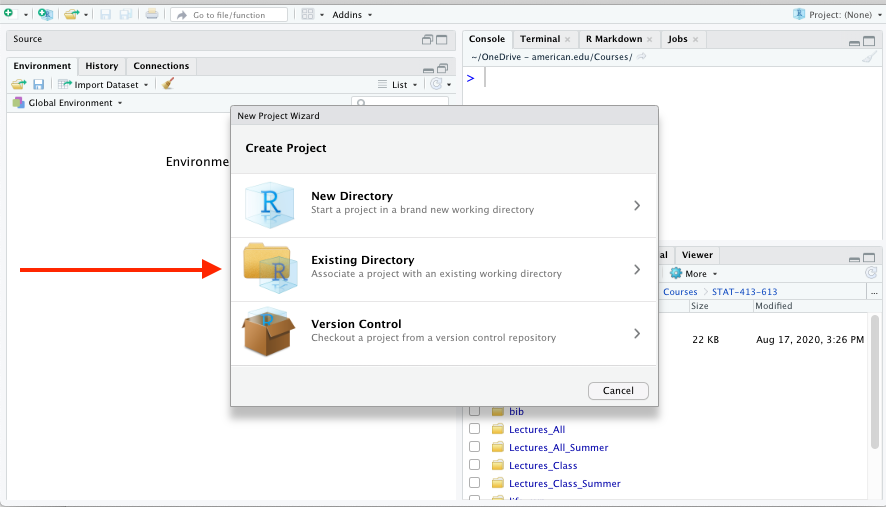 .
.
Find your
life_expfolder.- Click the open in new session check box.
- Click
Create Project.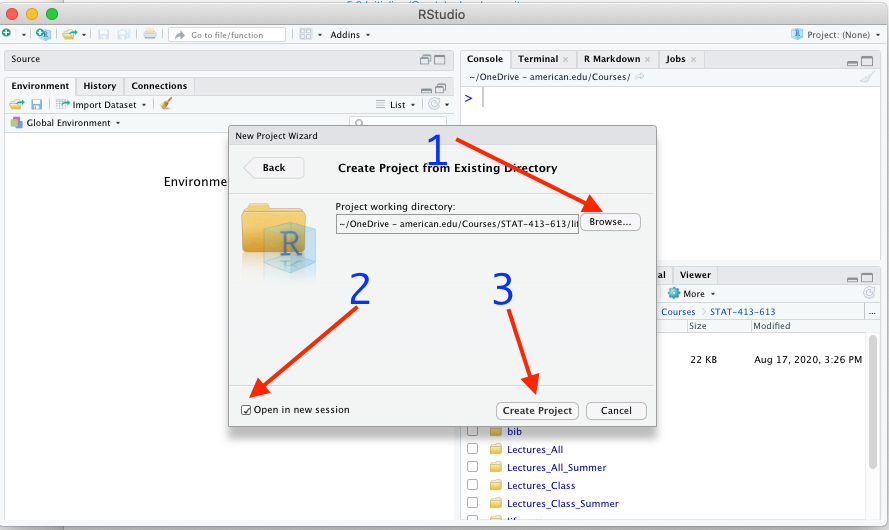
RStudio will now open up a second session.
You should see a second RStudio icon with the Project Folder’s name in it in your dock/taskbar.
The pane with environment pane should have a new Tab called
Git.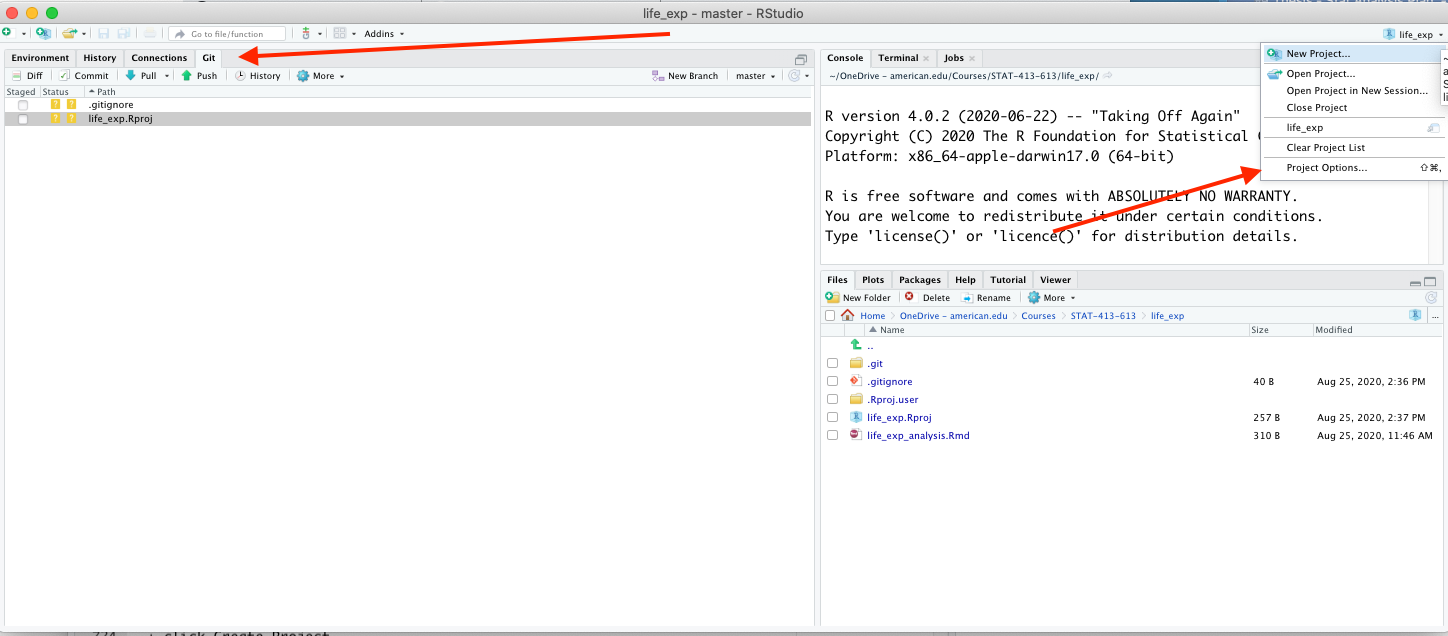
If you do not see it, go to the RStudio Project Options (top right), select
Git/SVN, and confirm you can see your folder, and selectOK.
2.8.2 The Git Pane
The Git Pane shows the file structure in the repo directory - with only the tracked files that have uncommitted changes to them so no files listed your .gitignore file.
- It has several commands in its menu to allow you to execute common Git and GitHub commands.
- Both
DiffandHistoryopen up a new window with either the un-committed changes to the selected file or the history of the committed changes to the selected file.
2.8.3 The Stage, Commit, Push Workflow
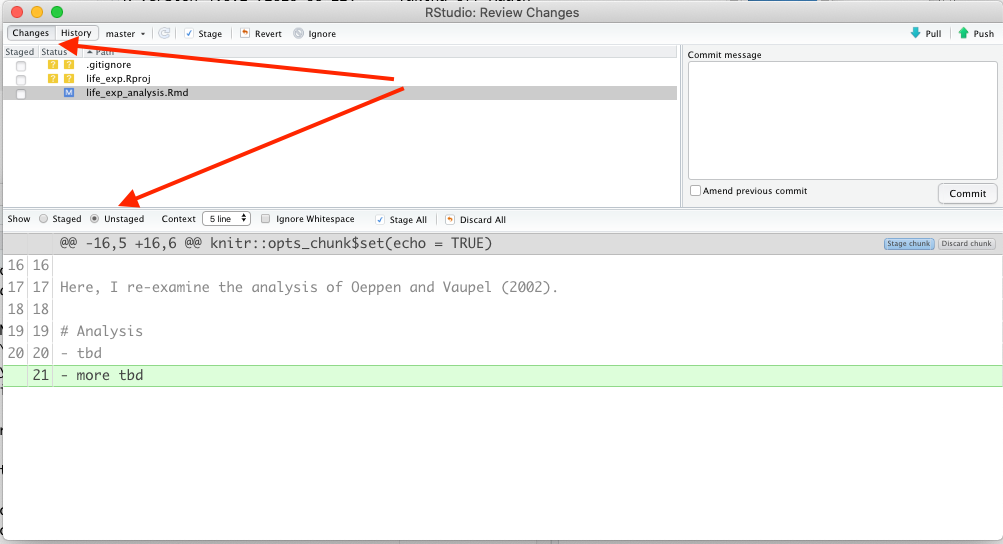
Open your life_exp.Rmd file and make a small change to add a few words and save it.
Go to the
Gitpane and you should see it.In the main
GitPane you can click the check box to the left of a file to stage it.- You will see the status change to staged.
Then click on the
Commitbutton in the menu row.- A new window will open with files to be committed. (you can also stage or un-stage files by clicking on them here).
Write a commit message in the upper right Commit message box and click the
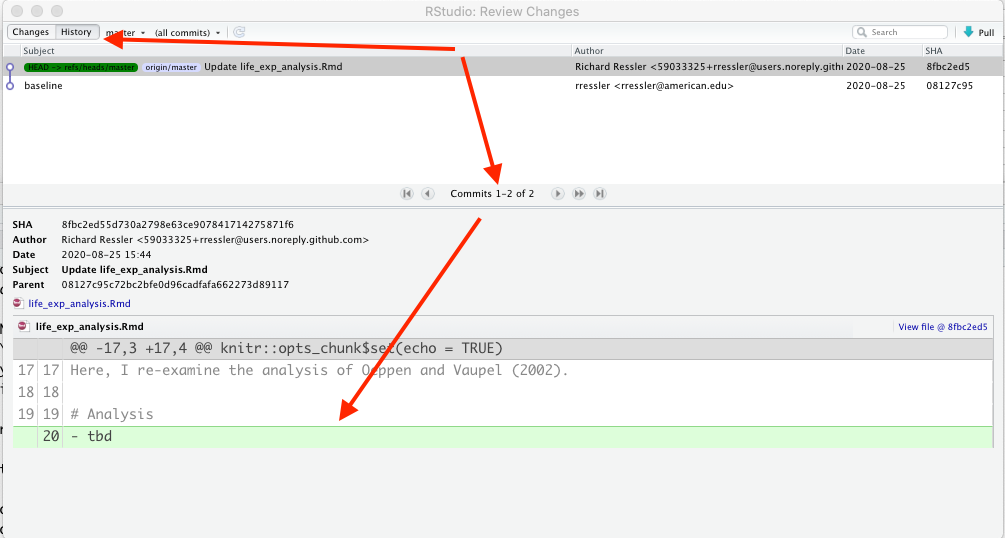
Commitbutton below the message.- You get a pop-up window with the results (from the terminal window).
- Notice the file has disappeared from the Git Pane file listing but shows up in the history.
If you use the ’Diff” pop-up window, you can select a line, a chunk or a file to Stage.
- You can use the separate buttons for each.
There is a Git status message in the
Gitpane that shows you are ahead oforigin/mainby one commit.Select the
Pushbutton at the top right (green up arrow) to push to GitHub.
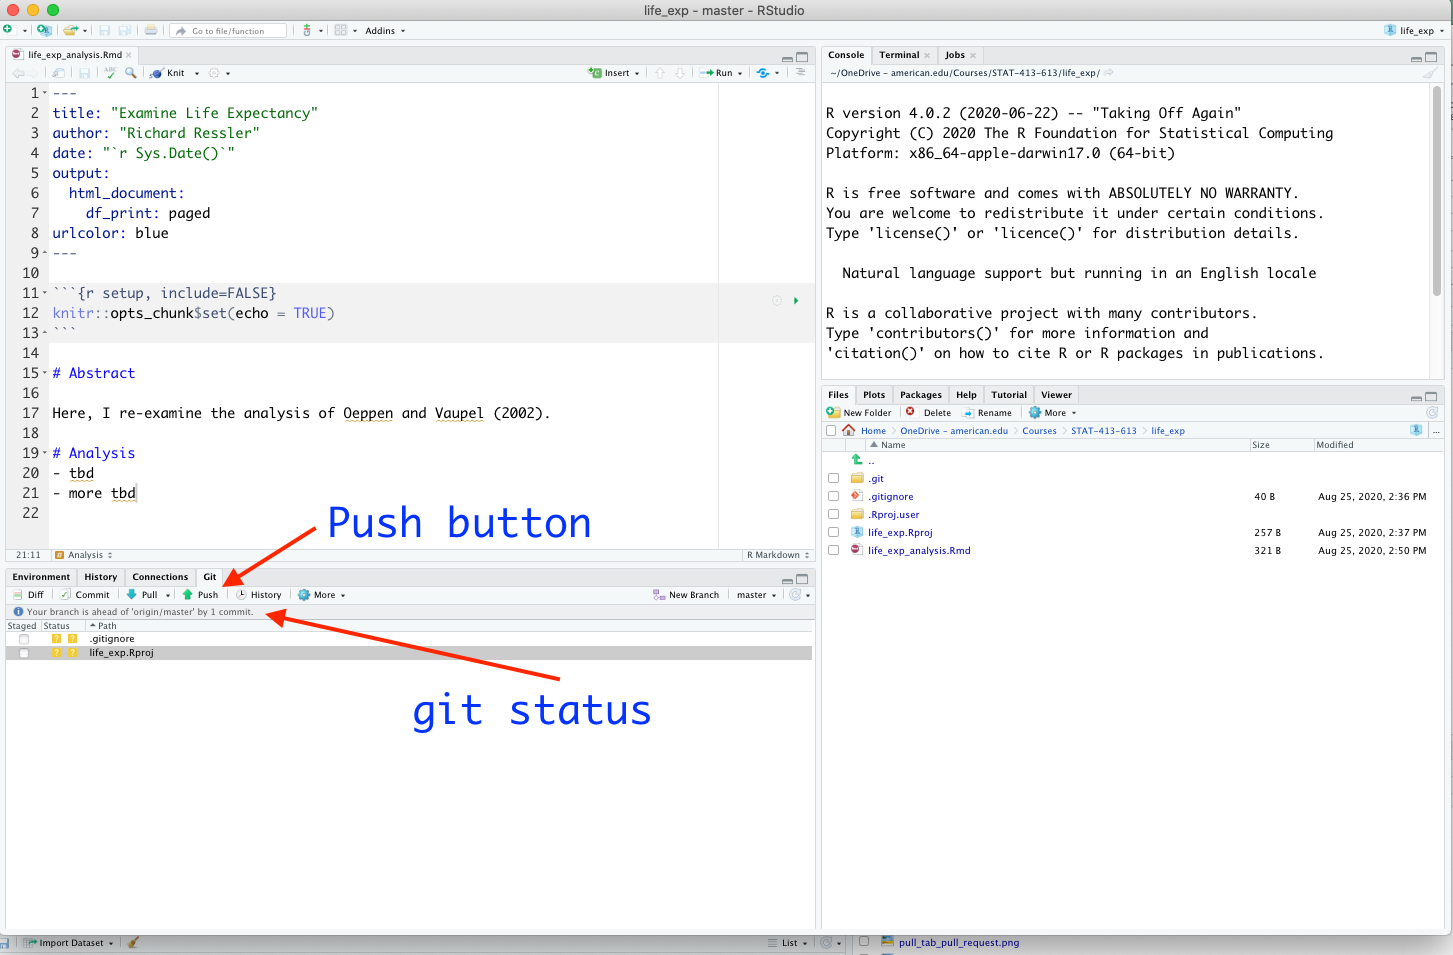
The status message is now gone.
You can go to GitHub to see your updated files.
There are other options in RStudio Git Pane that we will discuss in a later lecture on branching and collaboration workflow.
The combination of RStudio Projects with a dedicated pane for Git and GitHub makes for a convenient workflow for using Git and GitHub to manage your code.
2.9 Git and GitHub in Positron
Positron has built-in Git Version Control via the Source Control view, and it is designed around opening a folder/workspace (rather than an “RStudio Project”).
2.9.1 Positron User Interface Layout
When working in Positron, the default layout may look like Figure 2.2.
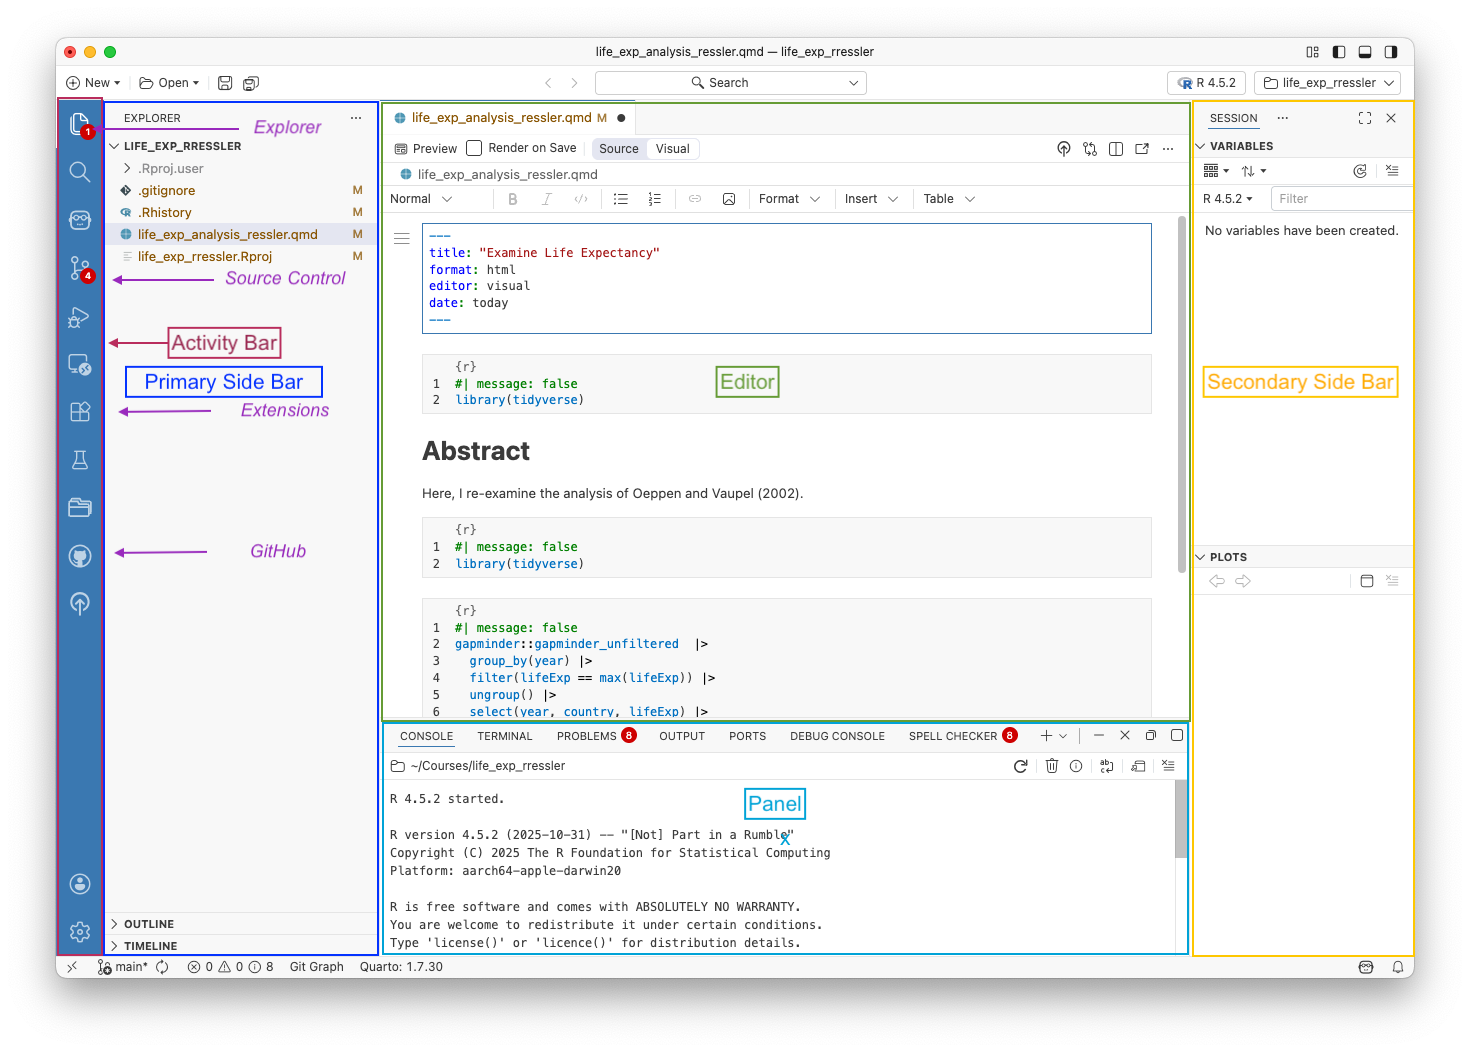
Main elements in the Positron Layout include:
- The Activity Bar is on the left It has icons to open different “views” in the Primary Side Bar. The views include:
- Explorer: for working with files and folders in the workspace, similar to the RStudio Files pane.
- Source Control: for managing core Git workflows such as staging files, committing changes, and syncing with GitHub.
- Extensions: to browse, install, and manage Positron and VS Code extensions. There are many possibilities.
- GitHub: for GitHub-specific workflows beyond basic Git, such as working with pull requests, issues, and code reviews.
- The Center (top) is for the Editor which appears when you open one or more files.
- The Center (bottom) contains the Panel which can host multiple tools, including interactive consoles (e.g., R, Python), terminals, background tasks and other runtime output. This is somewhat similar to the Console pane in RStudio.
- On the right is the Secondary Side Bar which provides information about the workspace. This includes:
- The Session information on top which covers the active environment similarly to the Environment pane in RStudio, and
- The Plot pane on the bottom for viewing plots similar to the Viewer Tab in RStudio.
In practice:
- In Positron, a folder/workspace is the unit of work (analogous to “one repo at a time”). You typically open the root folder of your repository.
- Positron can open an existing local repo, initialize Git in a folder, or clone from a remote (e.g., GitHub) directly from the UI.
2.9.2 Cloning a Repo from GitHub
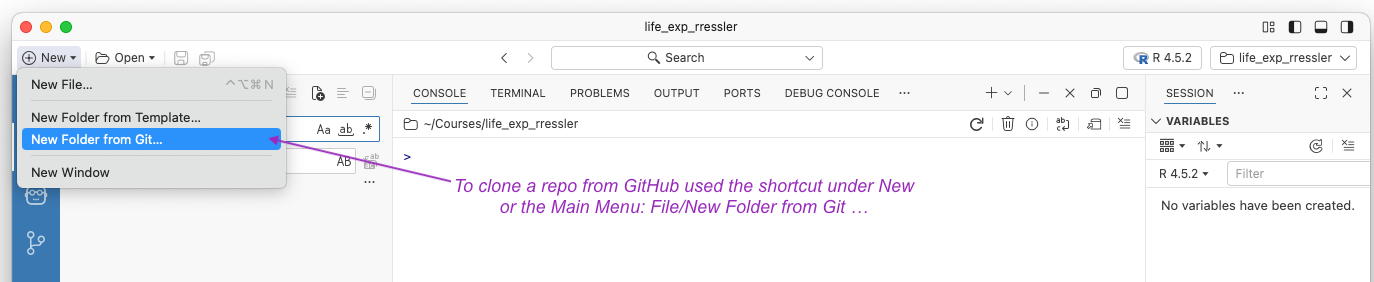
If there is a repo on GitHub that you want to clone, you can clone it from within Positron.
- Use the main menu to select
File/New Folder from Git ...or the short cut as shown in Figure 2.3.
- This will open a popup window as seen in Figure 2.4
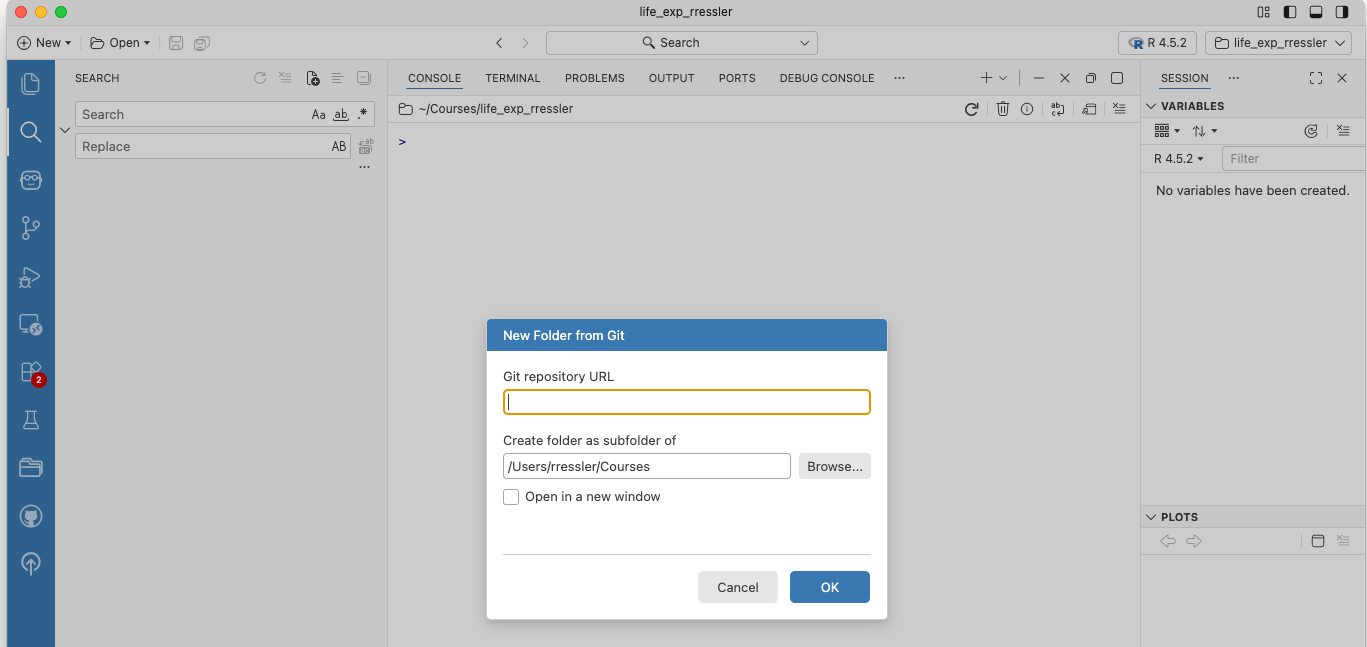
- Paste in the URL of the Repo from GitHub
- Browse to get to the folder where you want to place the repo, e.g., homework.
- Select Open in a new window.
- Select OK
Positron will clone the repo and open a new window with the workspace already open.
Positron will not nest a repo inside another repo as that is non-standard practice.
- It will check the directory you entered into Figure 2.4 before cloning the repo.
- If the directory is already within an existing repo (it or a parent has a .git folder), it will not clone the repo and require you to select a new directory.
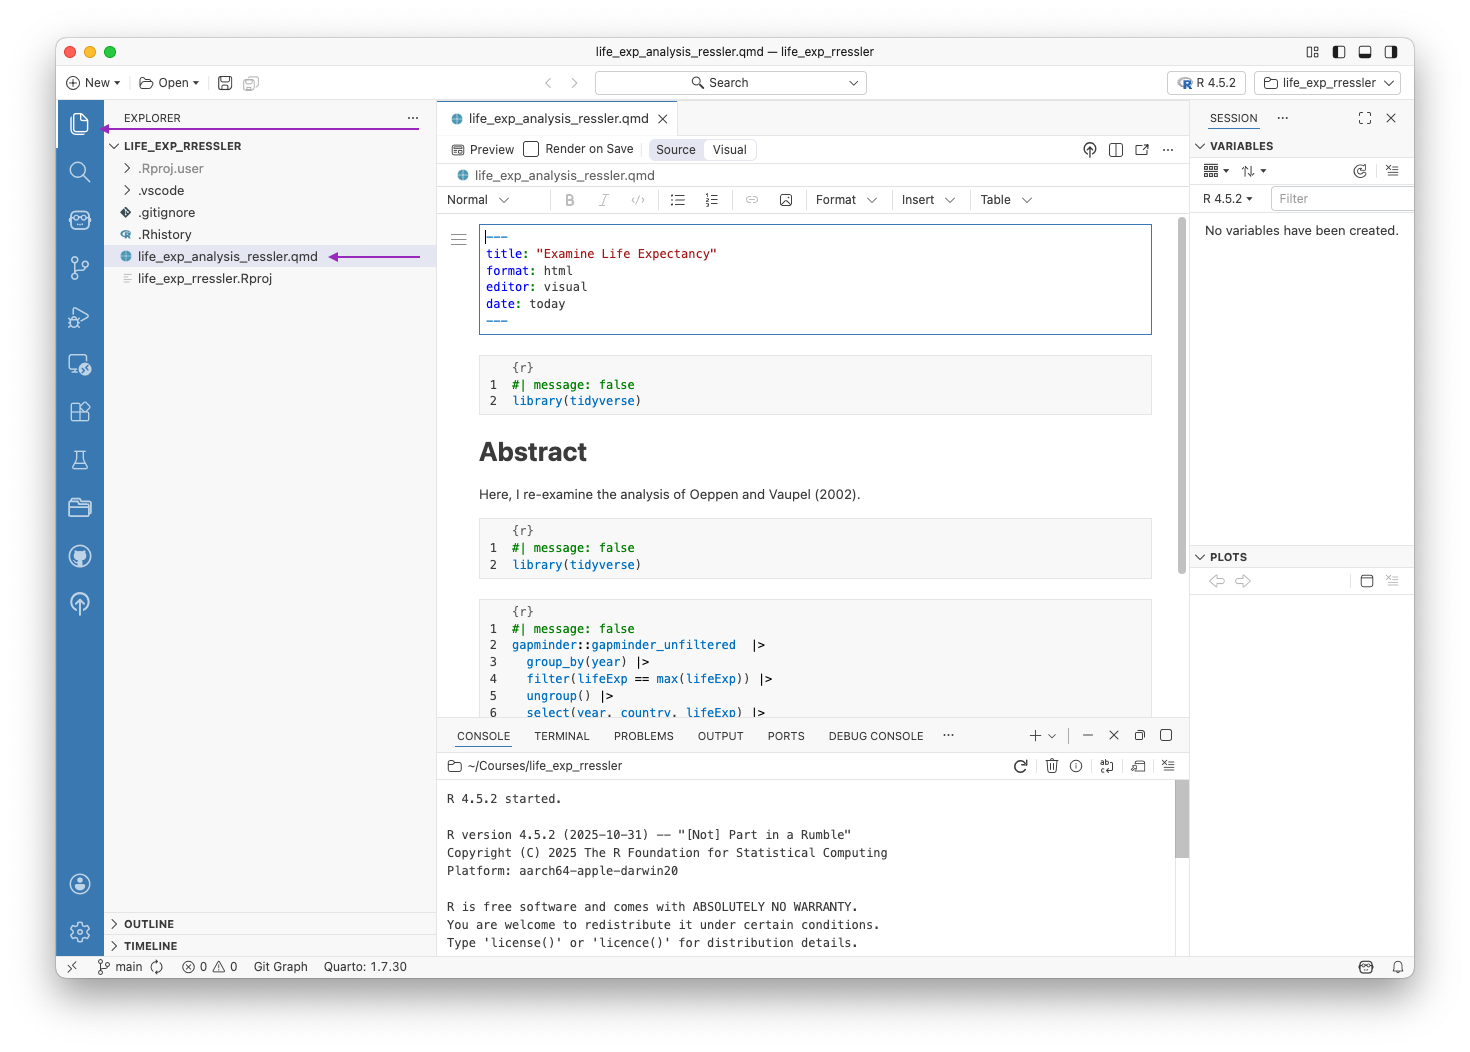
2.9.3 Opening an Existing Repository
In Positron, a folder/workspace is consider the “unit of work” to open a repo, so you should always open the root folder of your repository.
Select the Explorer Icon in the Activity Bar. It will show an “Open Folder” option (or, if you are on a welcome screen, you can also see an “Open Folder” icon).
- Navigate to the root folder of the repo of interest (in this case your Life Expectancy repo) and select it.
- Positron will open the directory tree in the primary side bar on the left.
- Find the file of interest (in this case your life-exp.qmd) and click it to open it in the editor.
- You should get a view similar to Figure 2.5.
2.9.4 The Source Control View
The Source Control view is where you do routine Git operations on established repositories:
- See which files have changed
- Stage selected files
- Commit with a message
- Push/pull/sync with the remote repository (GitHub)
To access the view, select the Source Control icon in the activity bar as in Figure 2.6.
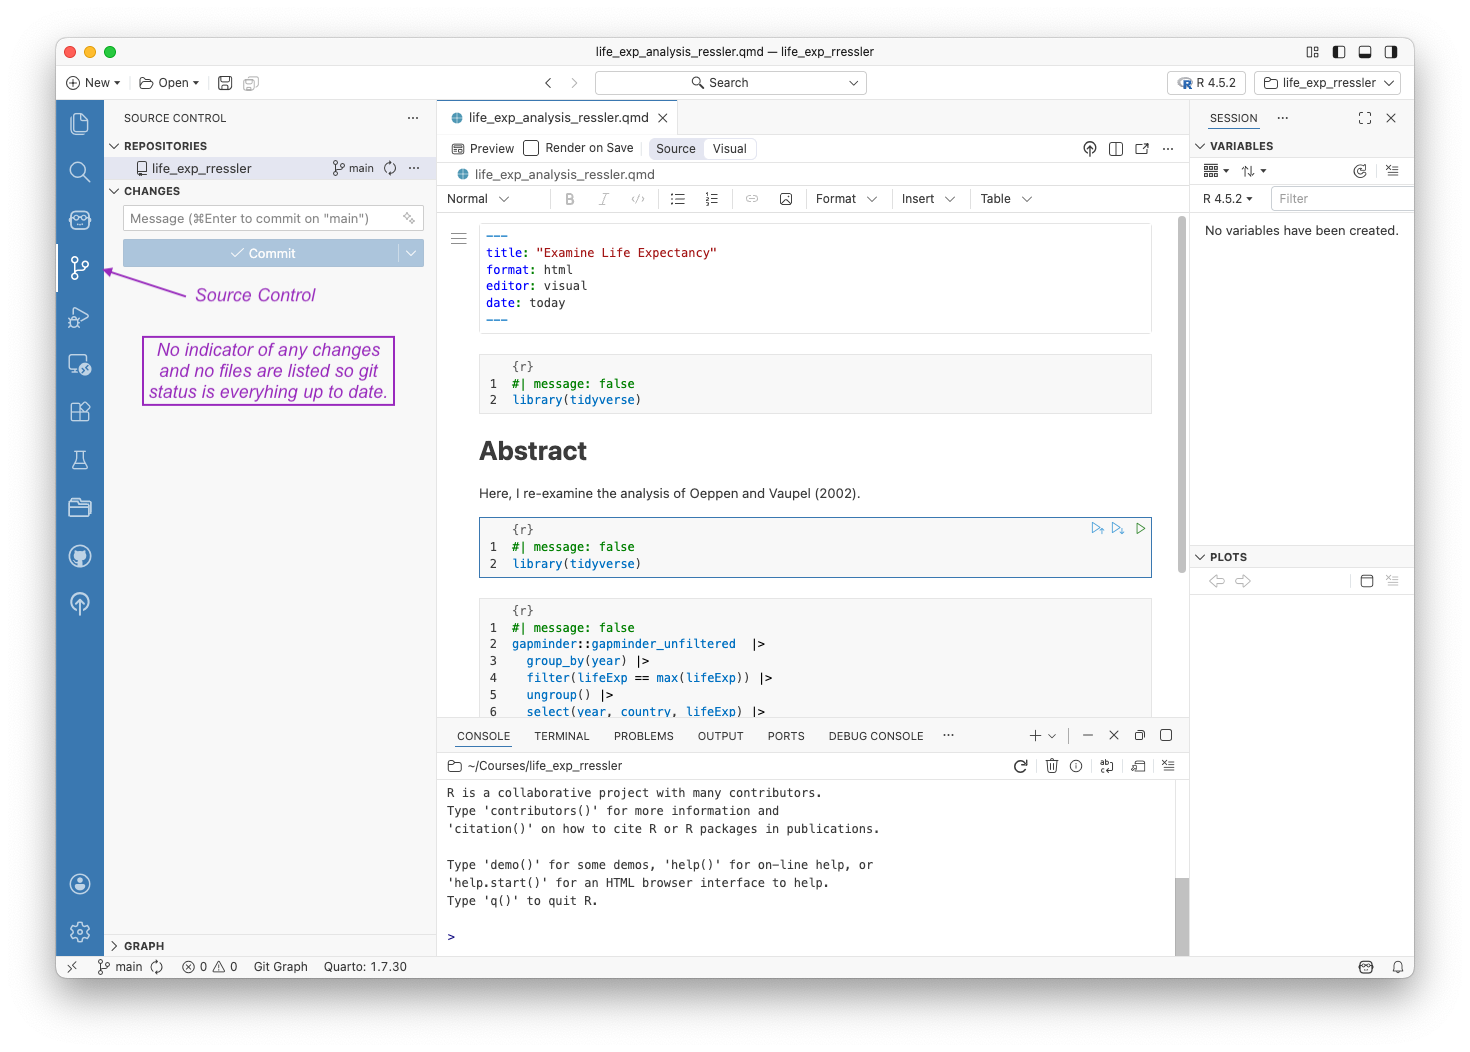
Figure 2.6 shows no known changes to any files as nothing is listed under the changes section.
- This is the git status of “Your branch is up to date with ‘origin/main’.”
If Git is not installed or not detected, Positron will provide guidance in the Source Control view.
2.9.5 The Git Stage, Commit, and Push Workflow
Since the file is open in the editor, make a small change, and save it.
- Here I added a plot and ran the code so I can see the plot in the plot pane.
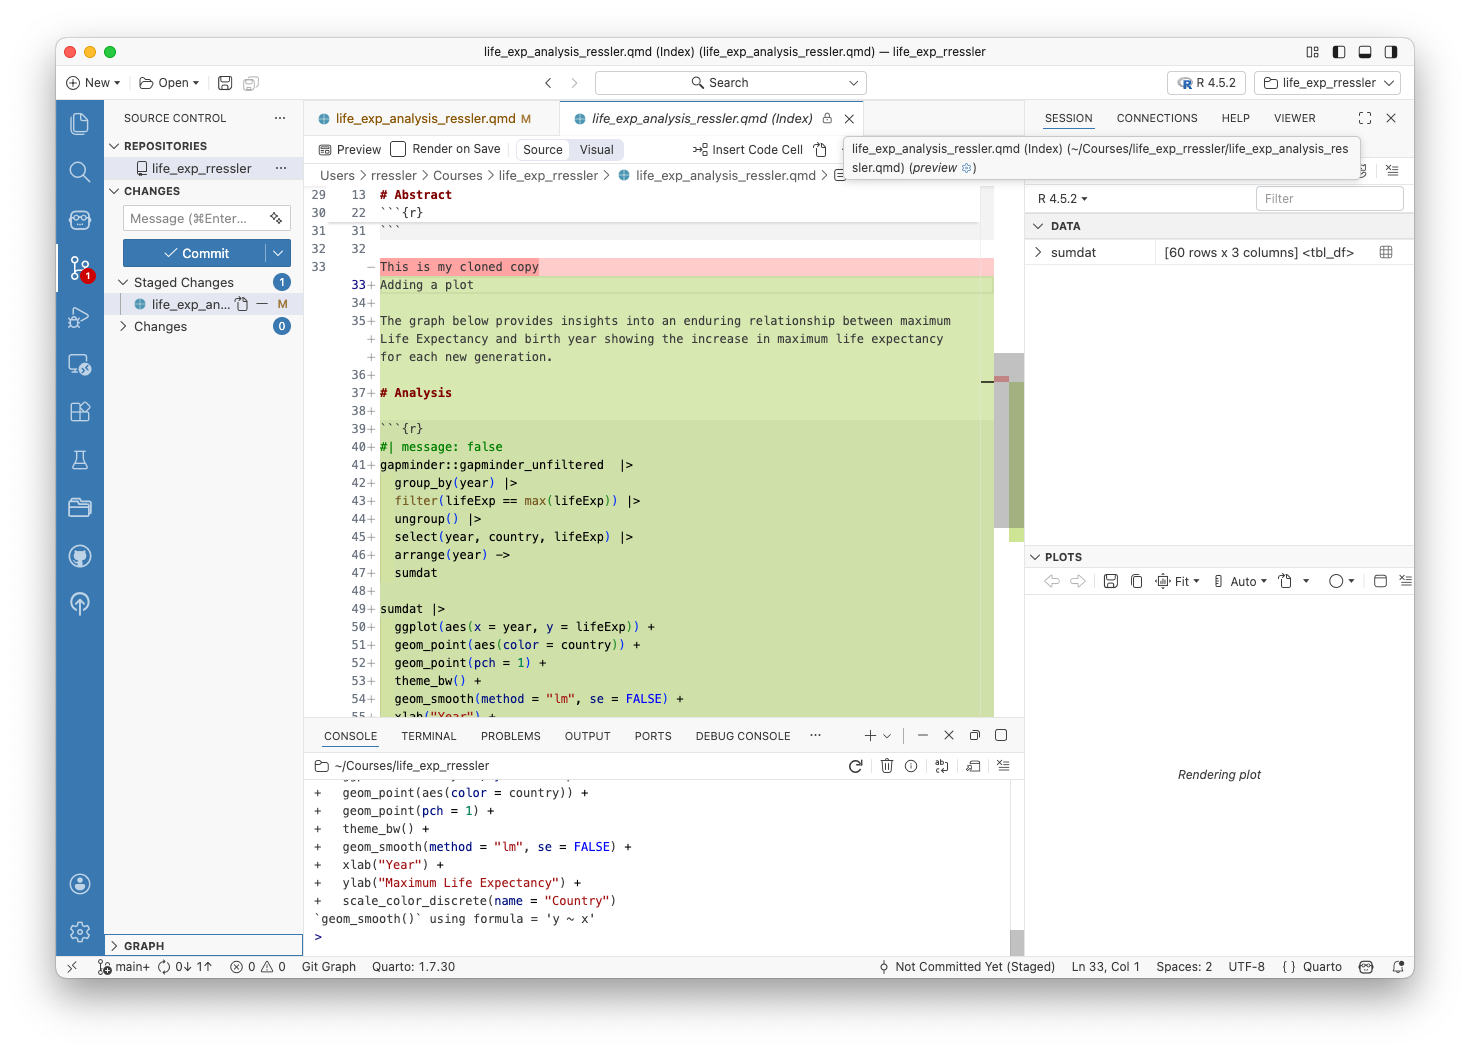
Select the Source Control view and it should now show the file name under changes with the “M” for modified status as in Figure 2.7.
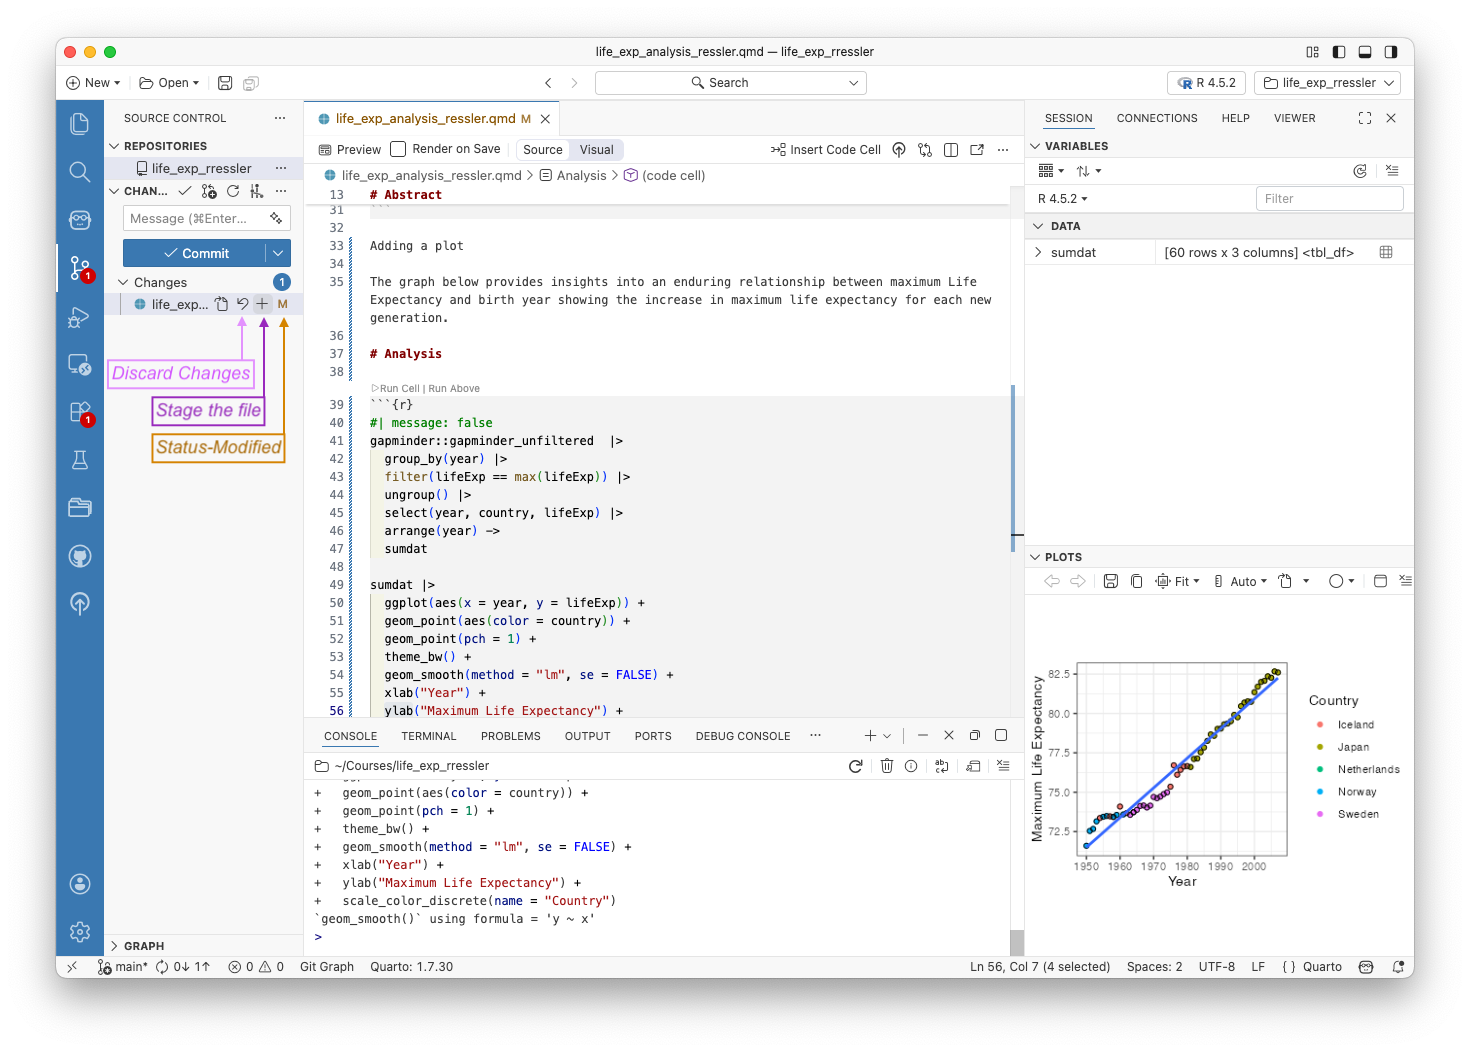
- If you hover the mouse pointer over the file name, you will see the popup options to discard changes and stage the file.
Other status symbols align with the Git model and include:
- A — Added: for a new file that has been staged to be included in the next commit.
- U/?? — Un-tracked: for a file that exists in the folder but is not tracked by Git.
- D — Deleted: for a file that was removed from the working directory. The deletion will be recorded in the next commit once staged.
- R — Renamed: Git has detected that a file was renamed.
- C — Copied: Git detected a file was copied from another tracked file.
- ! — Ignored: The file matches a rule in .gitignore so is intentionally excluded from version control.
2.9.5.1 Stage a File
Click on the “+” to stage the file - equivalent to git add filename.
- You should now see the file name under “Staged Changes” as in Figure 2.8.
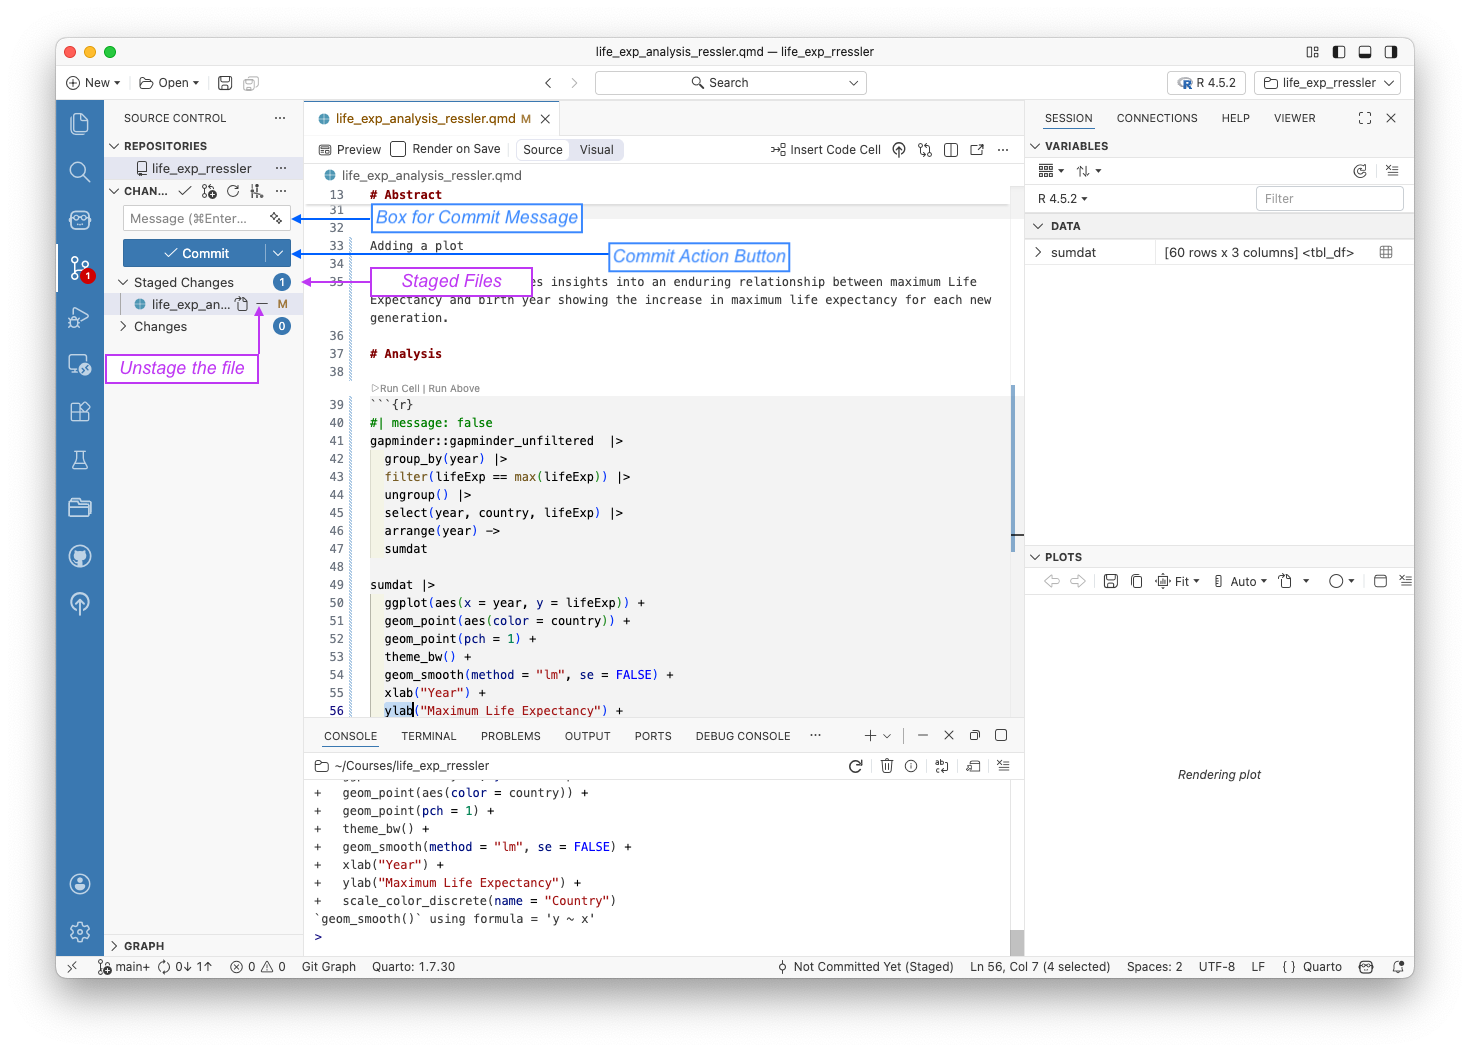
- There is also the “-” popup to allow you to un-stage the file.
If you click on the file name, Positron opens up the diff file in the editor as in Figure 2.9.
- Note you can see the “-” signs and “+” signs on the left of the lines of code showing the deleted and added lines.
- Recommended reviewing diffs before you commit to catch accidental edits.
2.9.5.2 Commit a Staged File
Enter a concise commit message describing what changed into the box as in Figure 2.8 and click on the commit action button.
Positron will complete the commit and your screen should now look like Figure 2.10
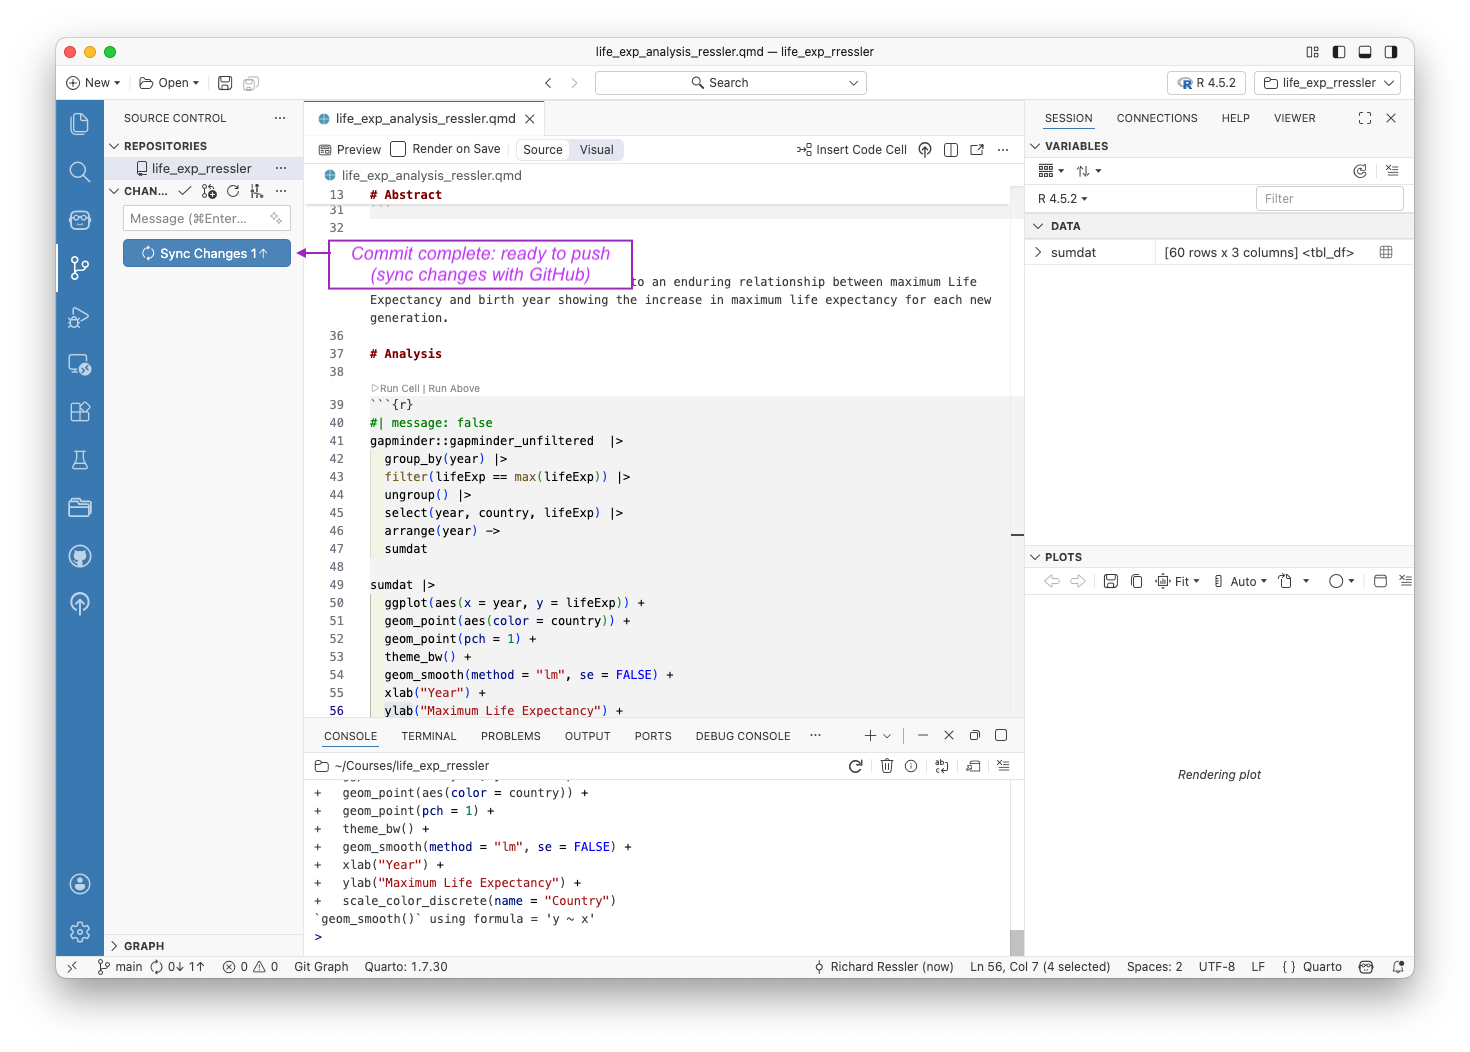
2.9.5.3 Push/Sync:
Click on the “Sync Changes” action button in Figure 2.10 to Push commits to GitHub or Sync to push and pull as appropriate.
Once complete, your screen should look like Figure 2.6 but with your new changes in the file.
If you hover the mouse over CHANGES, you can click on the View Git Graph (git log) icon and the log file of git commit history will open in the editor along with a simple graph of the history across branches (later in the course).
2.9.6 Summary
The combination of opening each repo as its own folder/workspace, and using the Source Control view for routine Git actions creates a convenient, repeatable workflow for using Git and GitHub to manage your code in Positron.
2.10 Manage Class Materials and Homework Assignments Using Git and GitHub
- We have a private organization in GitHub with a name based on the semester, something like 26S-DATA-x13-03.
- All class materials and assignments for this course will be online or provided via GitHub or Canvas.
2.10.1 Class Materials
- Class Lecture notes are online at https://rressler.quarto.pub/data-413-613/.
- If you want to point out any errors or suggest corrections, please email the instructor.
2.10.2 Homework and Group Project Assignments
2.10.2.1 Accepting Assignments
Homework and Project Assignments will be provided on GitHub via a link posted in Canvas.
- Each individual homework assignment will be its own repo.
- You will see a link in the Canvas assignment. Click on the link to accept the assignment.
- This will create the repo in GitHub.
- Clone the assignment under your computer’s
homeworkdirectory.- You do not need to create a new directory for it as it will create its own directory.
- Cloning will create a new folder with any necessary sub-folders for analysis and data in your assignment.
- Your repo will be a fork of the baseline homework repo (which you can’t see) and not a copy.
- This means that in the event the instructor updates the baseline rep for an assignment, e.g., correct an error, you can use a
git pullto get the update.
- This means that in the event the instructor updates the baseline rep for an assignment, e.g., correct an error, you can use a
2.10.2.2 Submitting Homework
All completed assignments should be submitted via pushing the final repo with .qmd and rendered HTML files and any data to GitHub.
- Submit a comment on Canvas when completed so it is clear the assignment is ready for grading.
- Save, stage, commit after each part of a question is completed and push after each major question is completed.
- You may also submit pull requests to the instructor while you are working on them to submit questions.
- GitHub tracks all commits and pushes so the instructor can see the how you progress on individual assignments
- The instructor can also see all the commits and pushes on Group projects to include scope and authors.
You may get feedback on GitHub but all grades will be recorded in Canvas.
2.10.2.3 Exercise
- There is a link to a
hw00_student_infoin the Canvas. - Accept the link.
- Navigate to your
Homeworkdirectory in your terminal window - Clone the assignment repo.
- You should see an
analysisfolder and adatafolder with an excel file with possible data sources in it.
- You should see an
- Edit the .qmd file to change the name in the header.
- Save, Stage(add), Commit, and push back to GitHub.
2.11 Summary
2.11.1 Best Practices
Do not nest repos or R projects. Always check with git status before creating a new repo.
The best way to learn Git and GitHub is to use it over and over and over so you build “muscle memory” into your workflow.
- Use the
git add -uto reduce typing when you are just updating the same set of files. - Commit frequently with meaningful messages.
- On the homework, commit after you complete each part of a question.
Keep your local and remote (GitHub) files in sync to minimize merge conflicts.
- Do not edit files on GitHub.
When collaborating, communicate who is working on what. Use Issues and Pull Requests for each issue and solve one issue at a time as separate workflows.
Usually, you should only commit plain text files such as .Rmd. .qmd, or HTML and any images or data.
- You can commit R-generated PDFs or .docx but they are easy to reproduce and clog up your repo storage.
- Git is actually tracking changes in each line in the files, not the whole files themselves. This is very efficient for plain text files.
- However, for non-plain text (binary) files like PDFs and .docx, the whole file is changed when you change a single line, so Git ends up saving the whole file each each time you change it.
Do Not Push or Upload sensitive data or information to GitHub. This could include personal identifying information, passwords, SSH private keys, etc..
Git and GitHub have extensive help but there are also many references and stackoverflow or other posts about issues so feel free to research any issues or ask your instructor/TA for help.
2.11.2 Parting Wisdom from XKCD
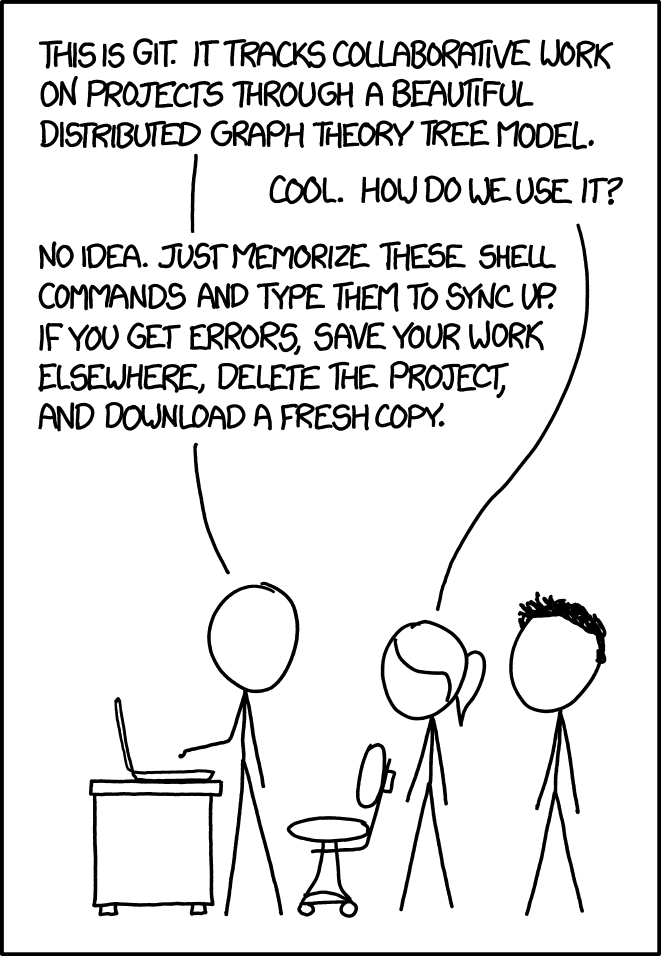
graphic from Mark Lodato↩︎