9 Branching and GithHub Team Workflow
Git, git branch, GitHub, clone, fork, pull request
9.1 Introduction
9.1.1 Learning Outcomes
- Explain the core elements of the Git branching model.
- Use Branching in Git to evolve your code without risking the production baseline.
- Create new branches, update files, push to GitHub, and merge updates to main.
- Apply both Fork and Pull and Shared Repository models for Team workflow.
- Use Pull Requests and Merge commands for coordinated development.
- Resolve Merge Conflicts.
- Select and apply a GitHub workflow model to a group project.
9.1.2 References:
- GitHub Flow (GitHub 2023b)
- Git Help (Git 2023)
- Collaborating with Pull Requests GitHub (2023a)
- Git and GitHub from the Terminal and RStudio (Lucet 2023)
9.1.2.1 Other References
9.2 Branching in Git and GitHub
9.2.1 Motivation
You have been using an individual workflow model for Git and GitHub for version control of your own work.
You have been building competency in …
- Creating repositories with a “main” branch.
- Editing the text and code in the files in the repo.
- Executing the save, add (stage), and commit workflow to create a git commit history.
- Pushing committed changes to GitHub for cloud-based replication and sharing.
Every push has updated main as the baseline on GitHub, even if the new version is still a work in progress.
An individual workflow has been fine so far as you are the only one using your code in a step-by-step approach on small projects.
However, the individual workflow model can lead to challenges when you are working on larger projects, others are using your code, or others are working on the same set of code.
- If you are working on a large project, you often want to maintain a working baseline while you experiment with different approaches while ensuring you are not breaking the current working code. A main-only approach does not support that goal.
- If you deploy a model so people are using your code, every commit means overwriting the baseline in main, even if the updated version no longer works. That could make for unhappy users!
- If you are part of a team, where your code has to work with other developers’ code, two people could update the same text or code or different parts of the same document.
- Without care, whichever version gets pushed last could overwrite the other person’s work or create a “merge conflict” which keeps the baseline from updating.
To mitigate the risks of an individual workflow model, most large projects and group efforts use a team workflow model.
9.2.2 A Development, Test, and Deployment Framework
Many data science solutions are deployed for continuous use by others. These include reporting models, optimization models, machine learning models, shiny applications, web sites, you name it.
- If other people are using your deployed solution you want to make sure it always works. However, you usually also want to be able to update the solution as new requirements appear or, worse, portions of your code no longer work as packages change and functions get deprecated.
The software development community has a framework for managing the tension and risks between ensuring a continuously working version for users while also being able to update the version. No one wants to update an airplane while it is in flight.
- A simple form of the framework has a version (or baseline) of code in one of three stages: Development, Testing, or, Production or, in shorthand, “Dev-Test-Prod” as in Figure 9.1.
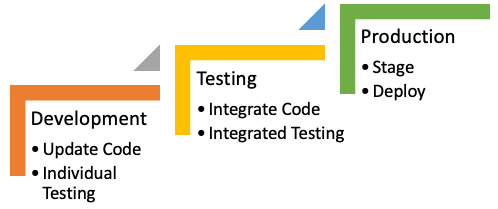
- Development is the stage where the developers do all their updates to their section or module of code, be it fixes or new features.
- They also do their own testing to make sure their code is working.
- Once each developer has their code working, they promote it to the testing stage.
- Testing is where the testing team checks if the entire set of code works together.
- They merge the working code from multiple developers into an integrated version.
- They test if previous functionality still works (“regression testing”) and then test if the bug fixes or new features actually work.
- Testing should occur in the exact same software/hardware environment used by the production version.
- Once the integrated version passes integrated testing, it is promoted to the production stage.
- Production is where the deployment team replaces the current release with the version promoted by the testing team.
- The new baseline is deployed as the working version (hopefully in a way to minimize disruption to the users).
There are many variations on this framework but the concept of separating the development baseline from testing baseline from the production baseline is a well-established “best practice.”
Git and GitHub use branching to enable new development without disturbing the production baseline until the new version is ready.
9.2.3 How Git Works Behind the Scenes
Before we work with branching, it is useful to review what Git is doing internally. Many common Git errors and confusing behaviors become clear once you understand four core objects:
- Commits
- Branches
- HEAD
- The Working Directory
9.2.3.1 Commits and the Commit Graph
Each commit is a complete snapshot of the project at that moment.
A commit stores:
- A snapshot of the entire file tree,
- A pointer to its parent commit(s) (the earlier snapshot from which the current commit was created).
- Metadata (author, timestamp, message).
Git stores your commits (the project history) as a data structure known as a directed acyclic graph (DAG) of commits.
Example of three commits:
A---B---C- Each letter represents a commit (a full snapshot).
- Because each commit points (directs) to its parent(s), Git can traverse history backward and reconstruct ancestry relationships.
9.2.3.2 What Happens on the First Commit?
Suppose your repository contains analysis.qmd and data.csv and you added and then committed the files with git commit -m "Initial commit".
Internally, Git creates a snapshot composed of:
- Blob objects: one blob for analysis.qmd and one blob for data.csv where each blob stores the file’s contents.
- Each blob is identified by a hash of its contents.
- A tree object that stores the file names and which blob belongs to each file
- It represents the full directory tree structure.
- A commit object that points to that tree and stores metadata (author, time, message)
- This commit has no parent (because this is the first commit)
Commit A
   ↓
 Tree A
   ↓
 Blobs (analysis.qmd, data.csv)
Git can use the snapshot to rapidly create the state of the project at that commit.
9.2.3.3 What Happens on the Second Commit?
Now suppose you edit only analysis.qmd and commit again. Git does not copy everything again. Instead:
- It creates a new blob for the changed version of analysis.qmd.
- It reuses the existing blob for data.csv (which is unchanged).
- It creates a new tree object reflecting the updated directory structure and blobs.
- It creates a new commit object that points to the new tree and points back to the previous commit as its parent
Conceptually:
Commit B
   ↓
 Tree B
   ↓
 Blob (new analysis.qmd)
 Blob (same data.csv blob as before)

Commit B parent → Commit A
Key Insight: Each commit represents a complete snapshot of the project.
Git is efficient because:
- Unchanged blobs are reused.
- Only changed files get new blobs.
- Each commit has its own tree object pointing to the latest versions of the blobs.
- The commit’s tree determines the full project structure for that commit.
9.2.3.4 Third and Later Commits
Each new commit repeats the same pattern:
- New blobs only for files that changed
- New tree object reflecting the updated directory structure and most current blobs.
- New commit object pointing to its tree and its parent commit
This forms a chain:
Commit A → Commit B → Commit CEach commit stores a full snapshot via its tree object, but internally Git shares unchanged file content via the blobs.
Thus, to create the files for any commit, Git does not replay changes from the beginning; it reconstructs the working directory directly from the tree object stored in that commit.
- This allows it to be very fast while maintaining a complete history.
9.2.3.5 Visualizing the Commit Graph
To see the commit graph and branch pointers directly in the terminal, use:
git log --oneline --graph --decorate --allHere is what each option does:
- –oneline: Shows a compact view (short commit id + message).
- –graph: Draws an ASCII visualization of the commit graph.
- –decorate: Displays branch names and HEAD next to the commits they reference.
- –all: Shows all branches, not just the current one.
Example output
* e3f1a2d (HEAD -> feature, origin/feature) Add new analysis
* 91b4c7a Update model
| * 4a12b8c (main, origin/main) Fix typo
|/
* 2f3d9e1 Initial commit
This visualization shows:
- Each * is a commit.
- The lines represent the parent relationships (the DAG).
- Branch names are labels attached to specific commits.
- HEAD -> feature tells you which branch you are currently on.
If Git ever feels confusing, run git log --oneline --graph --decorate --all and locate:
- Where HEAD is
- Where main is
- Where your feature branch is
The graph will tell you exactly what state your repository is in.
When you commit a file, Git does not store it under its filename. Instead, Git:
- Takes the entire contents of the file
- Applies a cryptographic hash function
- Uses the resulting hash value as the file’s unique identifier
- Stores the file contents under that identifier
- That stored object is called a blob.
- That hash becomes:
- The blob’s identifier
- The filename inside the
.git/objectsdirectory. - The permanent reference to that file content
If even one character changes, the hash changes completely and the blob gets a new identity.
- This ensures files cannot be silently corrupted and history cannot be altered without changing hashes, as every commit is cryptographically tied to its contents.
The tree object does not store file contents, it stores a filename and a blob hash.
analysis.qmd → e59ff97941044f85df5297e1c302d260
data.csv     → a47bc2398123...
Then the commit object stores a pointer to the tree hash, the parent commit hash, and metadata.
- Inside the repository
.git/objects/ab/cdef1234...Git splits the hash into folders to avoid having lots of files in any one folder:- First 2 characters = directory
- Remaining characters = filename
This hashing model gives Git de-duplication, integrity verification, efficient storage, immutable history, and fast branching
This model is also why rewriting history is complex; any change to a file changes its hash, which changes the tree hash, which changes the commit hash, which cascades forward.
The parent link in a commit puts the commit as a link in the chain of history and the tree defines the state of the repo for that commit.
It’s a simple Mental Model
- First commit: Create blobs, Create tree, and Create commit (no parent)
- Later commits: Create new blobs only for changed files, Create a New tree and Create a New commit (with parent pointer)
- That’s it.
9.2.3.6 Branches Are Just Pointers to a Commit
A branch is not a folder or a copy of files. A branch is simply a movable pointer to a commit.
Example:
A---B---C (main)If you create a new branch with git branch new_branch_name, then you have
A---B---C (main, new_branch_name)Both branch names point to the same commit as nothing has changed in either baseline.
- No files are copied.
- No new commit is created.
When you switch to the new branch and make a new commit on new_branch_name, then it looks like:
A---B---C
         \
D (new_branch_name)- The
new_branch_namepointer moves forward. - The
mainpointer remains atC. - Branches move but Commits do not.
9.2.3.7 What is the HEAD Pointer?
You may have seen statements about the position of the HEAD in a message from Git.
HEAD is a special pointer that tells Git:
“This is what you are currently working on.”
When on main, the normal state is the HEAD points to main:
HEAD → main → CWhen you make a new commit:
- A new snapshot is created.
- The current branch pointer moves forward.
HEADmoves with it as it is pointing to main.
9.2.3.8 The Working Directory
The working directory is the current on-disk representation of your project files that Git updates to match the snapshot stored in the commit that HEAD references.
It also contains any uncommitted files.
In short:
- The folders themselves are physical.
- Their contents represent the tree of the active commit and any uncommitted files.
- They are not permanently tied to main; they reflect whichever branch HEAD points to.
If you switch from main to branch “feature”, Git rewrites the content of the working directory to match the latest commit in feature, plus any uncommitted files, even though the folder location on disk stays the same.
The working directory is physically real (it is your actual folder on disk), but its contents are not independent of Git.
- It is what your operating system file manager sees and works with.
— Git rewrites that directory whenever you switch branches or commits so the working directory reflects the tree of the currently checked-out commit.
- If you are working on a branch and quit RStudio. Your disk will contain the files as of the last commit and any uncommitted files
Because each commit stores a complete snapshot, switching to a branch means loading a different tree based on the most recent commit for that branch.
When you switch branches or commits:
- Git reads the snapshot stored in that commit.
- Git does not replay the entire history.
- Git simply rewrites your working directory to match that snapshot exactly.
9.2.3.9 Conceptual Summary
Behind the scenes:
- The commit graph is the full history of the project.
- A branch is a pointer to a commit.
HEADtells Git which branch (or commit) you are currently using.- Switching branches moves
HEADand rewrites the files in the working directory. - Commits create new snapshots.
- Branches move; commits do not.
Understanding these mechanics makes branching, merging, fast-forward behavior, and detached HEAD states logically predictable rather than mysterious.
9.2.4 Branching in Git and GitHub
Git can create and synchronize multiple branches within a repository.
- A branch is not a separate copy of your files.
- A branch is a movable pointer to a specific commit in the repository’s history.
At any moment:
- The repository contains a directed acyclic graph (DAG) of commits.
- Each branch name simply points to one commit in that graph.
- The commit a branch points to represents the latest snapshot of the files on that branch.
Branching allows you to:
- Develop new features without disturbing a stable baseline.
- Test changes before integrating them into main.
- Work on multiple features in parallel.
- Reduce risk to deployed or production code.
Branching aligns naturally with Dev–Test–Prod workflows and team collaboration.
GitHub supports two common team workflow models:
- Fork and Pull Model
- Shared Repository Model
Choosing a workflow model enables consistent, parallel development while minimizing risk to the working baseline in main.
9.2.5 Creating a New Branch
Every repo has at least one branch, typically called main.
- main is considered sacrosanct as it represents the baseline or production-ready version of your code.
- It is assumed to be stable and working.
9.2.5.1 What is a Git Branch
A Git repository is a collection of snapshots (commits) of your files over time.
A branch is simply a pointer to one of the commits in the repository history
When you create a new branch, Git creates a new pointer to the current commit.
- No files are copied.
- No new snapshot is created until you commit.
Future commits made while on that branch will advance that branch pointer forward, creating a separate line of history without affecting main.
9.2.5.2 Open the life_exp Repo as our Exercise Repo
Navigate in the Terminal Pane to the directory/repo for the life_exp_analysis.qmd file you created earlier in the course.
- If you do not have a repo and file, create one as in Section 2.5 and create a new GitHub repo for it.
- Render the .qmd file to HTML.
- Go to your terminal window and navigate so the working directory is set to that directory and repo.
- We will use this repo for the rest of this section.
9.2.5.3 Before You Create a New Branch
- Enter
git pullto ensure main is up to date with the remote repository main.- You (or someone else in a group project) may have made changes to main from a different branch.
git pullrunsgit fetchfollowed bygit merge.- This ensures your local main reflects any changes pushed by others.
- If there are conflicts, you will have to resolve them and try again until you get a clean pull and your repo is consistent with GitHub main. (See Section 9.4.3.)
- Check for existing branches with
git branch -aso you know what branches exist and their names.- It may return something like:
* mainremotes/origin/main
- The
*in* mainmeans main is the current branch. remotes/origin/mainmeans GitHub has a branch called main that is tracking the local main.
- It may return something like:
9.2.5.4 Create a New Branch
- Create a new local branch with
git branch new_branch_name.- The new_branch_name should be short but descriptive of the contents of the branch.
- Local guidelines may ask you to connect the name to a code issue, a specification, or bug report ID.
For our example, call it testnameso use git branch testname.
- At this moment:
testnamepoints to the same commit as main.- No files are copied.
- The terminal working directory does not change.
- If you now run
git branch -a, you will get:
* main
  testname
remotes/origin/main- The
*remains on main because you have not switched branches yet.
When you create a branch, Git:
- Creates a new reference (pointer) to the current commit.
- Does not copy files.
- Does not create a new directory.
- Does not duplicate history.
Branches do not contain commits; commits exist independently in the graph.
Branches exist only as references inside Git’s internal metadata.
Your file manager shows the working directory.
When you switch branches, Git rewrites the working directory to match the snapshot stored in the commit that branch points to.
9.2.6 Switching Branches and Working within a Branch
Git 2.23, released on 16 August 2019, added two experimental commands: git switch and git restore to augment and simplify the use of git checkout so older posts may refer to git checkout instead of what you see below.
Go to the terminal window and enter git --version to check which version is on your computer. If it is before 2.23, then update.
- Go to git downloads to get the newest production version of Git.
- If using a Mac with Homebrew use
brew upgrade gitin the terminal. - You may need to update the RStudio Tools/Global Options for git to the new version to see the Git Pane.
To switch to working in a new branch:
- Make sure you have committed any changes in main so local main is up to date.
- RStudio may prompt you if open files differ between branches.
- Enter
git pullto ensure main is up to date with the remote repository main.
- Switch to any branch with
git switch branch_name, heregit switch testname.- Now:
- Your working directory is updated to match the snapshot at that commit.
- If this is a new branch, there should not be any changes.
- Any new commits you create in testname will move the testname pointer forward along the testname branch history.
- The main pointer remains unchanged - it stays where it was before you switched.
- Your working directory is updated to match the snapshot at that commit.
- If you now run
git branch -a, you should see:
- Now:
  main
* testname
remotes/origin/main`- Note the
*has moved totestnamewhich is now your “current working branch”.- If you have an open file that exists in the branch, it will switch to that version of the file.
- If you have an open file that does not exist in the new branch, RStudio will ask you to close it since the directory “no longer exists”.
- If your branch is not new, ensure your branch is up to date with main with
git merge main.- This will update your current branch with any code changes from the local main.
- If there are no changes it will tell you
Already up to date. - If you have an open file, it will update it with any changes from the Main file.
- If there are merge conflicts, you will have to resolve them so you get a clean merge (see Section 9.4.3).
- Update your analysis/code files as desired.
- Remember to save, add, and commit as usual.
- Only now your updates are going into snapshots for the branch.
- For the exercise, add some additional commentary on the graph and save the file - but don’t close it.
- For the exercise, delete the HTML file.
- Running
git statusmay show something like the following:
On branch testname
Changes not staged for commit:
(use "git add <file>..." to update what will be committed)
(use "git restore <file>..." to discard changes in working directory)
modified: 98_github_team_workflow/98a_github_team_workflow.RmdHistorically, Git used: git checkout branchname. However, checkout performed multiple unrelated tasks:
- Switching branches
- Restoring files
- Checking out specific commits
- Creating new branches
Since Git 2.23, Git introduced clearer commands:
git switchwhich is used for branch movement:git switch main git switch -c newbranch
git restorewhich is used for restoring files.
git checkout still works and appears in older tutorials and error messages, but git switch is the modern best practice for branch operations.
9.2.6.1 What Happens When You Switch Branches?
When you run git switch new_branch_name, Git:
- Moves
HEADto point tonew_branch_name. - Reads the commit that
new_branch_namepoints to. - Rewrites your working directory to match that snapshot.
Switching branches rewrites the files in your project folder to match that commit plus any uncommitted files.
9.2.6.2 What Happens If You Switch to a Previous Commit
One of the strengths of Git is you can access any commit in the history at any time. You may want to:
- Inspect earlier versions of code.
- Identify when a bug was introduced.
- Reproduce past results.
- Recover deleted files.
If you switch to a specific commit, e.g, git switch --detach a1b2c3d, the head is “detached” from a branch and points to the commit.
HEAD → a1b2c3dThis is a detached HEAD as you are not on a branch.
- Detached HEAD is not an error. It simply means:
- You are viewing a historical snapshot.
- No branch pointer will move if you create commits.
As an example, to restore a deleted file without staying detached:
git restore --source=<commit> path/to/file
git add path/to/file
git commit -m "Restore file from earlier commit"
Generally you should not create commits on a detached head as they are not on a branch. However, if you create commits and want to keep them:
git switch -c recovery-branchWhen you are done working with the older commit, you want to get back to a branch, e.g., main.
git switch main9.2.6.3 Mental Model Diagrams: Commits, Branch Pointers, and the Git Working Directory
Given a repo with one branch (main) pointing to the latest commit
- Diagram
A---B---C (main)- Each letter (A, B, C) is a commit (a snapshot of the whole project).
- main is a pointer (a label) to commit C.
- Your working directory matches commit C because you’re on main.
When you create a new branch testname with git branch testname the diagram just adds the pointer for the new branch.
A---B---C (main, testname)- What changed?
- Git created a new pointer testname that points to the same commit as main.
- No files were copied.
- Your git working directory does not change because you did not switch branches.
Now when you switch to the branch and make commits
git switch testname
# edit files
git add -A
git commit -m "Work on testname"- The diagram shows the new branch commits
A---B---C   (main)
         \
D---E (testname)- What changed?
- New commits D and E were created only on testname.
- The testname pointer moved forward to E.
- main stayed pointing at C.
- New commits D and E were created only on testname.
9.2.6.4 Exercise Continued
- Add all (
git add -A) and commit with a comment. - Switch back and forth between
mainandtestnamebranches and observe the changes in the .qmd file and the RStudio Files pane. - Switch to the
testnamebranch and check withgit branch -a. - Now it’s time to upload the branch to your repo on GitHub.
9.2.7 Synching your Branch with GitHub
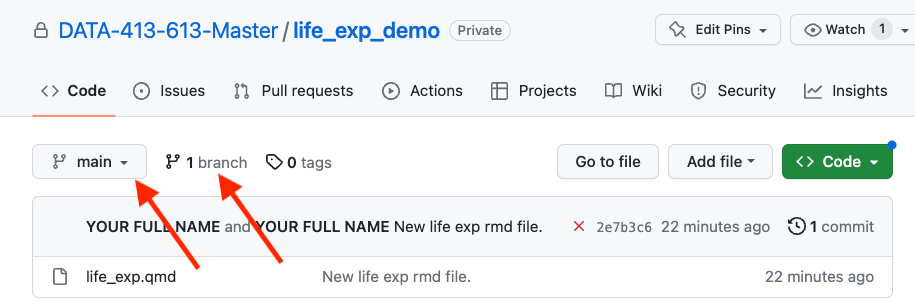
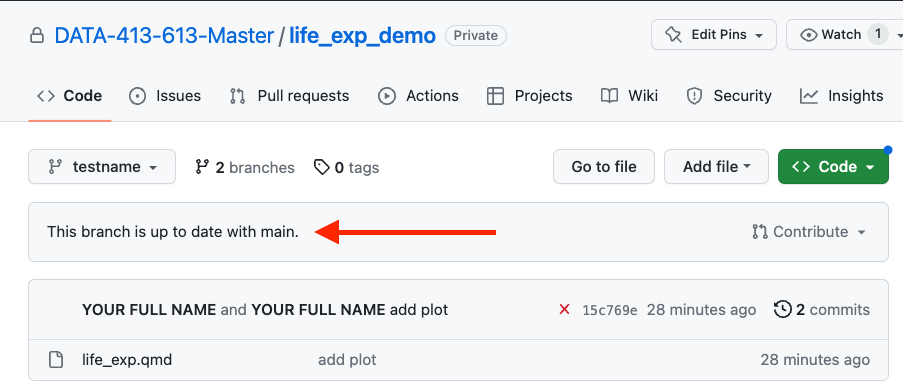
If you go to the remote repo in GitHub, it is on main and there is only 1 branch as in Figure 9.2.
- Create a remote version of the branch on GitHub with
git push --set-upstream origin branchnamewherebranchnameis “testname”.- This creates the upstream (origin) branch and completes the first push to that branch.
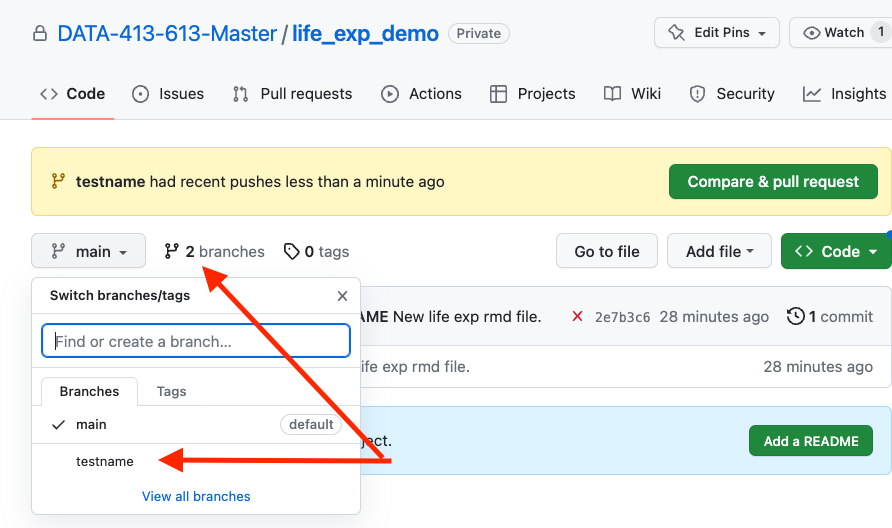
- Refresh your GitHub page to see the new branch listed under branches as in Figure 9.3.
- Use the pull down to switch to branch
testname.
- Update your files and push to GitHub as normal
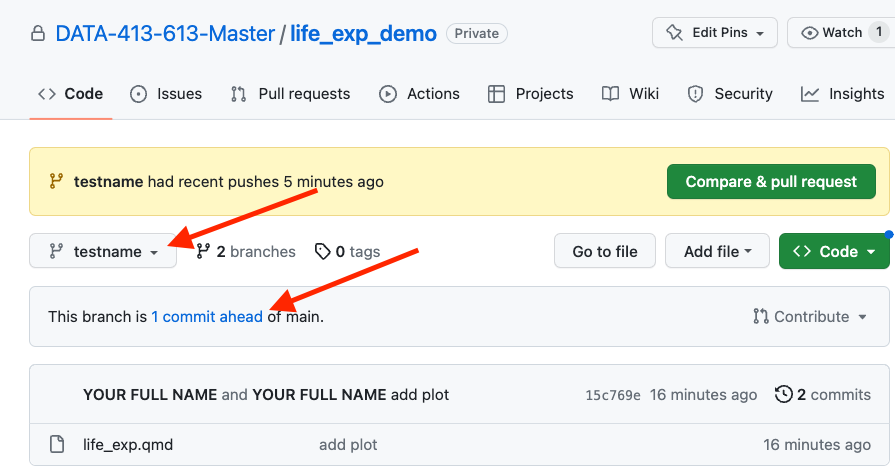
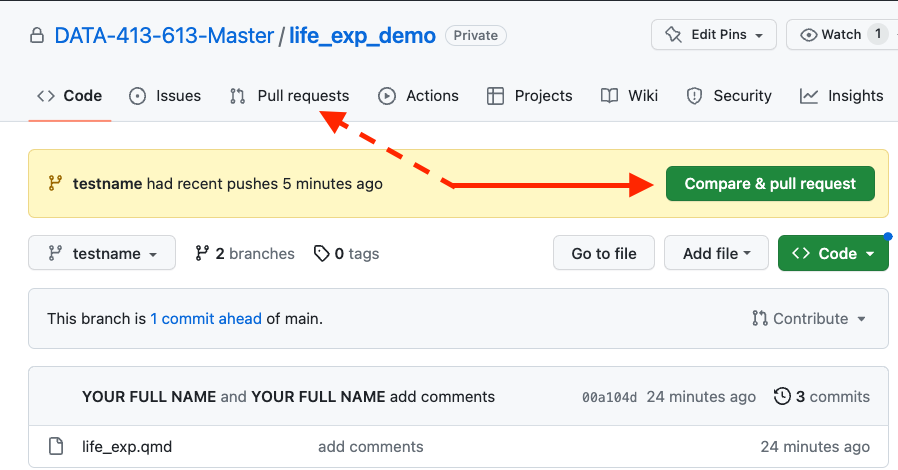
- You will see the comments on GitHub branch to show how many commits the branch is ahead of main as in Figure 9.4.
9.2.8 Merging Your Updates From a Local Branch into local main
- When finished testing the code in the branch, you can merge the updates in the
testnamebranch into the local main.- Save and close all files in the
testnamebranch. - Execute a final
git add, commit,andpush. git statusshould show:On branch testnameYour branch is up to date with 'origin/testname'.
- Switch to
mainwithgit switch main. - Before you merge, ensure your local
mainis up to date with the remotemainwithgit pull. - This step is critical is to ensure you have all changes from other people, or from other branches you already merged, to minimize the risk of merge conflicts on GitHub.
- Save and close all files in the
- Merge the changes from the branch into main with
git merge branchname. - At this point, one of two things will happen:
- If no new commits were added to main after you created testname, Git will perform a fast-forward merge.
- If commits were added to main while you were working on testname, Git will create a merge commit.
- If conflicting changes exist, Git will pause and ask you to resolve merge conflicts.
- After a successful merge, running
git statusshows something like:
On branch main
Your branch is ahead of 'origin/main' by 3 commits.
(use "git push" to publish your local commits)Git can merge branches in two different ways depending upon if anyone has updated main independent of the other branch.
- Fast-Forward Merge
- If main has not changed since you created testname there cannot be any conflicts so Git simply moves (fast-forwards) main pointer forward to the latest commit from testname.
- No new commit is created.
- History remains linear.
- Git will print: Fast-forward:
- Visually the commit tree looks linear and it added the testname to the last commit as the parent.
- If main has not changed since you created testname there cannot be any conflicts so Git simply moves (fast-forwards) main pointer forward to the latest commit from testname.
A---B---C---D (main, testname)- Merge Commit
- If main has changed, i.e., it has a new commit and testname has a new commit then the two branches have diverged so there may be a chance for a conflict.
- Git creates a new merge commit with two parent commits.
- The new commit is added to the history.
- The branch structure is preserved in the history.
- Git may open an editor (vim by default) for you to enter a message about the merge commit.
- Visually:
A---B---C-------M   (main)
         \       /
D---E (testname)- The commit M records the integration of the two histories.
In most individual project where only one person is working and main has not changed, Git will perform a fast-forward merge. This is normal and considered best practice in simple workflows.
- Update your
upstream/origin mainon GitHub withgit push.- No need to do
git addandgit commitsince thegit merge branchnamereused a commit (fast-forward) or created a new one for a merge commit. - Refresh Github to show the branch is up to date with main as in Figure 9.5.
- No need to do
9.2.9 Deleting a Branch
- Deleting the Local and Remote Branch when finished.
- Once all the branch changes have been merged, the branch is usually no longer needed.
- On large scale projects where branches are tied to specific requirements or issues, it is common to delete branches that are completed from a housekeeping perspective.
- For individual work you can keep reusing a branch for different requirements or you can delete it and create a new branch as needed. Just make sure you keep your branches in sync with main .
Make sure you are not in the branch you want to delete, i.e., go to main with git switch main.
- Delete a local branch with
git branch -d localBranchNamewhich for this istestname. - Then delete the remote (origin) branch with
git push origin --delete remoteBranchNamewhich for this istestname.
9.2.10 Common Misconceptions About Git
- “Branches Contain Their Own Copies of Files”: Incorrect. Branches do not contain files.
- A branch is just a pointer to a commit.
- Commits contain trees and trees reference blobs.
- There is only one working directory on disk.
- When you switch branches, Git rewrites that working directory to match the commit the branch points to.
- “Uncommitted Changes Belong to a Branch”: Incorrect. Uncommitted changes live only in the working directory. -They are not part of any branch until committed.
- You can see uncommitted files after switching branches.
- Git may block branch switching if it would overwrite them.
git stashexists — it temporarily stores working directory changes.- Branches only track committed snapshots.
- “Git Stores Line-by-Line Changes”: Not exactly. Git stores full file snapshots in blob objects.
- When a file changes: a new blob is created, the tree is updated and a new commit references that tree.
git diffcomputes differences for each line dynamically.
- “Deleting a File Removes It from Git”: Incorrect. Deleting a file and committing creates a new snapshot that omits the file.
- But earlier commits still contain the tree object referencing the file and the blob containing its contents.
- That file still exists in history unless you rewrite history.
- This can create issues with committing large files locally and GitHub refusing the commit. It may require the use of bfg
- “Branches Have Hierarchy”: You can create a branch while working in a non-main branch, but branches do not form hierarchies.
- Branches are labels attached to commits in the commit graph.
- Commits have ancestry. Branches do not.
- “Detached HEAD Is an Error”: Detached HEAD is not a failure.
- It simply means HEAD points directly to a commit so no branch pointer will move if you commit.
- It becomes risky only if you create commits and switch away without creating a new branch
- “Switching Branches Creates or Deletes Folders”: Switching branches does not create new project directories or duplicate the repo or clone anything.
- It rewrites the contents of the one working directory to match the commit snapshot for the switched branch.
- “Git Automatically Returns to main”; It does not. If you switch to branch testname and close your computer, when you reopen the folder, you are still on testname.
- Git does nothing automatically.
- The Correct Mental Model: Git consists of:
- A commit graph (immutable history)
- Branch pointers (movable labels)
- A special pointer called HEAD
- One working directory
- A staging area called the index
- Everything else is behavior derived from these components.
9.4 Life Cycle of a Pull Request
Pull Requests initiate discussion about proposed code changes with others on a team.
- The Pull Request workflow is tightly integrated with the underlying Git repository so anyone can see exactly what changes would be merged if they accept your request.
You can open a Pull Request at any point during the development process:
- When you have little or no code but want to share some screenshots or general ideas,
- When you’re stuck and need help or advice, or,
- When you’re ready for someone to review your work.
By using GitHub’s @mention system in your Pull Request message, you can ask for feedback from specific people.
- @GitHub_username anywhere in an issue or pull request notifies the person and subscribes them to future updates.
- e.g., @rressler - what do you think?
Once a Pull Request has been opened, the persons reviewing your changes can enter questions or comments.
- You can reply as part of the “conversation” about the Pull Request
- As you get comments you can continue to push updates resolving the comments to your GitHub branch.
- GitHub will show your new commits and any additional feedback you may receive in the unified Pull Request view.
- When done someone with write privileges can either merge your code into main with the final changes or you can close the pull request.
9.4.1 Pull Request Life Cycle in Pictures
If you deleted the testname branch, recreate it.
- Switch to the branch
testname. - Edit the
life_exp.qmdfile, enter some comments, and save it. - Add, commit, and push to GitHub so the
testnamebranch is again1 commit ahead of mainas in Figure 9.4.
9.4.1.1 Create a Pull Request
Go to your branch on GitHub and click on the green button Compare & Pull Request seen in Figure 9.6.
- You can also click on
Pull requestsin the menu bar and then click onCompare & pull requestorNew pull request. - Either way will bring up the
Open a pull requestpage.

- Check that the pull in the correct direction - main should be on the left and the branch is on the right with arrow going from the branch to main.
- This page is for pulling from one branch to another within a repo. You can also do a pull request to update a fork of a repo to get the latest changes from the original repo or submit proposed changes to the original repo owners.
- GitHub automatically compares the two versions and provides its finding if they can be easily merged at the top.
- You can compare the two versions, especially if there are merge conflicts, using the diff pane at the bottom as in Figure 9.8.
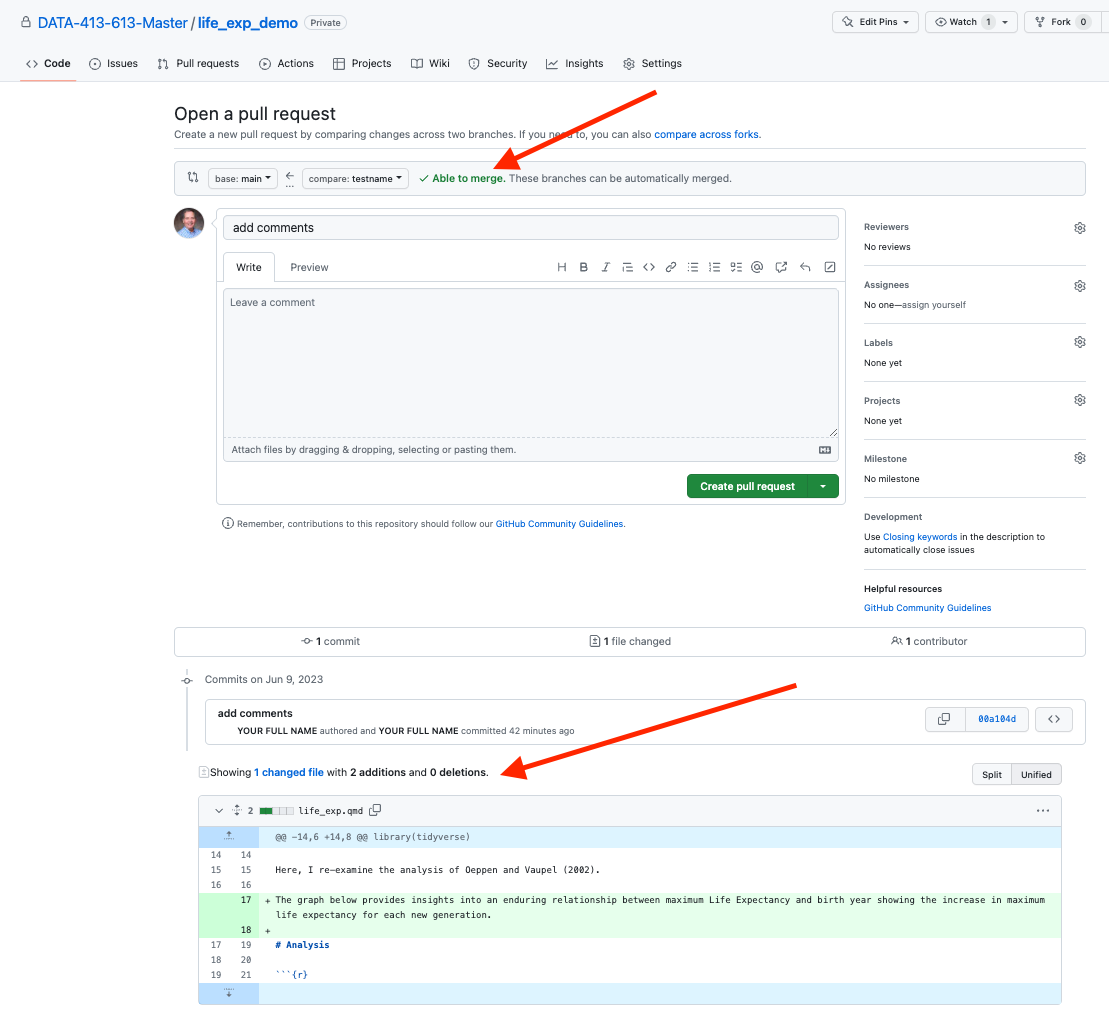
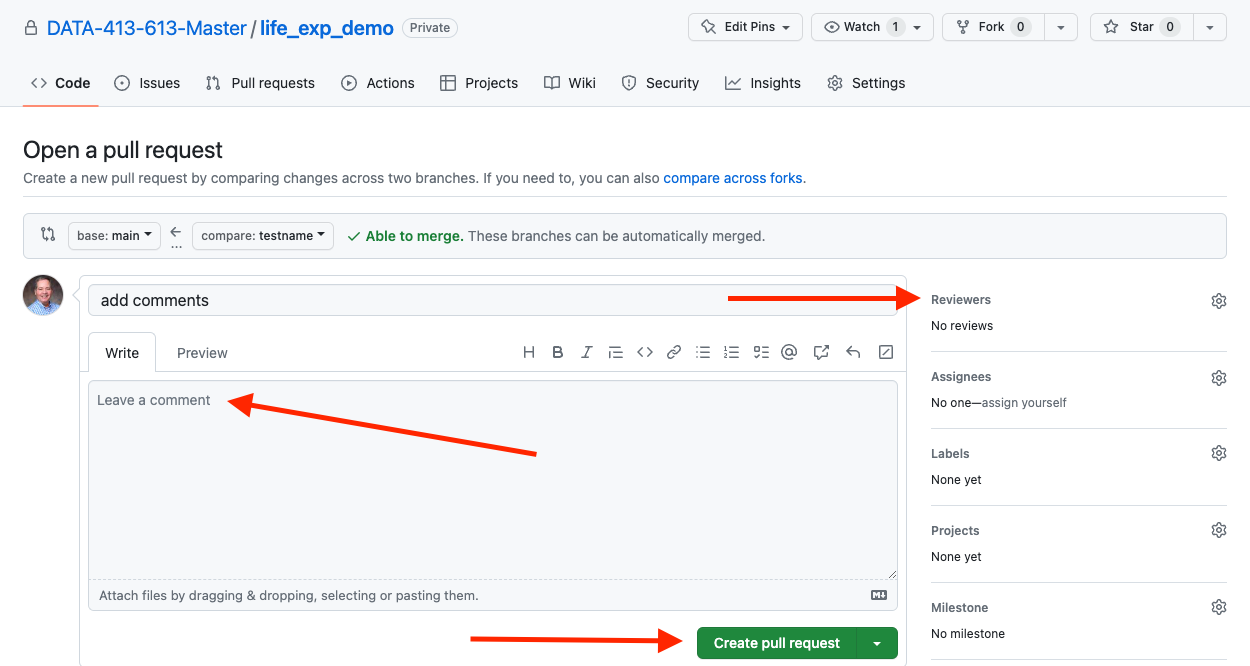
- Write comments for the reviewers.
- To select reviewers, click on the gear icon to see a drop down list of team members.
- Then click on Create pull request to distribute the request as in Figure 9.9.
9.4.1.2 Act on a Pull Request
If you are a reviewer of a pull request, select Pull requests in the repo menu bar to see the list of open pull requests.
You now have several options as in Figure 9.10.
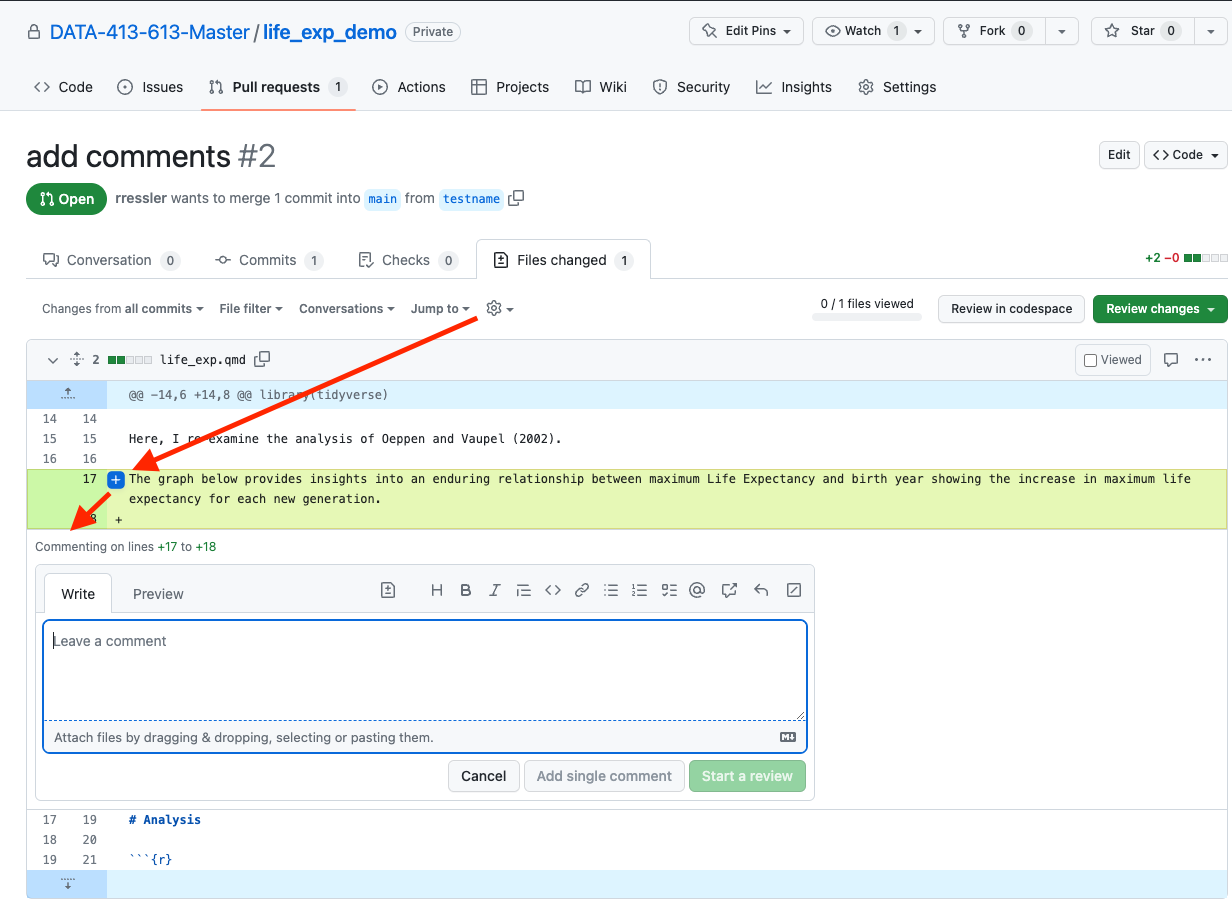
- Review: You can review several aspects of the pull request by using the tab panels
Conversationshows you all the comments that have been made on a pull requestCommitsallows you to delve into the list of commits since the last merge and then the details of individual commits,Checksshows you the results of any GitHub actions that affect the pull request.Filesopens up a diff of the changes in the files.
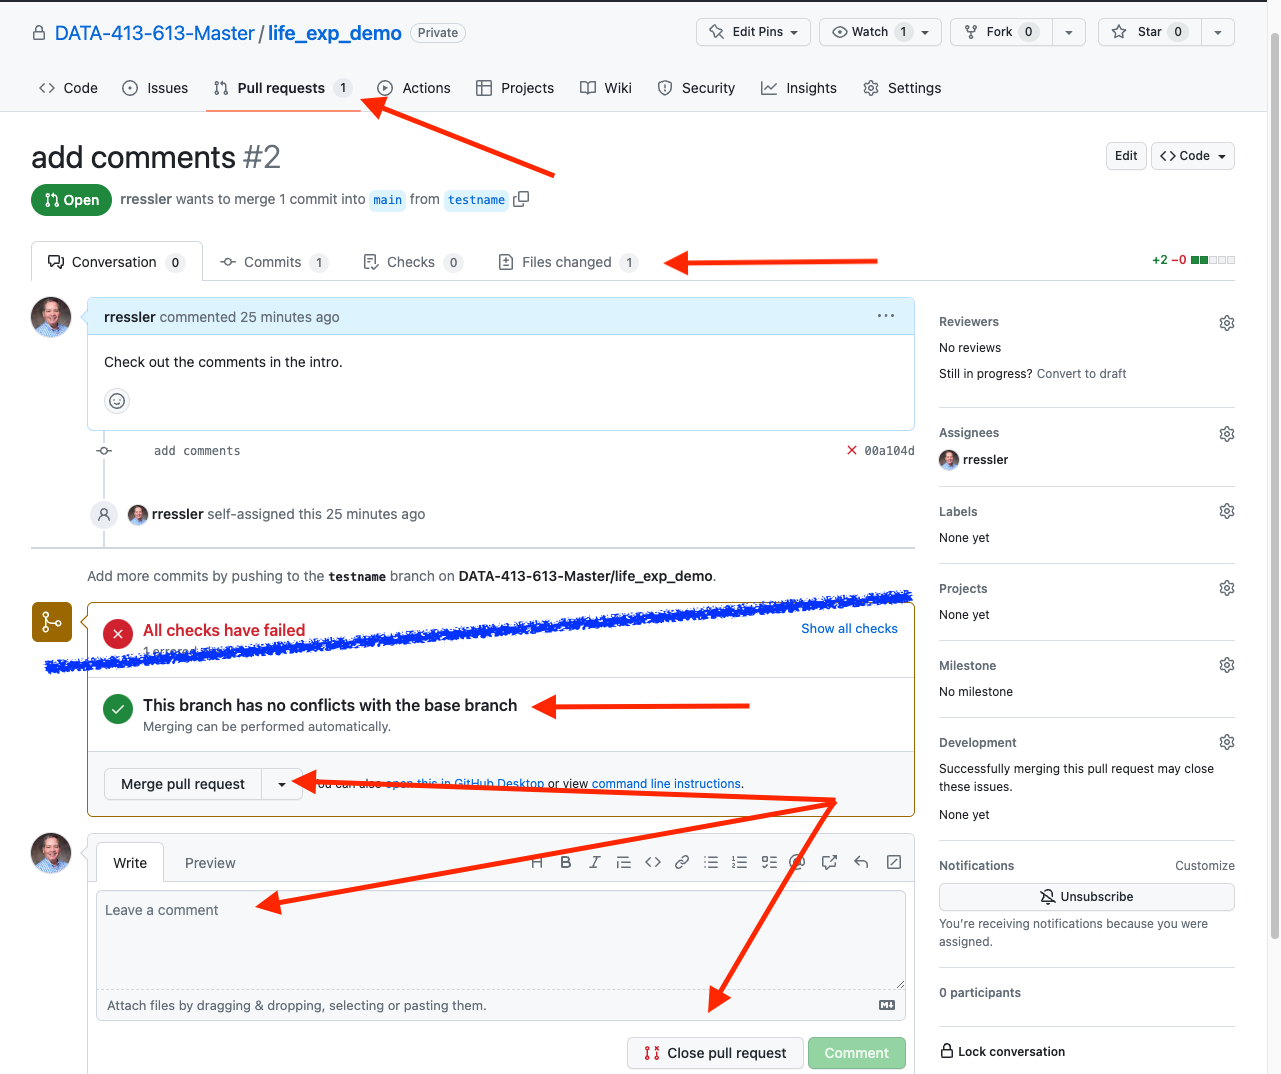
- When reviewing code you can comment on single or multiple lines by using the mouse to highlight them and clicking on the blue
+sign that pops up on the left of the lines. - That will open up the comment box where you can make suggestions and share with others.
- Merge Pull Request: Once you have review the pull request and you want to merge, go to the middle of the page where GitHub provides the output of automated checks.
- Figure 9.10 shows the Pre-commit CI check has failed. IGNORE THAT. The failure is because this is a private repo and that normally requires a paid plan for pre-commit actions.
- Github also shows that the branch has no merge conflicts with main.
- When ready to merge, click on `Merge pull request.
- There are three options, but just choose the default one for now. Other organizations may have guidance for which type of merge to use.
- You will be asked to
Confirm mergeand enter comments so everyone can see them in the history. - Enter comments and click to confirm the merge.
- The page will update as in Figure 9.12.
- Note that GitHub also provides the option to automatically delete the branch that generated the pull request from the repo.
- If you click on it, it will delete the branch and make a commit on the GitHub repo.
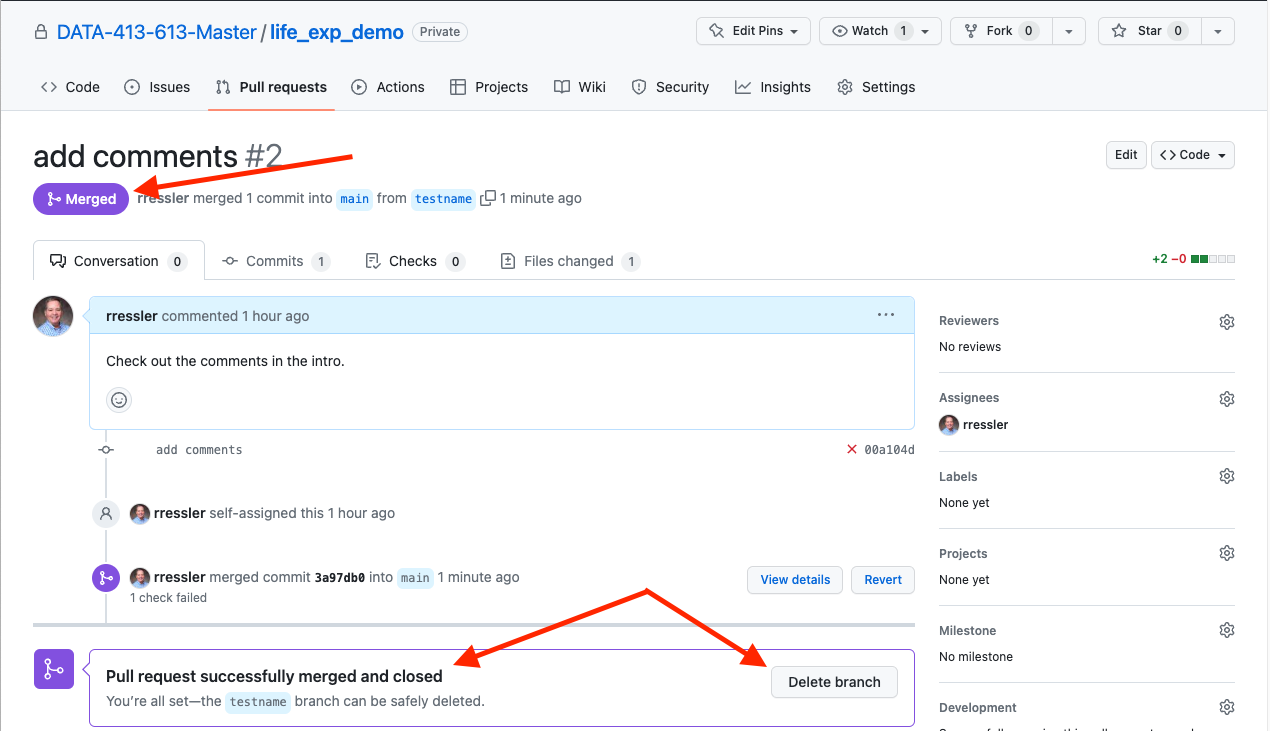
Figure 9.12: GitHub after Merge is confirmed. - Comment on or Close the Pull Request: If you decide not to merge, at the bottom of Figure 9.10 you can enter comments and share as to why, or you can enter comments and close the pull request without merging any code.
- The Pull request will no longer show up in the open list.
9.4.2 After a Pull Request Updates the Baseline, Team Members must use Git to Pull and Merge the Updates Locally
Once a Pull Request has been merged into the GitHub main, the remote baseline has changed.
Each team member must update their local repository to stay synchronized as in Section 9.2.6.
- Update Local main
- First, switch to your local main:
git switch main. - Then pull the latest changes from GitHub:
git pull(which runsgit fetchandgit merge) - This updates your local main to match origin/main.
- First, switch to your local main:
- Update Your Local Branch (if needed)
- Switch to the branch with
git switch your_branch. - Incorporate the updated main into it:
git merge main. - This ensures your branch includes the latest baseline changes.
- Switch to the branch with
- Inspect What Changed
- If you are unsure what the merged Pull Request changed, use:
git log. - By default, with no arguments,
git loglists the commits in reverse chronological order, i.e., the most recent commit shows up first. git logshows each commit with its SHA id, the author’s name and email, the date written, and the commit message.- For a clearer view:
- If you are unsure what the merged Pull Request changed, use:
git log --oneline --graph --decorate- This displays:
- Branch pointers
- Merge commits
- The structure of the commit graph
- Inspect a Specific Commit
- To inspect a specific commit, copy its id and run:
git switch --detach commit_id- This moves you to that snapshot in a detached HEAD state.
- Important:
- You are now viewing a historical snapshot.
- Do not begin working there unless you create a new branch.
- Always commit or stash your current work before switching commits.
To return to normal work: use git switch main.
After a Pull Request merges:
- The commit graph has changed.
- Your local repository must be updated.
- Your feature branches may need to incorporate those changes.
- Inspecting commits helps you understand what changed in the baseline.
9.4.3 When Things Go Wrong and There is a Merge Conflict
A merge conflict occurs when Git attempts to merge two branches and cannot automatically reconcile overlapping changes.
- Note: a message
error: Entry '<fileName>' would be overwritten by merge. Cannot merge. (Changes in staging area)means you have uncommitted changes that you need to commit before any merging can happen.
A merge conflict usually happens when:
- Two branches modify the same lines of a file, or
- One branch deletes or renames content that the other branch modifies.
Git will attempt an automatic merge first. If it cannot resolve a conflict safely, it stops and reports something like:
CONFLICT (content): Merge conflict in filename
Automatic merge failed; fix conflicts and then commit the result.
At this point:
- The merge is paused.
- Git has inserted conflict markers into the affected file(s).
- You must resolve the conflict before completing the merge.
9.4.3.1 Understanding Conflict Markers
When you open a conflicted file, you will see markers like this:
<<<<<<< HEAD
User 1 changed code and/or text comment
User 1 changed code and/or text comment
=======
User 2 code and/or comments
User 2 code and/or comments
>>>>>>>
Here is what each section means:
<<<<<<< HEAD: The content from the branch you were on when you ran git merge (the current branch).=======: Separator between the two competing versions.>>>>>>>branch-name: The content from the branch being merged into the current branch.
The conflict ends at the >>>>>>> marker.
9.4.3.2 How to Resolve the Conflict
To resolve the conflict:
- Edit the file manually.
- Choose which changes to keep (or combine them).
- Remove the conflict markers:
<<<<<<<=======>>>>>>>
- Save the file.
If there are multiple conflicts in the file, scroll down to (search for) the next set of conflict markers and repeat the previous step to resolve the conflict.
You should collaborate with the teammate whose changes overlap with yours before finalizing the resolution.
9.4.3.3 Complete the Merge
- After resolving all conflicts:
git add filename
git commit -m "Resolve merge conflict"- Once all conflicts have been resolved, use the
git addcommand to move the new changes to the staging area, and thengit commit -m "fixed merge conflict"to commit the changes. Thengit push.
9.4.3.4 Resolving Conflicts on GitHub
For simple conflicts, GitHub’s web interface may allow you to resolve them directly in a Pull Request.
9.5 Group Project Workflow
- Either model will work for your group project
- There are trade-offs between them in terms of level of planning and risk to the code - just like real-world work.
- You have to decide early on as a group which approach to use so individual contributors are using the same method.
- Both require establishing operating rules for the project to protect the working code.
- Set clear ownership for each requirement and piece of the App or the code - to include the vignette
- Agree on how the sections of code will interact with each other.
- Agree on styles, shared variable/object/function names and even libraries to be used.
- Agree on a testing approach for integrated testing
- The Shared Repository model requires less collaboration on merging code but puts the app at risk of someone breaking something that was working before (if they skip the pull request).
- Have to then go back to a working version.
- No need for a final arbiter to approve merge requests - everyone has push rights.
- Can result in merge conflicts
- The Fork and Pull Model requires more collaboration for merging code, using pull requests with feedback prior to merging, but can reduce code and team conflicts.
- Tends to drive more use of branching which reduces risk to a working baseline.
9.6 Git and GitHub Team Workflow Summary
- Branching provides a structured way to evolve your analysis without putting stable, working code at risk.
- It aligns with best practices for separating development, testing, and production environments.
- Branching allows you to:
- Work on multiple features simultaneously.
- Isolate experimental work.
- Prevent unfinished code from affecting the baseline in main.
- Branching also enables collaborative workflows where team members can work in parallel without overwriting one another’s contributions.
- Larger or open-source teams often use the Fork and Pull model, especially when contributors do not have direct write access to main in the repository.
- Contributors work in their own fork and submit Pull Requests for review.
- Smaller teams frequently use a Shared Repository model, where all members have write access.
- This requires coordination about feature ownership and branch usage.
- Teams typically still use Pull Requests for code review before merging into main.
- Pull Requests create a structured review process.
- They allow discussion, feedback, and revision before changes are merged into main.
- This reduces the likelihood of breaking the working baseline.
- Use branches whenever you have a stable working baseline and want to develop new code while preserving that stable version until your changes are tested and ready to integrate.