11 Git and GitHub
Version Control, Git, Cloud Collaboration, GitHub, Git Branches, Fork, Clone, Pull Request
11.1 Introduction
This chapter provides a basic introduction to Git and GitHub to support moving a cloud repository to GitHub and understanding the GitHub collaboration workflow Pull Request workflow.
Learning Outcomes
- Explain the difference between Git and GitHub
- Create a GitHub account
- Create a GitHub Personal Access Token (PAT)
- Authenticate between Posit Cloud and GitHub
- Use Version Control in Posit Cloud to create and update a GitHub repo
- Explain the differences between Fork and Clone for sharing repositories on GitHub
- Explain the purpose and flow of a GitHub Pull Request
11.1.1 References
- Git Home Page
- Managing your personal access tokens
- Git Credential Manager
- Getting started with your GitHub account
Other References
11.2 Why Use a Version Control System (VCS)
A Version control system is a program which tracks changes to your files over time in a way that allows you to see the entire change history and recall previous versions.
- VCS tools have been around for years to support software development projects.
- Popular ones include Git, Azure DevOps, and Subversion.
- Git is the most popular VCS at 86.6% market share.
Git allows you (and others) to go back to previous versions of your code/text and compare with the most recent version, or keep the old version and start a new development path.
- You can create copies of your code or files, change them, then merge these copies together later.
GitHub is a popular site for creating, collaborating on, and sharing Git-based repositories.
- You will see many R packages that are not ready for CRAN, or don’t want to be on CRAN, hosted and accessible on GitHub.
In short, version control is a best practice for any data science project as it provides transparency and reproducibility and enables collaboration across teams.
- Employers expect it.
- Your future you will appreciate it.
- Git, GitHub, and IDEs make it easy to integrate into your workflows.
11.3 Git Overview
![]()
Git works by managing file status using three levels as seen in Figure 11.1 :
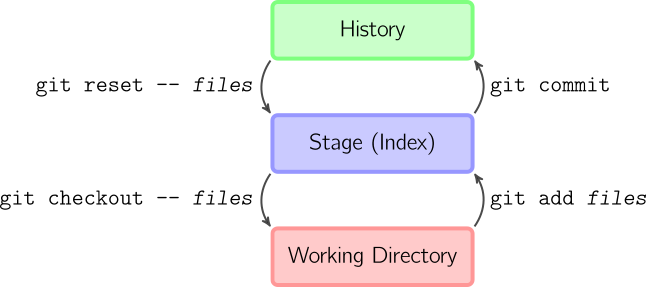
Files start at the lowest level, the working directory. Users advanced files into the history or out of the history.
Working Directory: Git uses the terminal working directory as its working directory.
- This is the folder where your terminal pane shell tries to execute commands and where it looks for files.
- It is not necessarily the same as your RStudio Console working directory!
- Any changes to files you have saved but not staged or committed to Git only exist in the working directory and are not yet indexed or saved in the Git history.
Stage: Files that are staged (added) are prepared (scheduled) to be committed to the history, but are not yet committed. Only files in the stage will be committed to the history.
History: The timeline of file versions (snapshots). You commit a file to the history and then, even if you modify it later, you can always go back to that same file version.
We’ll focus on the right-hand-side of Figure 11.1.
11.3.1 The Git Workflow for Version Control of Local Files.
A typical workflow for local version control has three steps:
- Edit files as normal until you want to take a snapshot of one or more files. Save the files.
- Stage/Add these modified files to the staging area.
- Commit staged files to history, where they will be kept forever (on your computer).
The workflow on the left-hand side of Figure 11.1 is used to undo actions from the right side.
- Usually only when you need to undo mistakes or have changed your mind.
Git does not save complete versions of the file each time.
- It tracks the differences that occur in each line of a text file and it can recreate the version at any point in the file’s commit history.
- The tracking of “differences” in text-based files allows for very efficient storage and processing.
- Git is not as efficient at tracking non-text (binary) files such as PDF or .xlsx where changes can only be identified at the whole file level.
Git uses a file called ,gitignore to avoid tracking folders and files you don’t want to commit.
- As an example, if you can generate an output file such as HTML, you do not need to commit it as you can always generate it when you need it.
- On A Mac you do not want to commit the
DS_storefile that Macs use for indexing directories. - You can add these to your
.gitignore` file so they do not clutter up your git actions.
Use the standard file/directory syntax to identify why you do not want to commit.
A typical .gitignore file might look the following
.Rproj.user
.Rhistory
.RData
.Ruserdata

/.quarto/
/_freeze
*_cache/
*_files/
*.html
/_book/
*output/

.DS_Store
11.3.2 Common Git Commands
Git is designed to work using the terminal and most IDEs have adopted a graphical interface.
- The terminal window provides access to all Git commands that may not be present in an integrated application.
- As an example, if you need to fix an error, like committing a very large (>100MB file) that will be rejected by GitHub for being too large, you must use commands only available in the terminal window.
All Git commands begin with git followed immediately by space and then an argument for the type of command you want to execute.
The following Git commands are used most often:
git init: Initialize (or create) a Git repository. Only do this once per project/repository.git status: Show which files are staged in your working directory, and which are modified but not staged.git add: Add modified files from your working directory to the stage.git commit -m "descriptive message": commit your staged content as a new commit snapshot.git push: create a copy or update a copy of your repository on GitHub,
If you want to see the “differences” between the previous version and the current saved version, you can use
git diff: Look at how files in the working directory have been modified.git diff --staged: Look at how files in the stage have been modified.
11.3.3 Repositories and Folder Structure (Housekeeping)
A repository (or repo, for short) is a collection of files (in a folder and its sub-folders) being version controlled (configuration managed) as a set.
- The repo also contains the local version control data, in a hidden
.gitfolder and files.- You can use the RStudio IDE to see hidden files and folders by using the
Moreoption in theFilespane.
- You can use the RStudio IDE to see hidden files and folders by using the
In data science, each repository is typically one project (like an analysis, a model, a homework, or a collection of code that performs a similar task).
- Users often turn a Git repo into an RStudio project as well. While Git does not care about whether a repo is an RStudio project, the RStudio IDE has features which make it easier to use Git with RStudio projects as we will see.
It is not a good practice to nest repos or RStudio projects inside each another repo or project!
- Before you create a new repo, take care that the terminal working directory is not already under a Git repo. Run
git statusand it should fail. If you get a status you are already in a repo.
11.4 Using GitHub as a Remote Repository for Version Control
![]()

11.4.1 Intro to GitHub
GitHub is a website that hosts Git repositories and allows workflows for collaboration and continuous integration (among other things).
- Don’t confuse Git with GitHub.
- Git is version control system on your local machine or cloud workspace.
- GitHub is a decentralized cloud-based system for managing and sharing many, many repositories.
- GitHub recommends repositories remain small, ideally less than 1 GB, and less than 5 GB is strongly recommended.
- Smaller repositories are faster and easier to work with and maintain.
- Individual files in a repository are strictly limited to a 100 MB maximum size limit.
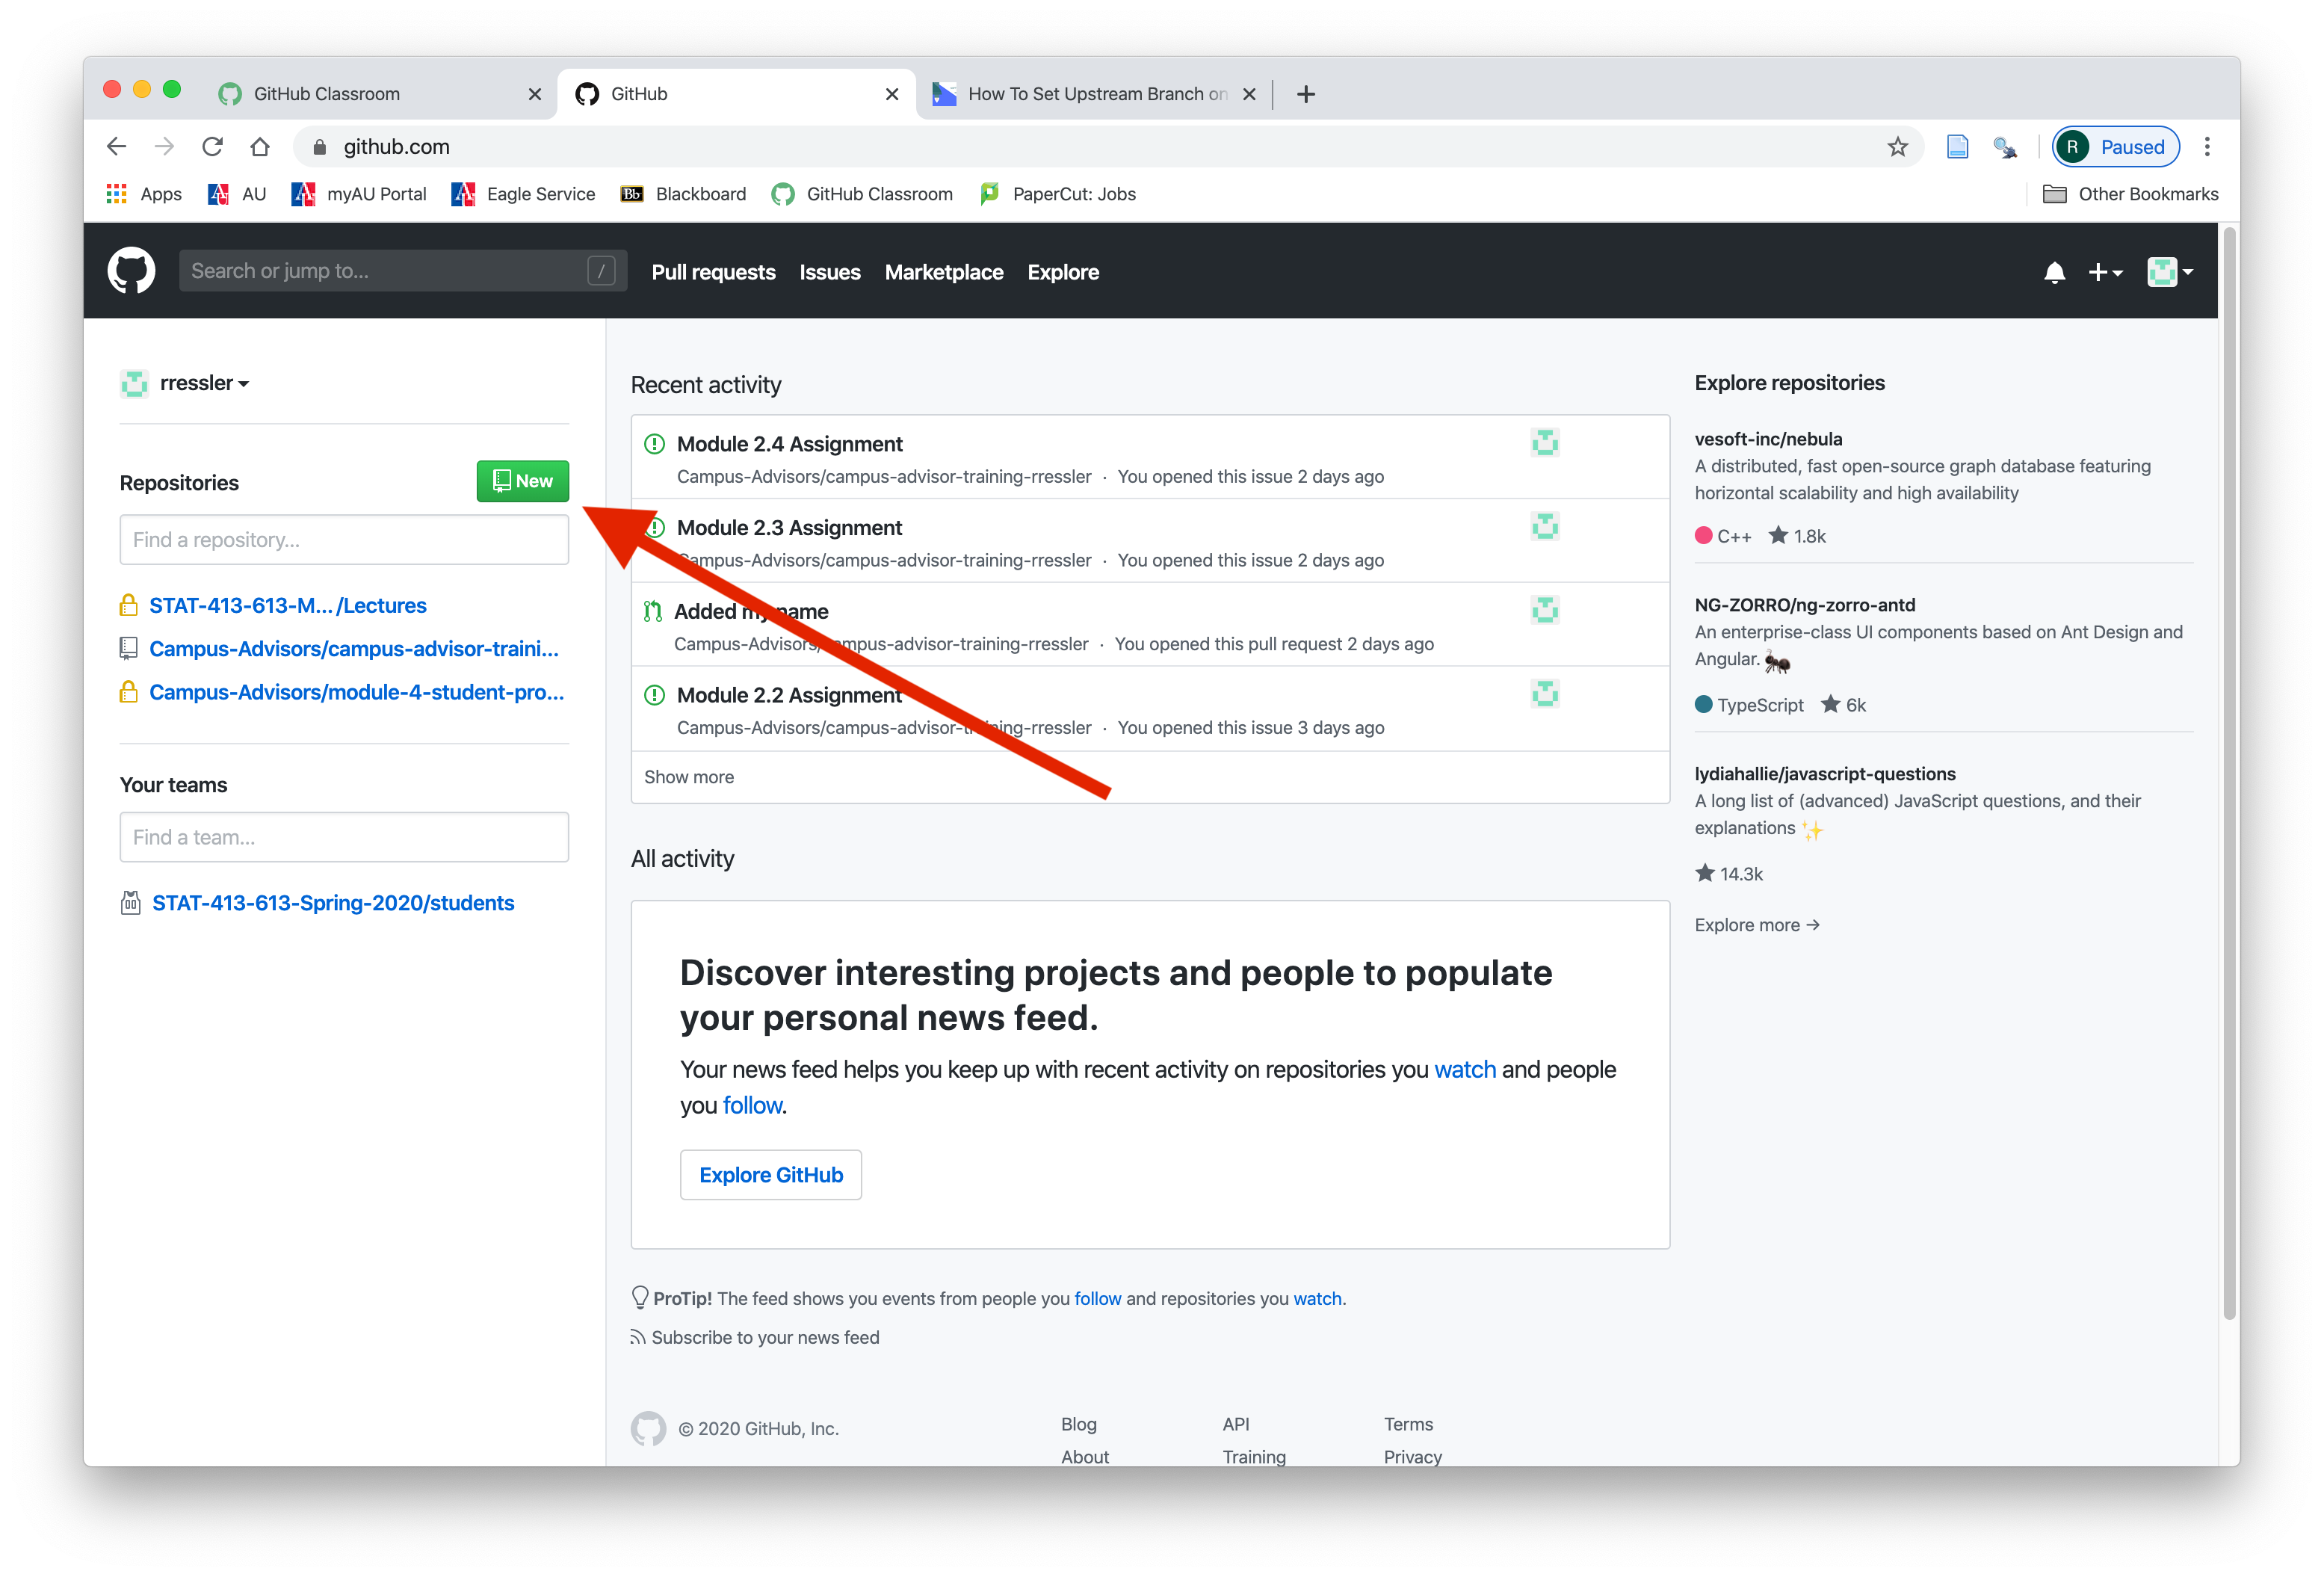
Once you have a GitHub account, you do three things to host a repository on GitHub:
- Create a repo on GitHub.
- Tell Git where GitHub is going to host your repo (the URL).
- Tell Git to move (push) your committed files and commit history to the designated GitHub repo.
Let’s start with getting and Account
11.4.2 Setting up GitHub
The course Posit Cloud workspace is a temporary Git repository. GitHub is an enduring cloud-based site for storing, sharing and collaborating on Git repositories.
- If you may want to establish a GitHub account and personal access token so you can create and update a GitHub copy of your cloud repository under your own account, follow the next steps.
11.4.2.1 Create a GitHub Account:
Go to https://github.com/ and select Sign up.
- Choose a free plan.
- Use your university email address or a personal address you check regularly.
- Choose your GitHub username carefully — you may use it professionally.
- Include your name or initials (e.g.,
jsmithorjane-smith)). - Avoid user names you would not want on your résumé.
- Include your name or initials (e.g.,
11.4.2.2 Create a Personal Access Token (PAT)
Posit Cloud (and Git in general) cannot use your GitHub password to push code to GitHub.
- Instead, GitHub allows you to use a Personal Access Token, a long random string that it generates for you to authenticate interactions with GitHub.
- Go to https://github.com/settings/tokens (or navigate via Settings → Developer settings → Personal access tokens → Tokens (classic)).
- Click Generate new token → Generate new token (classic).
- Complete the 2FA prompt if asked.
- Fill in the form:
- Note: Give it a meaningful name, e.g.,
posit-cloud-intro-ds. - Expiration: Choose 90 days (a reasonable balance for a course; you can regenerate it later).
- Scopes: Check the
reposcope (this grants full access to your repositories). That is all you need for this course.
- Note: Give it a meaningful name, e.g.,
- Scroll to the bottom and click Generate token.
- Copy the token immediately since GitHub will never show it again.
- Do not close the window showing the PAT.
The token is displayed only once. If you navigate away before copying it, you must delete it and generate a new one.
11.4.2.3 Store the PAT on Your Local Computer
Store the PAT securely somewhere on your computer so you can copy and paste it when Posit Cloud asks for it.
- The best place to store the PAT is in your local computer’s credential system.
If you have a Windows system, you can use the Git Credential Manager (GCM) that may be installed on your computer.
- Open the Control Panel -> Credential Manager -> Windows Credentials
- Create a generic credential such as:
GitHub PAT.- Username: GitHub username
- Password: Paste in your GitHUB Personal Access Token
- Save it.
If you have a Mac OS:
- Open Applications -> Utilities -> Keychain Access (not Password)
- Create a generic credential such as:
GitHub PAT- Name: git:https://github.com
- Account: GitHub username
- Where: git:https://github.com
- Password: Paste in your GitHUB Personal Access Token
- Comment: GitHub PAT for Posit Cloud and others
- Save it.
Now, whenever you need to enter your PAT, you can open the credential manager and copy it, then paste into the pop up window or cursor prompt.
For local computer Git to GitHub interactions both Windows and Mac systems can use a version of Git Credential Manager to register the credential manager and credential with GitHub so it authenticates silently in the future.
- Posit Cloud does not have this feature. You could store your GitHub PAT in your Posit Cloud account but for this course we’ll just copy and paste it.
11.4.2.4 Set the GitHub Default Branch Name to “main” for New Repositories
- Go to your GitHub account Settings (click on your profile picture in the top right).
- Select Repositories
- Change the
Repository default branchfor new repos to use “main”.
11.4.3 Create a Repository on GitHub
- Go to your GitHub account with your GitHub ID
- Create a new repo on GitHub by selecting
Newon the homepage:
- Tell GitHub the name of your repo.
- For this class, name it “posit_workspace”.
- To avoid errors, do not initialize the new repository with README, license, or .gitignore files.
- You can add these files after your project has been pushed to GitHub.
- Set the repo to Private (not like the image!)
- Then, click
Create Repository.
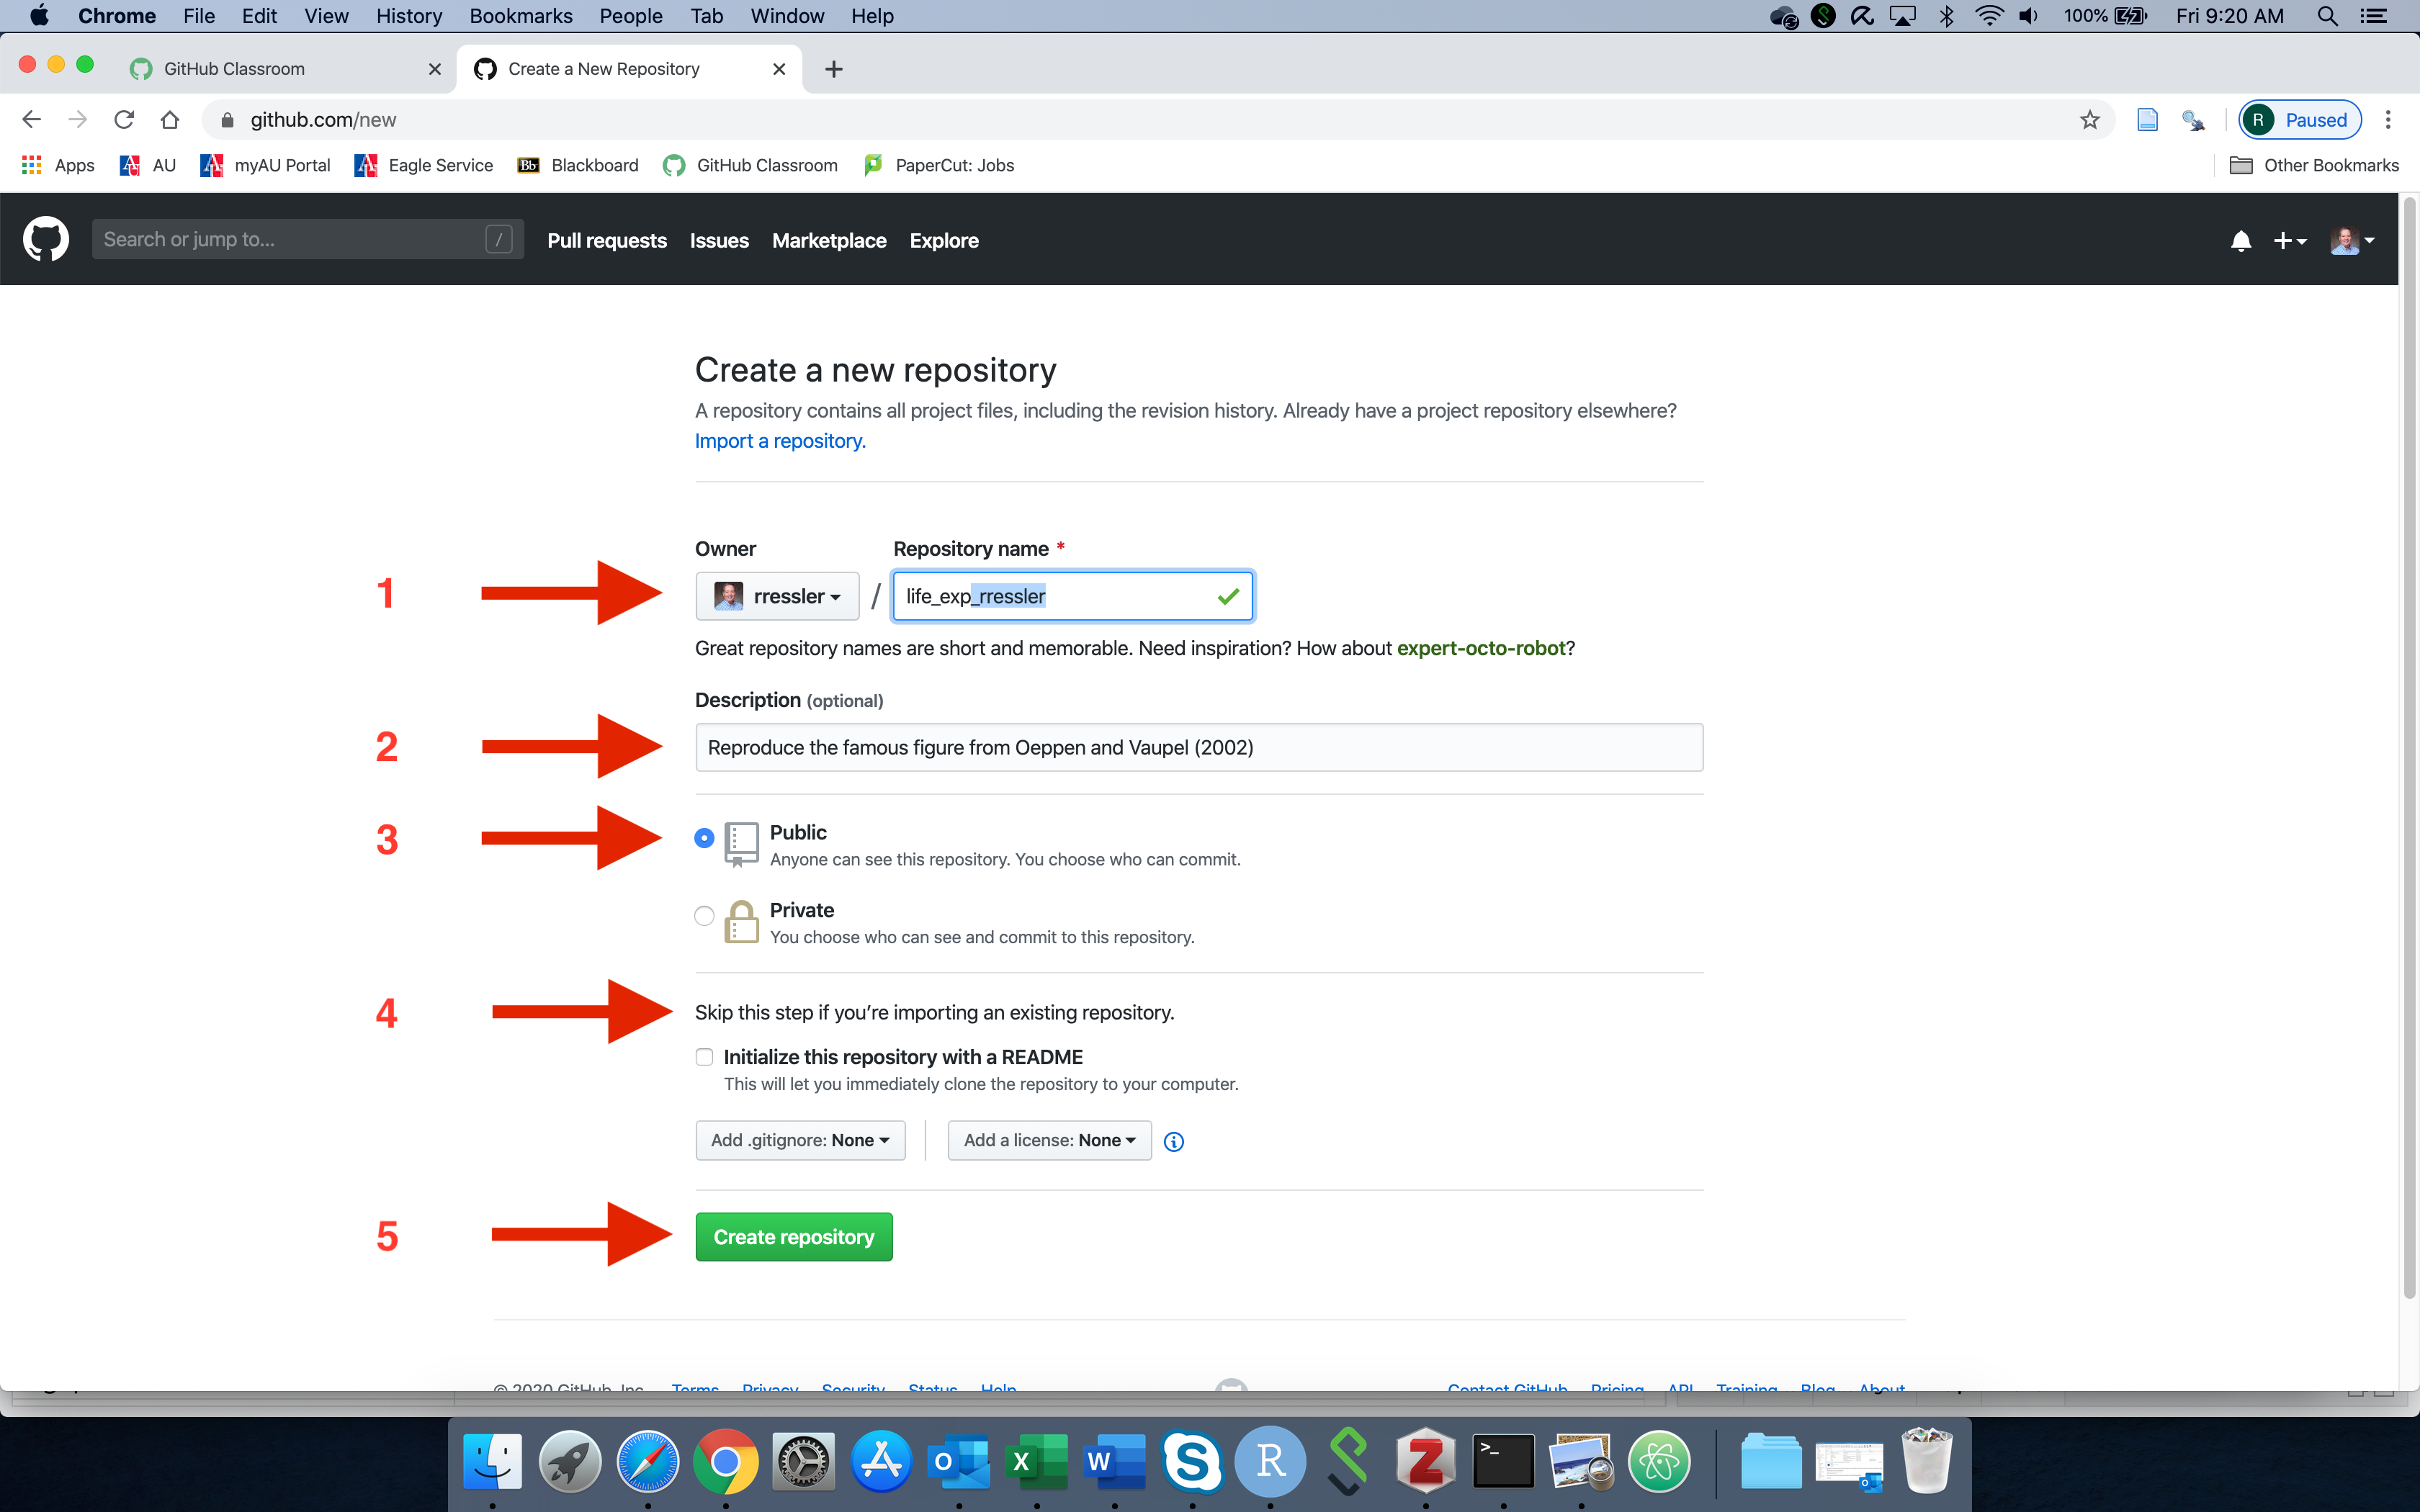
- You will get a new screen with the suggestions for what to do on your computer in the terminal window to add code to your new repo
11.4.4 Tell Your Local Git Where GitHub Will Host Your Repository.
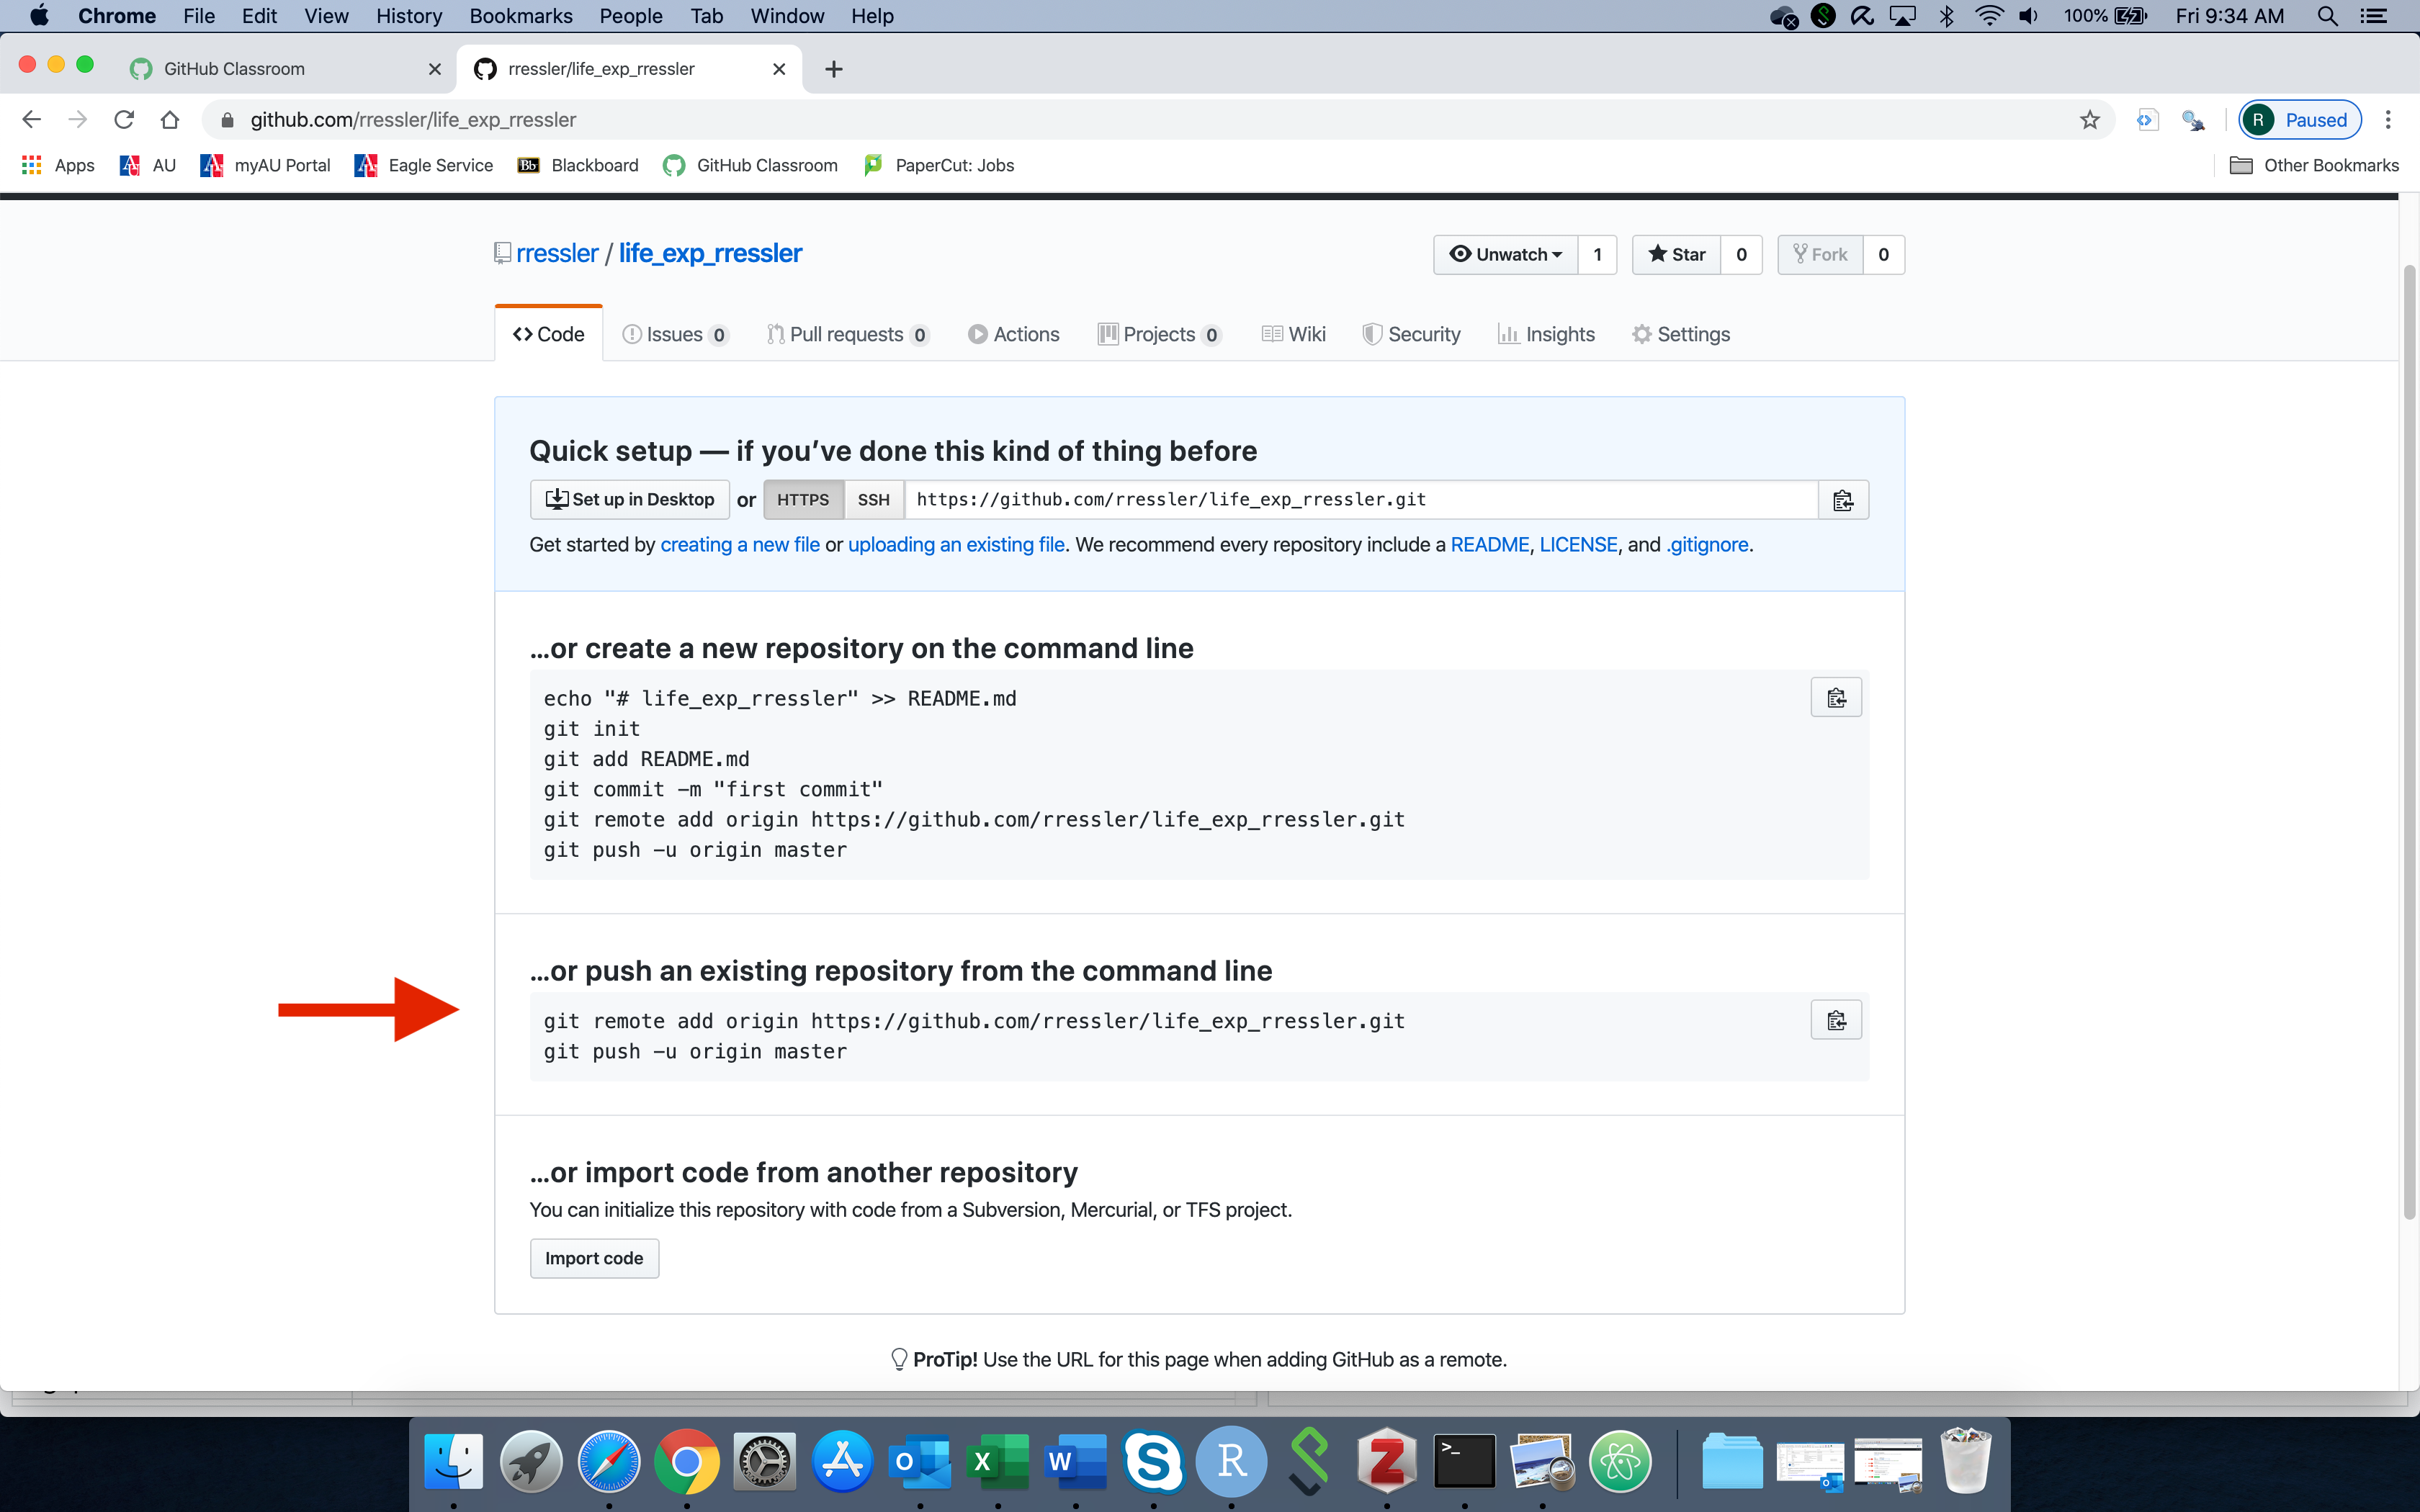
Normally we are working from a local computer with a new repository which is what Figure 11.2 expects.
We would follow the suggestion in Figure 11.2 to copy the Git Commands to tell Git to add a new remote repo (on GitHub) to store a copy of our local repo and tell Git the name and location of the new remote repository and paste them into our terminal.
- Use
git remote addto tell Git the nickname for the remote repo and where it is hosted. - This example uses the URL for my GHUser name and repo name. Substitute your own repo URL and name.
However we do not have a new repository as it has a link to an existing GitHub repo already!
- We will need to change that.
Open the terminal tab in RStudio in Posit Cloud and enter the command to ask if there is an existing Github (remote) repository.
You should get a response similar to the following:
The URL here is the location of a GitHub repository. We want to change that.
- It is generally of the form “https://github.com/GHUser/GitHubRepoName.git” where GHUser is the user name of the repo owner and “GitHubRepoName” is whatever the owner chose to name the repo on GitHub.
Use the command git remote to tell Git to do something associated with a remote repository, e.g., on GitHub.
Here we want to tell Git to set a new URL for the repo.
- In the above command, “
origin” is just the nickname (or alias) we give to the location URL that is hosting our repo so we don’t have to type the URL every time.- We could have used “
github” or “deep_space_nine” instead, but “origin” or “upstream” are traditional nicknames you will see in documentation and on-line posts. Think of the “o” in origin as “online”.
- We could have used “
Now check with the command git-remote -v in the terminal to see if your name now appears in the response.
- If it does, you are ready to “push” your Workspace Files to GitHub.
Once your repo is on GitHub, you have several options to get a version somewhere else (especially since Posit Cloud will not be around too long after the course is over).
If you go to the Code section of the GitHub repository you see a green button on the right. Click on it.
- You now see an option to Clone the repo as discussed in Section 11.8.3.
- You also see an option to just download the entire repo as a Zip file.
11.4.5 Push Files From Your Local Repo to the Remote GitHub Origin
Since we did not set up the Git repository, it has a Posit Cloud-generated name and email instead of our real name and email.
We want to change that so Git (and GitHub) know how to track who we are and identify us as the author of any changes we commit.
Use the terminal to enter the following
Before you push your files to GitHub you want to ensure they are all saved and in the commit history.
- Go to the Terminal and enter the following
- The
-mstands for message and it is required and you have to put a message in quotes after it. This is used to help you (and others) identify the purpose or contents of the commit.
You should get a response about files being updated.
- You can check with
The first time you are pushing to a brand new repo on GitHub, you need to use the -u flag (for upstream) and identify the remote nickname and branch:
- Read this as git push (first time) to the upstream online repo with the origin (URL) and merge to its main branch.
- A window will pop up asking for your user name. Enter your GitHub user name.
- It will then ask for our password. Copy your PAT from the credential manager and paste that into the window. You will not see it there. Hit enter.
- You will see code scroll by in the terminal window showing the actions that are happening as part of the push.
When the push is complete, check your code is now up on GitHub.
- Go to the repo you created on GitHub and check the repository for your code.
Once Git knows where to go on GitHub for a given repo, just use git push to push new commits to GitHub.
11.5 Git and GitHub in RStudio Projects
In addition to the Terminal, RStudio has a Git Pane for working with Git and GitHub for RStudio “Projects”.
- Users can convert a repository folder into an RStudio Project (see the upper right corner)
- Converting a folder into a project makes it easier to work with a project as it sets the working directories and exposes the Git Pane.
The Posit Workspace is already an RStudio Project as there is a project_name.Rproj file in the repo.
- We can see the Git Pane to the right of the Environment Pane Figure 11.3.
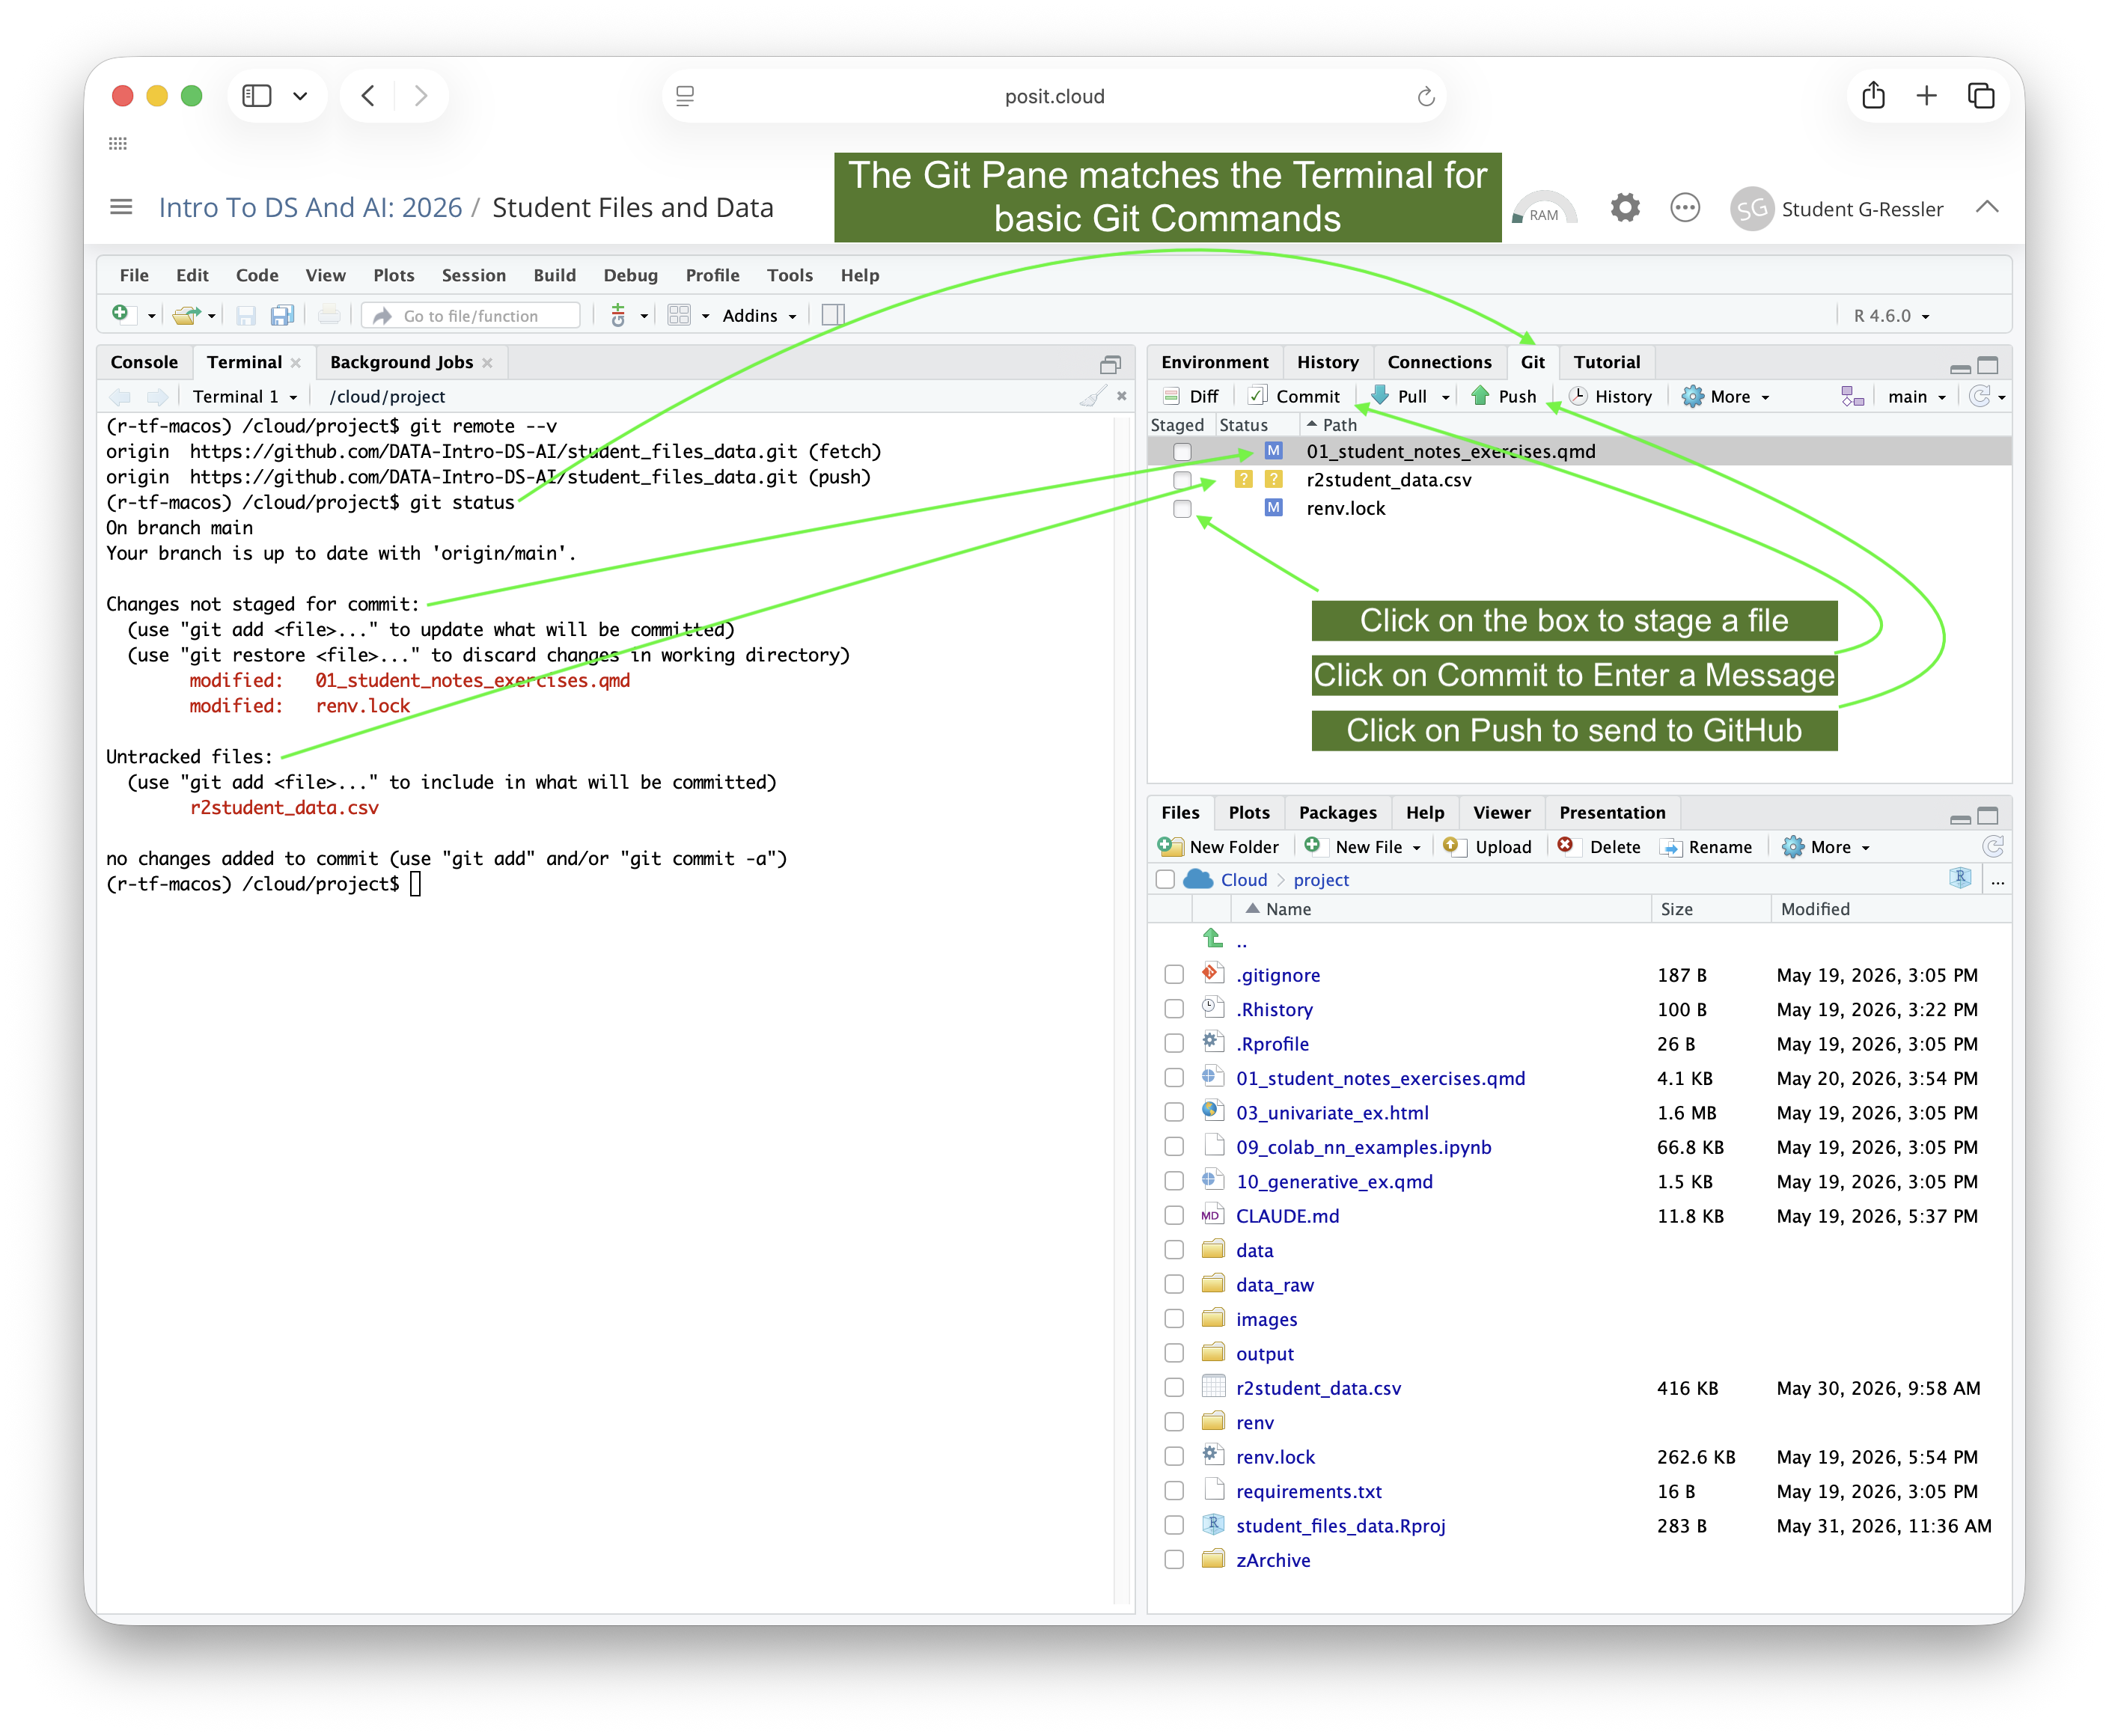
The Git Pane mirrors what you would see or do using Git commands in the terminal.
- It shows the current status of modified and saved files (uncommitted changes) that are not listed your
.gitignorefile. - It has several commands in its menu to allow you to execute common Git and GitHub commands.
DiffandHistoryopen up a new window with either the un-committed changes to the selected file or the history of the committed changes to the selected file.- You can stage (add), commit, and push or pull files to and from GitHub as seen in Figure 11.3.
11.6 Exercise 12: Using Git in RStudio
- Open your notes file and make a small change to a line to edit a few words and save it.
- Go to the
Gitpane and you should see your file with a blue M box meaning modified.
- Go to the
- In the main
GitPane you can click the check box to the left of a file to stage it.- You will see the status change to staged.
- Click on the
Diffbutton to see a “git diff” of the file in a pop-up window instead of the terminal.
- The green lines are new lines (with a + in the terminal).
- The red lines are deleted lines (with a - in the terminal).
- You can select a line, a chunk or a file to Stage.
- You can use the separate buttons for each.
- Click on the
Commitbutton in the menu row.- A new window will open with files to be committed. (you can also stage or un-stage files by clicking on them here as well).
- Write a commit message in the upper right Commit message box and click the
Commitbutton below the message.
- You get a pop-up window with the results (from the terminal window).
- Notice the file has disappeared from the Git Pane file listing but shows up in the history.
- There is a Git status message in the
Gitpane that shows you are ahead oforigin/mainby one commit.
- Select the
Pushbutton at the top right (green up arrow) to push to GitHub.
- The status message is now gone.
- You can go to GitHub to see your updated files.
The combination of RStudio Projects with a dedicated pane for Git and GitHub makes for a convenient workflow for using Git and GitHub to manage your code.
11.7 Branching and Merging in Git and GitHub
Git uses the concept of a “branch” to allow you to work on your code without changing the already working code.
Users can create and synchronize multiple branches within a repository.
- The
mainbranch is the top level branch which is usually reserved for working (or production) set of code. - Developers create a new branch to work on new features or fix a bug in the working code.
Branching allows you to:
- Develop new features without disturbing a stable baseline.
- Test changes before integrating them into main.
- Work on multiple features in parallel.
- Reduce risk to deployed or production code.
11.7.1 A Branching Workflow: Summary
This is a deliberate summary of the basic workflow. In practice, there are additional steps, especially if other people are working on the code to minimize merge conflicts.
- Start at the
mainbranch. - Create a new branch with
git branch my_branchname.- A branch is not a separate copy of the files.
- A branch is a movable pointer to a specific commit in the repository’s history.
- When you are ready to work on your new code you
git switch my_branchname- When you
git switchto a branch, Git does its magic to quickly create the files for that specific branch based on the most recent commit in your environment (and on your hard drive). - That is what you see in the RStudio File Manager because they are the files on your drive.
- When you
- Work on your code, save the files and
git commit -mas usual, only the commits are on themy_branchnamebranch of the git tree.- There are commands to create a copy of the branch on GitHub so you can push your code there so others can see it.
- When you are finished updating, testing and commuting your new code in the branch, you are ready to merge it back into the main branch.
- Use
git switch mainto go back to themainbranch. - Use
git merge branchnameto have git try to integrate the new code, line by line, with deletes and adds, into the main branch files.
- Use
- If there are no issues, it will finish the merge and create a new commit on
mainfor you.- You can use
git pushto put the new code up on GitHub main branch.
- You can use
- If there are issues, most commonly a “merge conflict”, that means you (or someone else) changed one or more lines of the code in
mainthat were also changed in the new code.- Git will tell you and put markers in the file for you to identify the conflicts and edit the file to make it consistent.
- Save it and all conflicts are resolved, it will complete the merge and you are ready to push.
Branching aligns naturally with “best-practice” Development–Test–Production workflows and team collaboration.
11.8 Collaboration on GitHub
11.8.1 GitHub Commands for Sharing Repositories
The key concept of GitHub is to enable widespread sharing of code while protecting the integrity of the code and the intellectual property rights of the code owners.
- Repo owners set read and write permissions for the public and for authorized users
- By default, you can create a copy of any of the public repositories and any private ones for which you have permission.
If you can see a repo, GitHub allows three main ways of creating a copy:
forkcopies a repo “horizontally”, from one GitHub account to another GitHub account without direct links or write permissions to the original repo.clonecopies a repo “vertically”, moving a copy of a repo on a GitHub account down to your local machine while maintaining a link to the original (origin) on GitHub so it’s easy to update your copy or even write to the original repo (if authorized).downloadcreates a file you can put on your local machine without any links.
When you have used fork or clone, you can sync across forks on GitHub or use git pull on your local computer to update your copy with any changes from the original repo.
GitHub supports two common team collaboration workflow models:
- Fork and Pull Model: when you have forked a repository from a team repo to your individual github account
- Shared Repository Model: when you have cloned the team repo to your local computer.
Choosing a workflow model enables consistent, parallel development while minimizing risk to the working baseline in main.
11.8.2 The Fork & Pull Workflow Model
In a Fork & Pull workflow model, each user creates a forked version of the repo on GitHub under their own organization and then clones the forked repo to their local machine.
- Users make all the changes they want locally (using branching of course).
- Users push their updates to their forked repo on GitHub.
- Users then initiate a “Pull Request” to ask the owners of the Original Repo to consider adding the update to a branch of the original repo., e.g., the Main or a test branch.
- This model is popular with open source projects because people can work independently, without upfront coordination, without putting the main code baseline at risk.
- As an example, anyone can fork the repos for tidyverse packages, make their own changes locally, and then submit pull requests for consideration by the tidyverse development team.
11.8.3 The Shared Repository Workflow Model
In a Shared Repository workflow model, each user clones a version of the repo on GitHub onto their local machine.
They first make sure they are not in another repository already or an RStudio Project.
You can check if the terminal working directory is already in a Git Repo with:
- If the command returns a failure message, that is good! You can clone your repo into that folder.
- Go to GitHub and click on the green
Codebutton and copy the URL or just copy the URL at the top of your browser. - Then use the following command in the terminal window and replace the URL with your repo URL.
- If you got a valid return from
git status, go up one level withcd ..to change the terminal working directory. - Keep checking till you no longer get a valid return or search up the directory tree to see if there is a
.githidden folder that does not belong there and delete it (after double checking!!). - When you have a clean working directory, i.e.,
git statussays it is not a repo, the clone as above.
Once you have a local version of the repo, …
- Users create branches for their work locally and on GitHub.
- Users push their updates to their branch of the repo on GitHub.
- Users then initiate a “Pull Request” to ask the owners of the Repo to consider adding the update to the
mainbranch of the repo. - This workflow model is slightly riskier as any contributor could push directly to
mainbranch on GitHub without using a pull request and create numerous merge conflicts for others if they are not communicating well. - It is popular with small teams who are disciplined and experienced in Git and GitHub as it does not require going through a forked copy of the repo to sync all the changes.
11.9 The Pull Request Workflow
Both collaboration workflow models use Pull Requests to help sync and integrate changes to code.
The Pull Request workflow is built around branches on GitHub.
- It is tightly integrated with the underlying Git repository so anyone can see exactly what changes would be merged if they accept your request.
You can open a Pull Request at any point during the development process:
- When you have little or no code but want to share some screenshots or general ideas,
- When you’re stuck and need help or advice, or,
- When you’re ready for someone to review your work.
By using GitHub’s @mention system in your Pull Request message, you can ask for feedback from specific people.
- @GitHub_username anywhere in an issue or pull request notifies the person and subscribes them to future updates.
- e.g., @rressler - what do you think?
Once a Pull Request has been opened, the persons reviewing your changes can enter questions or comments.
- You can reply as part of the “conversation” about the Pull Request
- As you get comments, you can continue to push updates resolving the comments to your GitHub branch.
- GitHub will show your new commits and any additional feedback you may receive in the unified Pull Request view.
- When done, someone with write privileges can either merge your code into a branch with the final changes or you can close the pull request.
11.9.1 Pull Request Life Cycle in Pictures
Pull Requests initiate discussion about proposed code changes with others on a team.
- Anyone with read access to a repository can create a pull request.
11.9.1.1 Create a Pull Request
If you pushed a branch, go to your branch on GitHub and click on the green button Compare & Pull Request as seen in Figure 11.4.
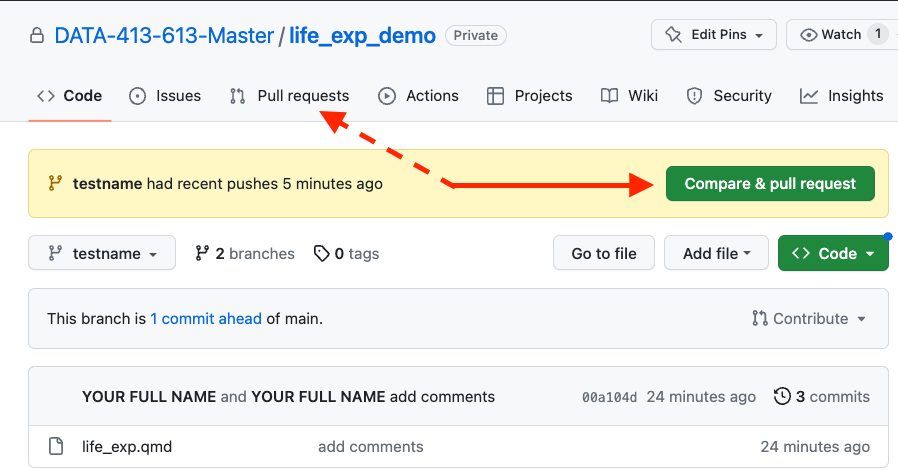
- You can also click on
Pull requestsin the menu bar and then click onCompare & pull requestorNew pull request. - Either way will bring up the
Open a pull requestpage as in Figure 11.5.
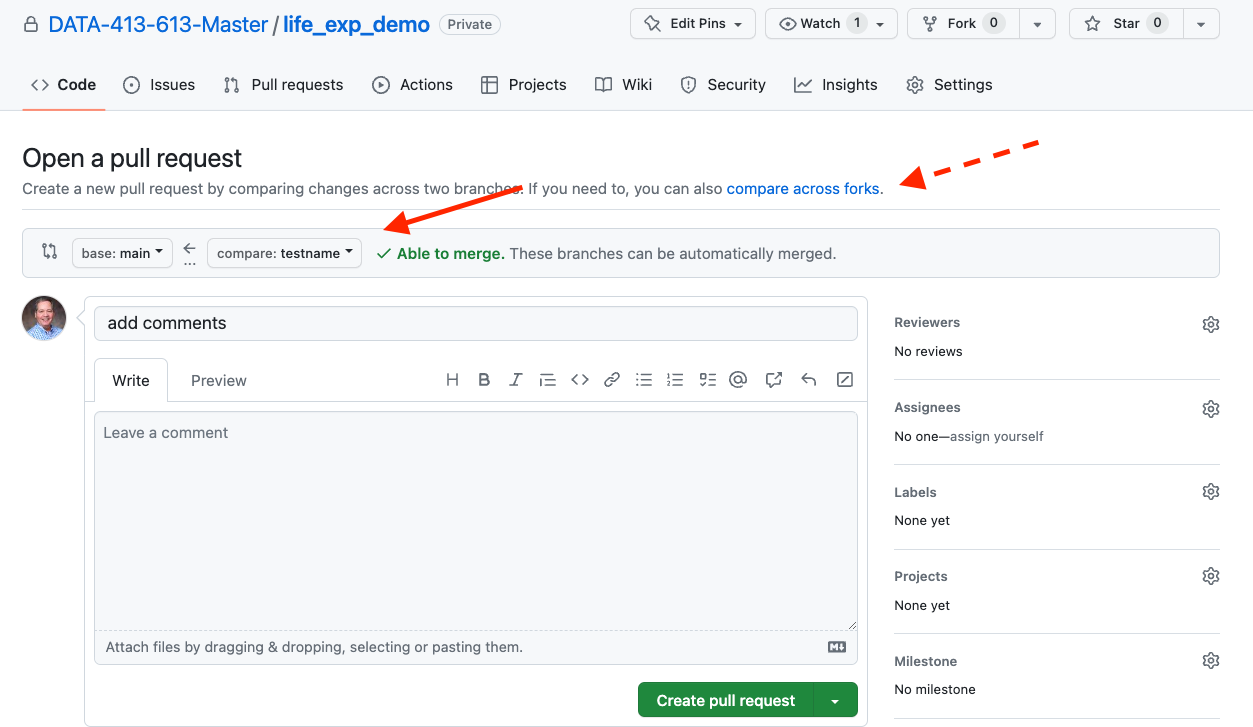
- Check that the pull in the correct direction: main should be on the left and the branch is on the right with arrow going from the branch to main.
- This page is for pulling from one branch to another within a repo.
- You can also do a pull request to submit proposed changes to the original repo owners.
- GitHub automatically compares the two versions and provides its finding if they can be easily merged at the top.
- You can compare the two versions, especially if there are merge conflicts, using the diff pane at the bottom as in Figure 11.6.
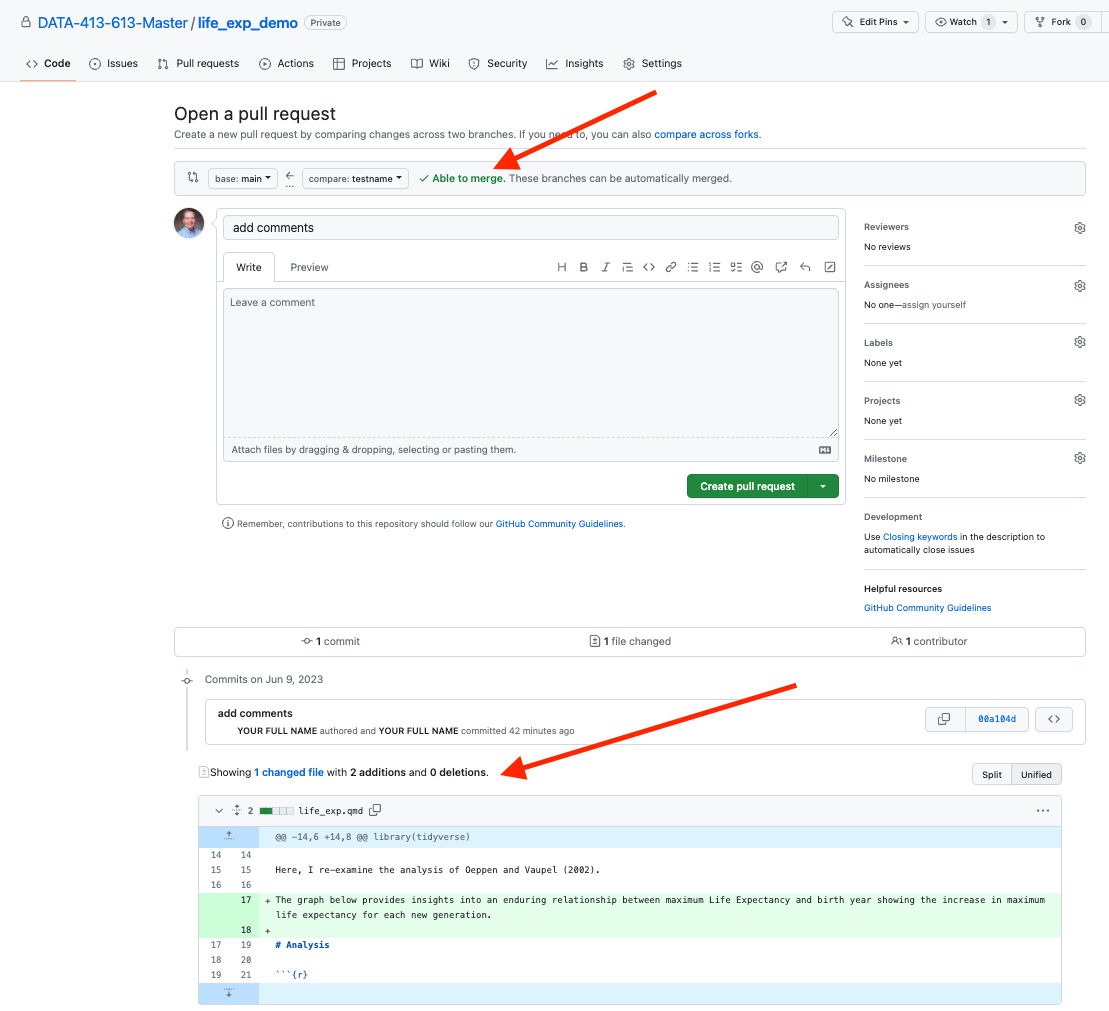
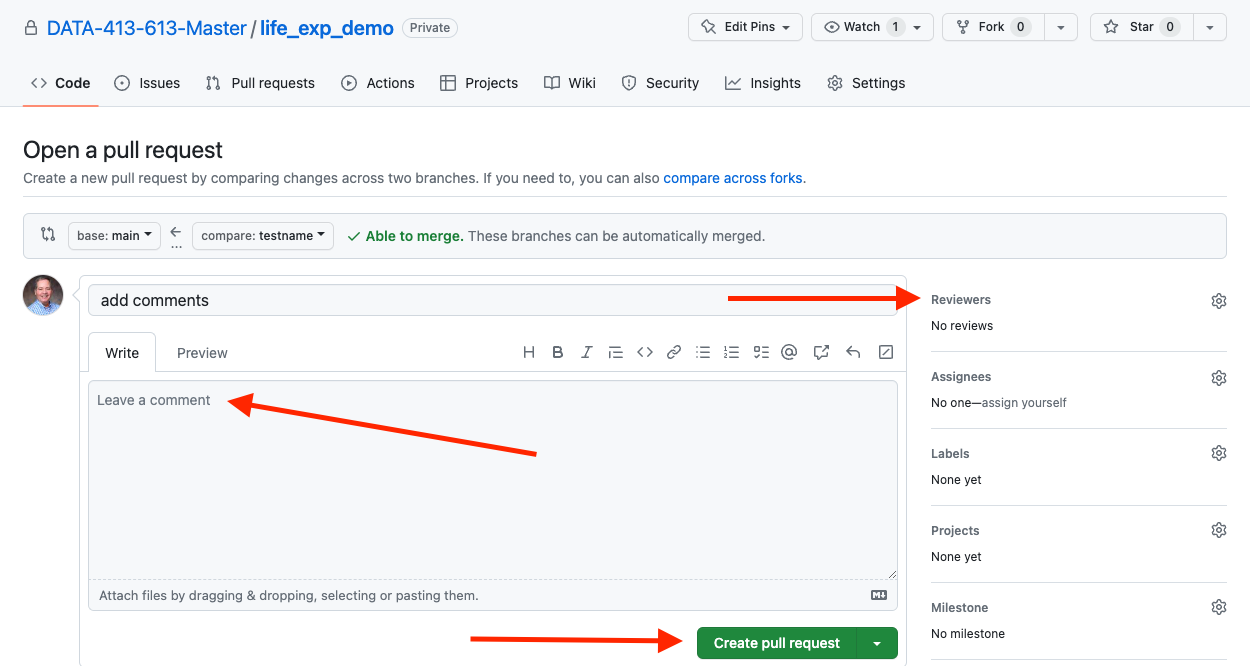
- Write comments for the reviewers.
- To select reviewers, click on the gear icon to see a drop down list of team members.
- Then click on Create pull request to distribute the request as in Figure 11.7.
11.9.1.2 Act on a Pull Request
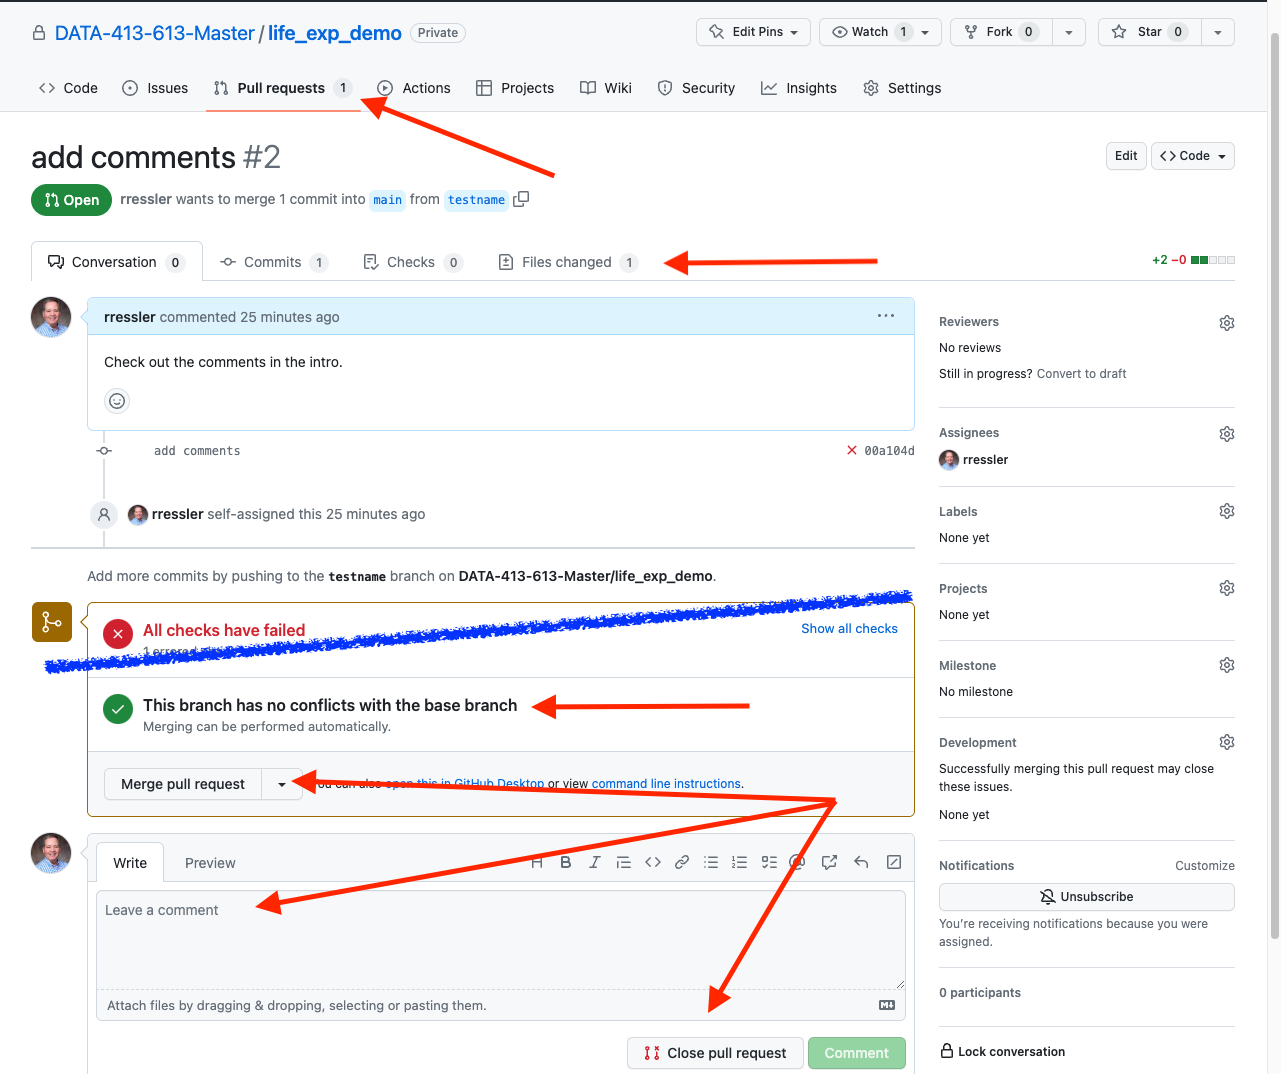
If you are a reviewer of a pull request, select Pull requests in the repo menu bar to see the list of open pull requests.
You now have several options as in Figure 11.8.
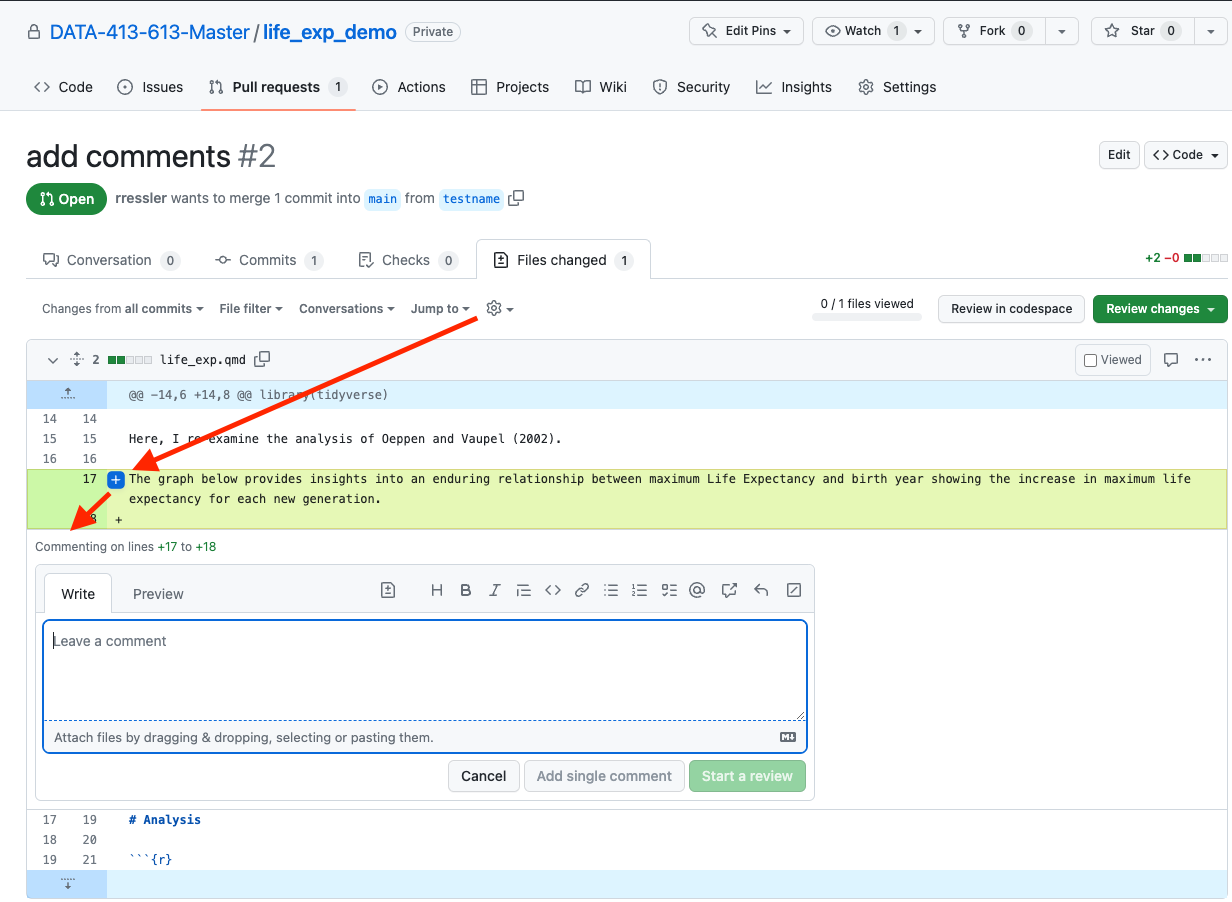
- Review: You can review several aspects of the pull request by using the tab panels
Conversationshows you all the comments that have been made on a pull requestCommitsallows you to delve into the list of commits since the last merge and then the details of individual commits,Checksshows you the results of any GitHub actions that affect the pull request.Filesopens up a diff of the changes in the files.
- When reviewing code you can comment on single or multiple lines by using the mouse to highlight them and clicking on the blue
+sign that pops up on the left of the lines. - That will open up the comment box where you can make suggestions and share with others.
- Merge Pull Request: Once you have reviewed the pull request and you want to merge, go to the middle of the page where GitHub provides the output of automated checks.
- Github also shows that the branch has no merge conflicts with main.
- When ready to merge, click on `Merge pull request.
- There are three options, but just choose the default one for now. Other organizations may have guidance for which type of merge to use.
- You will be asked to
Confirm mergeand enter comments so everyone can see them in the history. - Enter comments and click to confirm the merge.
- The page will update as in Figure 11.10.
- Note that GitHub also provides the option to automatically delete the branch that generated the pull request from the repo.
- If you click on it, it will delete the branch and make a commit on the GitHub repo.
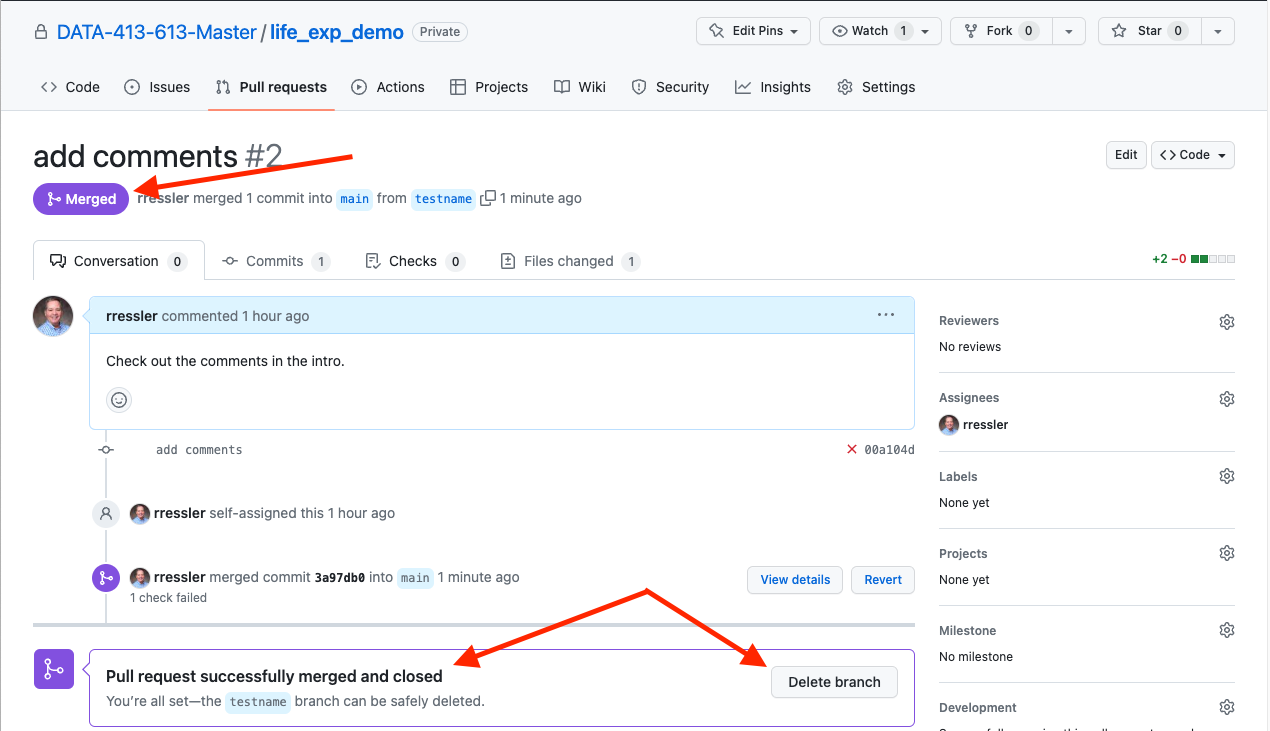
Figure 11.10: GitHub after Merge is confirmed. - Comment on or Close the Pull Request: If you decide not to merge, at the bottom of Figure 11.8 you can enter comments and share as to why, or you can enter comments and close the pull request without merging any code.
- The Pull request will no longer show up in the open list.
After a Pull Request updates the baseline, team members must use git pull to merge the changes into their local main branch so they are up to date. This would be part of an expanded branching workflow.
11.10 Summary
Version Control and Cloud Collaboration are baseline skills for data scientists (and software developers).
- Git and GitHub are very popular tools for these tasks but there are other options.
- Git allows you to track all changes to your text and data files in a transparent and repeatable manner. It is fast and efficient.
- GitHub allows you to work as part of a group or team on the same code base with tools to minimize conflicts across the code.
AI agentic systems use these same basic ideas when they are developing their own code or working on your code.
- They expect you to be familiar with the concept of saving and staging files, reviewing diffs of code, and executing merge commands.
- They also expect you to be making pull requests so you or others can review the code.
- Given sufficient permissions, AI Agents can send you Pull Requests to review their code before merging it into your baseline.
When working with an AI Agent on code, you are never a solitary developer, you are part of a “team” with the AI agent. Being familiar with version control and collaboration workflows will help you be more effective and efficient in working with the agent.