Appendix E — Using GitHub in the Course
E.1 Learning Outcomes
After reviewing these notes students should be able to:
Sync their GitHub Classroom Repo with an update from the instructor’s Origination repo created by GitHub Classroom.
Use GitHub Pull Requests or GitHub Issues to solicit feedback on their work.
References
E.2 Synching a Student’s Repository with the Originating Repository
When Instructors use GitHub Classroom for a course, the student repos are (as of July 2024) created as forks from a copy of the instructor’s template repo.
- The originating copy of the instructor’s repo is hidden from the students.
If the instructor updates the originating copy of the repo, the students cannot “see” the update so they cannot create their own pull request to sync their forked copy (as one would normally do to sync across a fork).
- However, the instructor can use GitHub Classroom to detect any student repos that are out of sync and automatically create a “GitHub Classroom: Sync Assignment” pull request for each student.
E.2.1 Synching a Student’s GitHub Repository from a GitHub Classroom Originating Repository
When an Instructor updates their originating repository they can use GitHub Classroom to create a “GitHub Classroom: Sync Assignment” pull request for each student.
Students can go through the pull request process as normal.
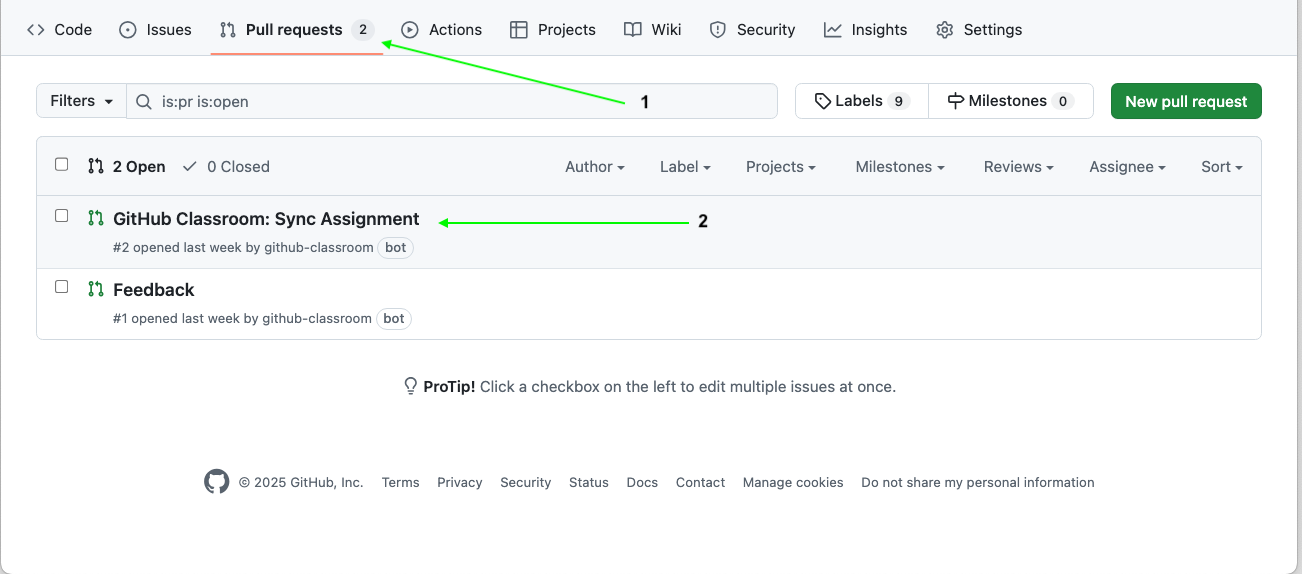
E.2.2 Find the Pull Request.
Figure E.1 shows the first two steps in the process.
- Click on the Pull Request menu item at the top of the page.
- Identify the “GitHub Classroom: Sync Assignment” pull request and click on it to open the pull request.
E.2.3 Merge the Pull Request
Figure E.2 shows the next steps in the process.
- Confirm the pull request has no conflicts with the base branch (e.g., the main branch) of the student’s repo.
- If the instructor is only adding new files, there should not be any conflicts (unless the new file is named the same as a student created file - rare)
- If the instructor is updating an existing file which has already been edited, saved and pushed to GitHub by the student, there could be a merge conflict.
- In that event, suggest the student rename their version of the file prior to attempting to merge the pull request.
- As an alternative, do the merge and resolve the merge conflict directly in the file. (see Merge Conflicts)
- Once there are no potential merge conflicts, click on
Merge Pull Requestto open the confirmation page.
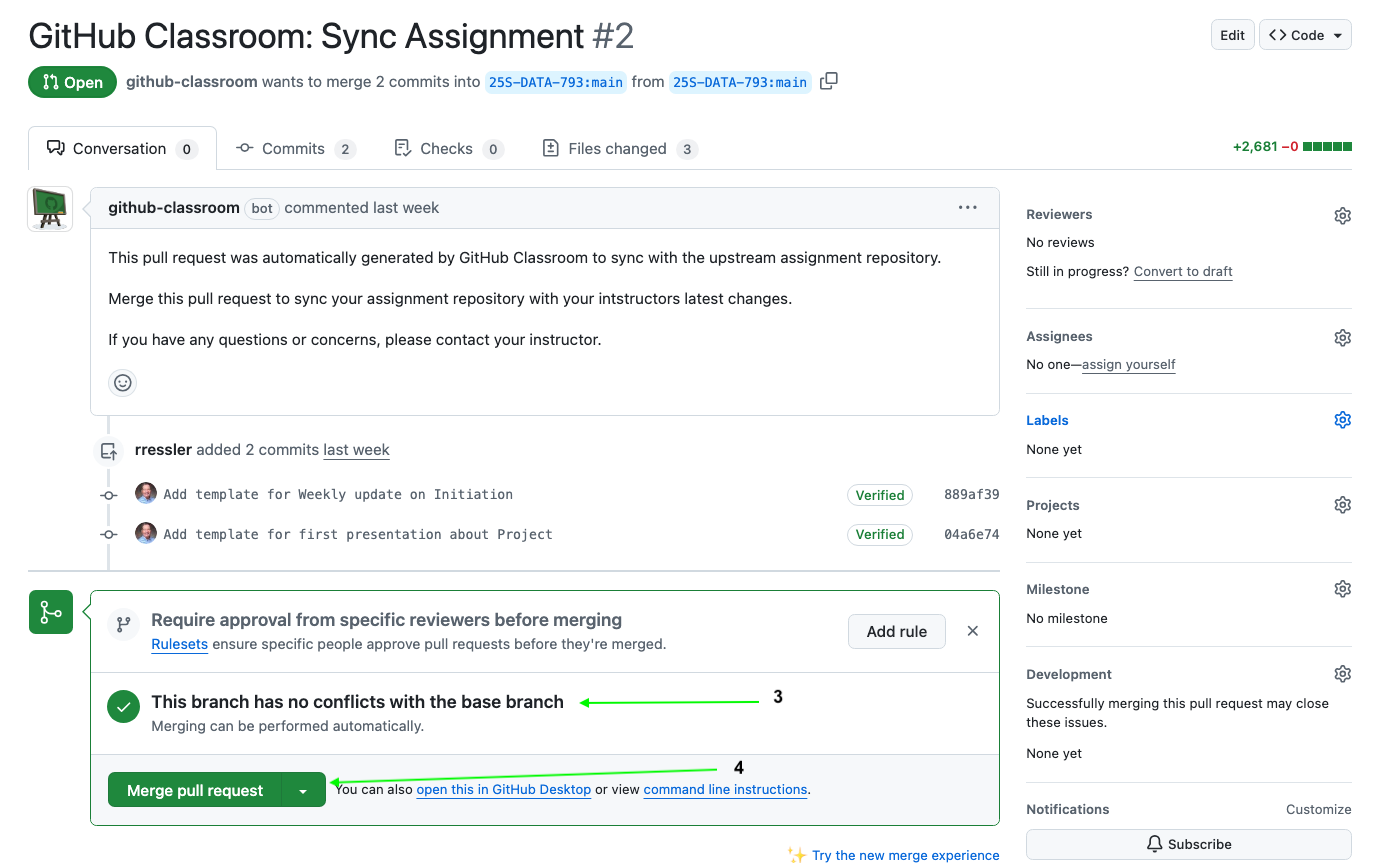
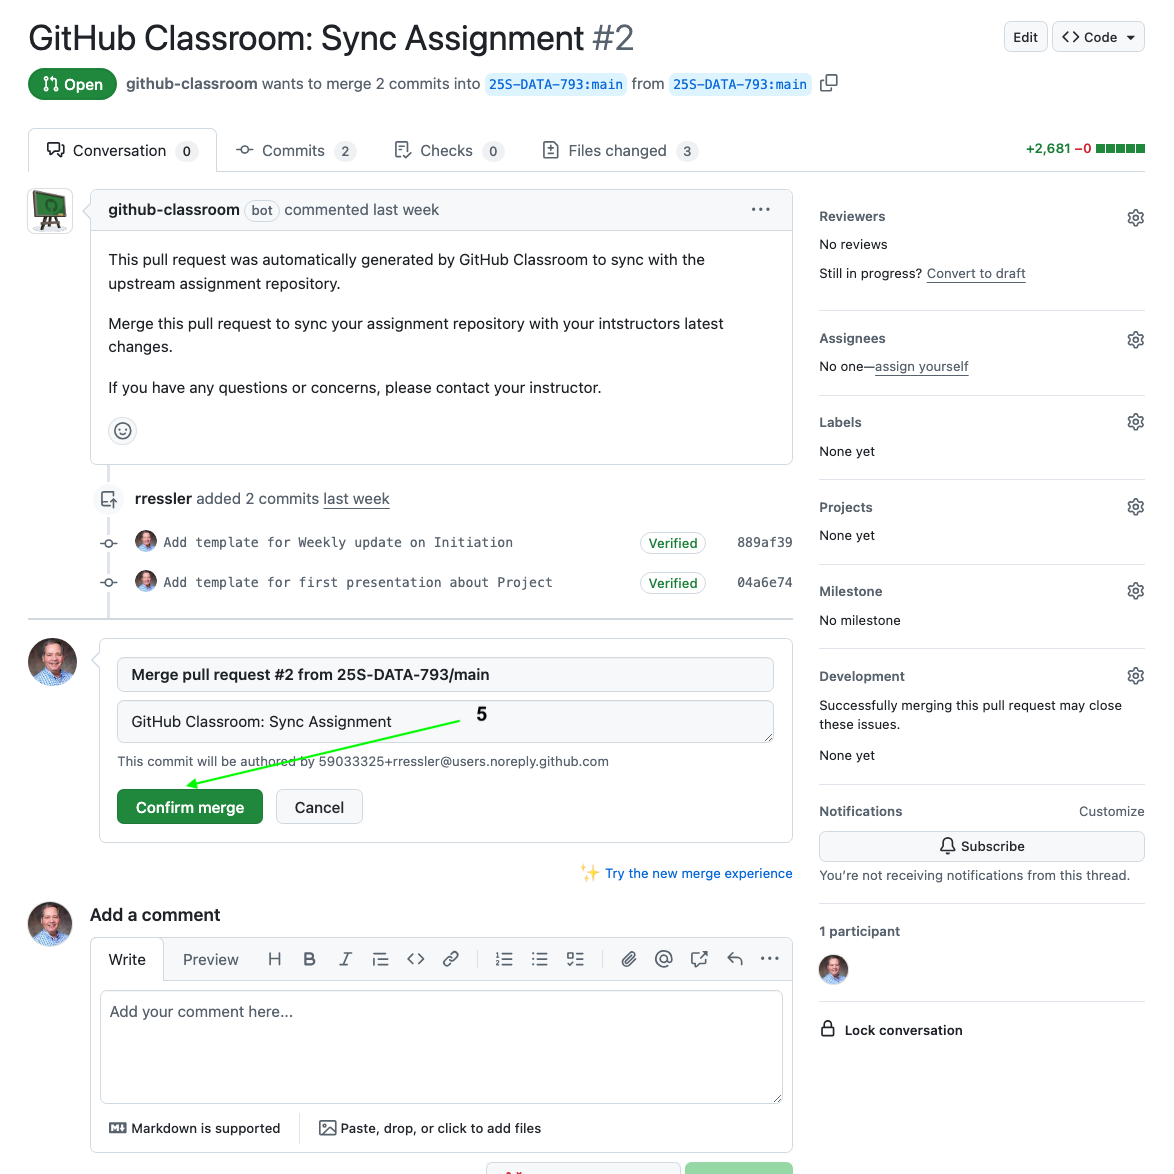
Figure E.3 shows the confirmation page.
- Click on
Confirm mergeto finish the merge of the updated files into the student’s GitHub repository.
E.2.4 Sync the Students Local Repository from their GitHub Repository
The student’s GitHub repository main (base) branch is now updated with the latest files from the instructor repository.
If the student has cloned the GitHub repository to their local computer and/or created branches, the next step is to propagate any updates to the local computer and any affected branches.
E.2.4.1 Updating a Local Main Branch
If using the terminal pane, navigate to the local repo in the terminal pane and enter git pull.
- If the local repository was synced with the GitHub repository, there should not be any merge conflicts.
- If the local repository has saved changes in the files affected by the update, but were not pushed to GitHub there may be merge conflicts to be resolved.
If the repo is an RStudio Project and using the Git Pane, open the project and click on the Pull icon (green down arrow).
- If the local repository was synced with the GitHub repository, there should not be any merge conflicts.
- If the local repository has saved changes in the files affected by the update, but were not pushed to GitHub there may be merge conflicts to be resolved.
E.2.4.2 Updating Local Branches
For each branch that may be affected by the update, go through the process of switching to the branch and executing the git pull process to update the branch and resolve any merge conflicts.
E.2.5 Summary
Students should now be able to update their classroom GitHub repositories with any updates from the instructors using a “GitHub Classroom: Sync Assignment” pull request and propagate the updates to their local main branch branch and other branches.
E.3 Getting Feedback with GitHub Issues or Pull Requests
There are two situations in this course for getting feedback on a document/ or code file that has been pushed to GitHub.
- For items that are already pushed or merged into the Main Branch - create a new Issue.
- For items that are in a Branch other than Main, e.g., feedback - create a new Pull Request.
E.3.1 Creating a New Issue
Once the document/file has in the main branch, click on the Issues icon in the main GitHUb menu.
This should open a pane for choosing what type of Issue as in Figure E.4.

Click on the Request Code Review type unless you are reporting a bug in the lecture notes.
That should open up a template for a new Issue as in Figure E.5.
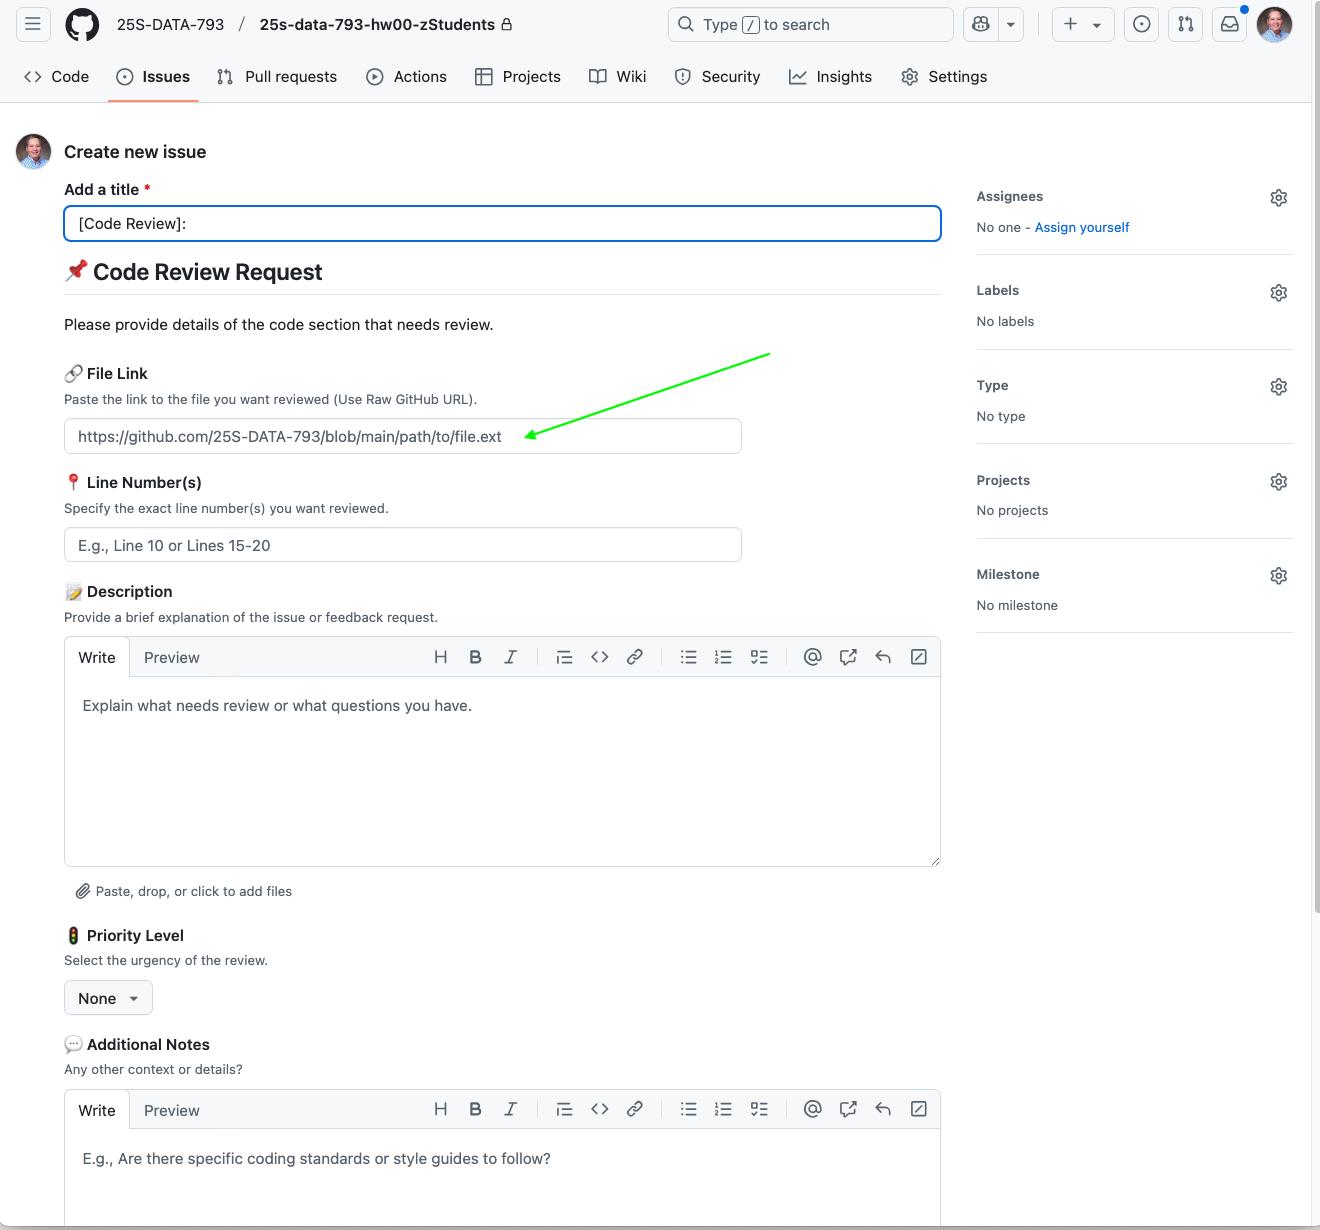
Fill out the template to describe your request.
Copy and paste in the URL for the document/file in question.
- If you have the document open in another tab, you can click on specific lines in the document that you want reviewed.
- Then copy and paste the URL from the browser window into the template.
- It should in the RAW URL which includes the
/blob/element.
- Go to the upper right and select who you want to review.
- When complete click on the
Createbutton at the bottom.
E.3.2 Pull Request
If the code is in a branch, e.g. the Feedback branch, then you can use a pull request.
For a refresher, see Branching in Git and GitHub
This is especially helpful for non-working code.
Click on the Pull Request icon and then the Create New pull request.
- GitHub will only allow you to do this if there is a valid branch with code that is different than the code in the main branch.
Fill out the template, you can use the same URL copy and paste, and select the people you want to review the code (Assign).
Then click Create and your assignees should get notified.
E.4 Cleaning the Commit History
Committed a too-large file or secret/sensitive information you need to remove from the commit history?
This can happen from time to time and it can be be fixed, but it is not as easy as you might wish because of the way Git operates.
If you have committed a file with sensitive information, updating the file and doing a new commit does not remove that information from your history.
It just creates a new entry in the history but the sensitive information is till there.
If you have committed a file that is too large for GitHub (>100MB) and the push to GitHub failed, deleting the file from the repository **does not* remove it from your commit history and your pushes will continue to fail.
You must remove the sensitive information or too-large file from your git commit history.
You can fix this using Git Commands such as git-filter-branch but that can be cumbersome.
- There are lots of blog posts and how-to posts online.
The recommended approach is to use the BFG Repo Cleaner software.
- This is a java script application so you will need a recent version of Java (at least 1.8).
Follow the BFG instructions carefully!
- Install bfg on Mac with homebrew
brew install bfg.- App website: https://rtyley.github.io/bfg-repo-cleaner/
- Install BFG on Windows
- Install the App
Go to a terminal window
Copy and paste the following command in Terminal app:
/bin/bash -c "$(curl -fsSL https://raw.githubusercontent.com/Homebrew/install/HEAD/install.sh)"and press enter/return key.Wait for the command to finish. If you are prompted to enter a password, please type your Mac user’s login password and press ENTER.
Mind you, as you type your password, it won’t be visible on your Terminal (for security reasons), but rest assured it will work.
Now, copy/paste and run this command to make brew command available inside the Terminal:
echo 'eval "$(/opt/homebrew/bin/brew shellenv)"' >> ~/.zprofileThen Copy and paste the following command:
brew install bfgDone! You can now use BFG.
- Using the App to clean up a commit history. See GitHub Using the BFG
BFG has multiple options for cleaning a commit history, The following is for files that are too large to store on regular GitHub, e.g., over 100MB.
- Using the terminal window, navigate to the top level folder of the repo with the commit history containing the large files.
- Clone a fresh copy of your repo, using the –mirror flag:
git clone --mirror.
- Clean the History of the large file.
- Be sure you have deleted the file and run a new commit without it.
- Assuming the BFG jar file is at the top of the repo or you have set a path to it, enter
bfg --strip-blobs-bigger-than 100Mas an example or on windows, enterjava -jar bfg.jar --strip-blobs-bigger-than 100M path/myrepo.git- The 100M is the GitHub limit. You can lower the 100M to the number you want to shrink the size of the repo.
- You could also use the
-boption instead of--strip-blobs-bigger-than.
- It it fails as there are no large blobs, but you know there are ….
- Ensure you have run a clean commit since deleting the large file (the last commit is protected by default).
- Pack the git repo with git gc as this will manually consolidate the fit files so large blobs will appear. See 10.4 Git Internals - Packfiles.
- It should tell you the deleted files and then tell you to run the following:
git reflog expire --expire=now --all && git gc --prune=now --aggressive.- If you have a protected commit with large files then rerun with the option
–no-blob-protection. - When ready, run
git add -A, then thengit commit -m "post BFG".- You may need to push with the
--forceoption.
- You may need to push with the