Using Git, GitHub, and GitHub Classroom for Courses
Suggestions for Instructors
Introduction
Git, GitHub, and GitHub Classroom can work together when teaching Data Science or other software-intensive courses.
The following is focused on students who will work with Git and GitHub on their local computing device, e.g., using RStudio. The other options for using GitHub desktop or cloud or codespace version are not covered here. See GitHub and GitHub Classroom resources for more information on those options
Resources
1 Getting Started
1.1 Ensure Your Computer has a Recent Version of Git 
Git is a free and open source version control system for your code on your computer and working with others.
- The latest version for Mac/Windows/Linux is
2.52.0(2025-11-17). - To check your version, open a terminal window and enter
git --version. - To download or update Git for Mac or Windows, go to Git Downloads and choose your operating system. Follow the instructions.
- If you have a Mac and use HomeBrew, you can also use
brew upgrade gitin a terminal window. If prompted for a password, use the password for your computer.
- If you have a Mac and use HomeBrew, you can also use
- The Git site also has Documentation and links to the Pro Git Book and GitHub Git Cheat Sheet.
1.2 GitHub
GitHub is a cloud-based platform for hosting and collaborating on Git repositories. There is a free version you can use along with educational benefits.
1.2.1 Sign up for a Personal GitHub Account for classes
- Go to https://github.com/, enter an email address and click on the
Sign Up for GitHubbutton - On the next screen, confirm your email and click on
Continue - Create a strong password and click on
Continue - Enter the username you want to use for this account and click on
Continue - Accept or decline email updates and and click on
Continue - Solve the puzzle(s) to verify your account and and click on
Create Account - GitHub will send an email to the email address you entered with a “launch code”. Enter this code and your account will be created and activated.
1.2.2 GitHub Account Authentication
GitHub now requires 2 Factor Authentication (2FA) for contributing code to repositories. Your user name and password in not sufficient.
There are several options for Configuring two-factor Authentication for GitHub.
- Google recommends a time-based one-time password (TOTP) application. AU uses the Duo TOTP and you can add an account for GitHub on it. see Configuring 2FA using a TOTP app
- Goggle also accepts a Passkey. See Configuring
- If you use the GitHub mobile app you can also log in to use that for 2FA as well.
These options will allow you to interact with GitHub.
However, you must also establish an authentication credential between your local Git on your computer and GitHub in the cloud.
1.2.3 Authenticating Between Git and GitHub
While you can go through 2FA each time you want to interact with GitHub you can use your local credential manager to streamline the interactions.
The Git Credential Manager (GCM) is a multi-platform tool to help Git users authentic with GitHub.
If you have a Windows machine, GCM is already included in Git for Windows. When you were installing Git for Windows, you should have selected GCM (it’s the default) as the Credential Helper
Mac users (and windows users who are unsure) can go to the Git Credential Manager Install Instructions and follow the instructions for your platform.
Once it is installed, it will automatically engage when you need to authenticate and create the linkage with your local Credential Manger, e.g., KeyChain on a Mac.
When you go to upload code to a GitHub repository at some point, a window will pop up asking you to authenticate using a browser or a code. Chose the browser and if you are not already logged into GitHub with the same email, it take you through the 2FA process you have established.
Assuming success, the GCM should take care of future authentication for you.
1.3 Teaching Git and GitHub without GitHub Classroom
One can teach how to use Git and GitHub without using GitHub Classroom. As an example one can use the following approach for issuing assignments and receiving student work.
- Require each student to create a personal GitHub account.
- Issue assignments as usual, e.g., through a learning management system such as Canvas or Blackboard.
- Have students complete their assignments on GitHub by creating an organization for the class.
- Have the students create a repo for each assignment.
- Have students either 1) provide you access by admitting you to the organization with access to all repos or, 2) submit zipped files of each repo they complete to you via the learning management system.
While this is feasible, it means the instructor is managing across multiple GitHub organizations which can be cumbersome and time consuming.
An alternative is to use GitHub Classroom, part of the GitHub Education capabilities. The rest of this document assumes you have Git working on your local computer and an active GitHub account (typically a personal account for educational purposes).
2 GitHub Classroom
GitHub Education is their program for supporting organizations, teachers, and students in learning how to work with Git and GitHub.
AU does not have an organizational account but you can Access free GitHub Education benefits
That includes the use of the GitHub Classroom to manage assignments for students.
GitHub Classroom is a companion capability for GitHub from GitHub Education.
- GitHub Classroom works with GitHub and GitHub “organizations” to allow an instructor to create assignments for students and then automatically creates student repos for an assignment within a single class organization.
2.1 GitHub Classroom Quick Start for Instructors
The Quickstart guide provides the steps to establish your account, get educator benefits and then set up the organizations and GitHub Classroom App.
To access the Quickstart, go to Help (under your account icon in the top right) and select Education and then select Quickstart
3 Create Two GitHub Organizations
3.1 Background
A GitHub account can create or join multiple GitHub “organizations”.
- A GitHub organization is a GitHub structure with an owner/administrator who manages the organization.
- An organization can have members with different roles/privileges, multiple teams with different privileges, and many different repositories.
- The owner/administrator controls which people/teams can access which repositories.
The GitHub Classroom App Quickstart focuses on creating a GitHub “Semester” organization. To manage courses over multiple semesters, it helps to create a second GitHub organization at the Course level.
The GitHub “Course” organization will hold all of the materials for the course and serve as the baseline for the course over multiple semesters. Students will not have access to this organization. This organization can support multiple instructors by creating a GitHub Team for Instructors and allowing access to the repos via the team.
A GitHub “Semester” organization holds the materials to be shared with the students for a single semester of the course and it also holds all the student assignment repos for that semester. Create a new “Semester” organization for each semester you hold the course.
To see all your GitHub organizations,
- Go to Github and sign in.
- Click on the Octocat icon
 on the top left to go to your personal account home page.
 - The account icon and name has a down arrow on the right side.
- Click on the arrow to see all your organizations and then you can select which organization you want to work with or create a new organization.
In summary, there will be three structures involved in using GitHub with GitHub Classroom:
The GitHub “Course” organization: This has all the current and historical baseline of course materials. No student access.
The GitHub “Semester” organization: This has only course materials to be shared with students for a given semester and all the student repos for that semester.
The GitHub Classroom “Classroom” which is Not a GitHub organization. It is a separate site where you set up template repos for each assignment and create a URL link for each assignment to distribute to students. This site is for instructor use only and is not used by students.
3.2 Create the GitHub “Course” Organization
Follow the instructions on creating an organization to create a new organization.
- Go to GitHub and sign in.
- Click on the Octocat icon on the top left to go to your personal account home page.
- The account icon and name has a down arrow on the right side.
- Click on the arrow to see all your organizations and then select
Create organization. - On the Pick a Plan Page, select
Create a Free Organizationon the left. - This brings you to the page to
Set up your organization.- Enter a name for the “Course” organization, e.g.,
DATA-413-613-course. - Enter your account contact email.
- Select that the organization belongs to
My Personal Account - Solve the puzzle to verify your account.
- No need for GitHub Copilot for business
- Accept the terms of service and click
Next.
- Enter a name for the “Course” organization, e.g.,
- No need to add people yet so click on
Complete setup - Scroll to the bottom and click on
Submit. - Confirm access.
- Your “Course” organization is now created.
3.3 Create a GitHub “Semester” Organization for Each Instance of the Course
Create a new organization for each semester’s version of the course. You will connect each semester’s class organization to GitHub Classroom. This is the organization students will join to get lecture notes, access their assignment repos, and submit their work.
Repeat the process as before.
- Go to GitHub and sign in.
- Click on the Octocat icon on the top left to go to your personal account home page.
- The account icon and name has a down arrow on the right side.
- Click on the arrow to see all your organizations and then select
Create organization. - On the Pick a Plan Page, select
Create a Free Organizationon the left. - This brings you to the page to
Set up your organization.- Enter a semester-unique name for the “Semester” organization such as
26S-DATA-413-613-secthat identifies the semester and course (and perhaps section if you want different organizations for multiple sections). - Enter your account contact email.
- Select that the organization belongs to
My Personal Account - Solve the puzzle to verify your account.
- No need for GitHub Copilot for business
- Accept the terms of service and click
Next.
- Enter a semester-unique name for the “Semester” organization such as
- No need to add people yet so click on
Complete setup - Scroll to the bottom and click on
Submit. - Confirm access.
- You now have a “Semester” organization to share information with your students and hold their repos.
GitHub will provide a default icon for the organization. You can change to something else to help you find it easier by clicking on the icon and it will take you to the Page for General Settings.
3.4 Add a Students Team to the “Semester” Organization
Once added to the semester organization, students automatically have access to their individual repos in the Semester organization such as each assignment.
If you create repos you want to share across all the students, e.g., lecture notes or references, the easy way to provide access to each student is to create a GitHub Team which has view privileges for the repo. You can then add students to the team later on and they will have access to the repo.
- Go to the Semester Organization in GitHub.
- Click on
View Organization - Click on
Teamsin the menu bar and then click onNew team(Green button) - Call it
Students. - Click on
Create Team. - You will add each student to the team as they join the organization.
- After you create the
Lectures_Classrepo later on, you will add it to this Students team and authorize the team access to the repo.
4 Create a GitHub Classroom “Classroom” for the Semester
4.1 Request Teacher Benefits/Educator Discount for the “Semester” Organization
- The first step is obtaining GitHub Teacher Benefits which allows you to upgrade your organizations to have multiple private repos for each student for free.
- For details, see the Quickstart section on Applying for an teacher benefits discount.
- Go to GitHub Education. Github education is in the midst of rolling out a new look and feel for its web site. Depending on your status your screen may be a bit different than what follows.
- If you see
Benefitson the top navigation bar click it. If not, click on your profile Picture and selectYour Benefits Application. - If you see an option, scroll down and select
Get teacher benefits.- Fill out the information as per the instructions.
- Since AU Faculty IDs do not include an expiration date, this may require redacting an employment contract, exporting it as a .png, and uploading the .png.
- Another alternative is submitting a copy of the course schedule for the upcoming semester showing your courses.
- These may still generate error messages. If so, contact the GitHub Education Support for help.
- When complete, click on
Process My Application. - Applications are typically approved right away but may take a few days.
- You need to renew your application for benefits each year. They will let you know.
4.2 Use GitHub Classroom to Create a Classroom for the Semester
- For details, go to the Quickstart section on Set up GitHub Classroom.
- The GitHub Classroom connects with your current GitHub account.
- Sign into GitHub Classroom and authorize access for the account where you created the GitHub Semester organization.
To create the GitHub Classroom “Classroom”:
- Select
Create Your first classroomorNew Classroom.- The screen should show your GitHub organizations.
- Select the GitHub “Semester” organization you just created, e.g.
26S..., not the Course organization. - This should take you to the
New Classroompage where you name the classroom.- I tend to shorten the name as it will be the prefix on each student repo, e.g., 26S-x13-03
- Click
Create Classroom.
- Skip the next two steps on adding TAs and adding students via the LMS. You can do it later.
- Once you know who your TA will be, you will need to add them as an owner on the GitHub Semester Organization so they can see and work with student repos.
- Your GitHub Classroom new classroom is now established and you should be able to see it in GitHub Classroom.
- In the settings for the classroom you will see an option to enable GitHub Codespaces. Recommend against that as it uses VSCode and not RStudio as the environment.
- The classroom does not appear in GitHub as it is not a repo or organization. It is a GitHub Classroom structure designed to just for managing the distribution of assignments and creation of student repositories.
4.3 Use the Educational Benefit to Upgrade the GitHub Semester Organization
- Once your educational benefit is approved (you will get an email from GitHub), apply to upgrade your GitHub “Semester” organization.
- Go to Upgrade your organization.
- Click on your GitHub “Semester” organization. Select it as a classroom and then
Finish Upgrade. - You should get an email right away stating that it has been approved.
4.4 Add Students to the Semester Organization
4.4.1 Connecting Canvas and GitHub Classroom
AU Canvas can add GitHub Classroom as an “external App” to your AU Canvas Course. This will allow you to create and sync the GitHub Classroom membership with the students enrolled in the course in Canvas.
- The instructions Linking a Canvas Course with a classroom cover most steps.
- Go to the Canvas Course
Settingsand click on theAppstab. - Click on the
View App Configurations(step is not in the GitHub instructions). - Now you will see the
+sign. Click on it. - Under
Configuration Type, selectBy Client ID. - Enter AU’s client ID: 124330000000000228.
- Then click on
Install.
Once it is installed you will see GitHub Classroom on the course Settings page under Course Status on the the upper right side of the page.
- Click on the
GitHub Classroommenu item. - Canvas will open up GitHub Classroom and ask you to
Choose your classroom to link. - Select the GitHub Classroom for the semester.
- It will then ask you to select an identifier. Recommend selecting
Nameas students probably will not know their Canvas ID and may be using a different email. - Select
Import roster entries.
This will import all the students from Canvas and you will see them in the Students tab of the GitHub Classroom.
- At this point, each student will show as an
Unlinked userin the classroom. - That is because connecting Canvas and GitHub Classroom does not link the students to their GitHub account or put the students into the course’s semester organization on GitHub.
- Students will have to accept an assignment from a personal GitHub account and then they will linked their personal account to their name in the Classroom Roster.
4.4.2 Linking Students with their GitHub Accounts
Follow the steps below on issuing assignments to create an assignment “hw_00” in GitHub Classroom and issue it to students.
- As each student accepts the assignment, they will be sent to a “Join the classroom” screen which shows the names of all the students on the canvas roster who have not yet joined.
- They should click on the right facing arrow
>to the right of their name and then their account will be linked. - If they make a mistake, they should let you know. You can go into the
Studentstab on GitHub Classroom and click onUnlink tGitHub accountand then they can try to accept the assignment again. - Successfully linked students will be added to the GitHub “Semester” organization as an outside observer.
- Go the the semester organization and click on the
Peopletab. - Go to the
Outside Collaboratorson the left menu and find the students name. - Invite them to join as “members” and at the same time check the box to invite them to the Students team so they can see the lecture notes or other repositories you share.
4.5 Add a TA to the GitHub Semester Organization
Once you you know your TA’s email, (even better their GitHub ID), add them to the Semester Organization.
- Go to GitHub and select the Semester organization.
- Click on
View Organizationand selectPeoplefrom the menu. - Click on
Invite memberand add the TA as an owner of the Semester organization so they have admin privileges. - Go to the GitHub Classroom, select the semester’s Classroom, and select
TAs and Adminsto invite the TA to the semester’s classroom.
4.6 Add the TA to the Course Organization
If you want to share the assignments repo with the TA so they can see the solutions, go to the GitHub Course Organization, not the Semester organization.
- Create a TA Team as you did with Students.
- Invite the TA to that team.
- Grant the Team read access to the Assignments repo so they can see the solutions.
4.7 Summary
At this point you should have two new GitHub organizations. One for the baseline course that is enduring and one for the Semester organization.
- The baseline course may have teams for Faculty and one for TAs.
- The semester course should have a team for Students.
You should also have a “GitHub Classroom” Classroom that is linked to the Semester Organization in GitHub.
5 Considerations for a Course Directory Structure
The workflows that follow are based on the following directory structure.
Each course has in its own directory, e.g., /DATA-413-613/ which is Not a repository or an RStudio project.
OneDrive used to be a good solution for storing your GitHub Repositories.
However, in the past few years it has adjusted its approach to managing files in the cloud and on disk, especially on Mac OS.
As your repositories grow, it will become quite slow and unstable as it tries to manage the thousands or millions of small files that can be generated by Git over time.
Note: OneDrive does not consider itself a backup system - just a collaboration system. Recommend only putting files in OneDrive that you intend to access on multiple devices or share with others.
5.1 Course Content Directories
Underneath the Course directory, create four directories for content that persist across semesters as the current and historical baseline for the course.
/Assignments//Lectures//bib/
These directories are each their own Git repository (repo). Their upstream repo is in the GitHub Course organization. None of these files are distributed to or shared with students (other than the TA).
/Assignments/contains all the .qmd and HTML files for homework, quizzes, and projects as well as any necessary data files./Lectures/contains all the .qmd and HTML files for each subject.- If you look at my course repos you will see i actually have a
lectures_bookdirectory and alectures_presentationdirectory to separate book content from slide presentations.
- If you look at my course repos you will see i actually have a
/bib/contains the .bib files used in the lecture notes or assignments.
The /Assignments/ directory has sub-directories for each assignment, e.g., /hw-01/.
- The directories for the individual assignments in
/Assignments/generally have sub-directories, e.g.,/analysis/and/data/. - Some assignments may have additional sub-directories, e.g., for different shiny apps.
- The
analysisfolder contains the .qmd files with the complete lecture notes or assignments along with the rendered output files with and without solutions.
The /Lectures/ directory has sub-directories for each lecture topic, e.g., 01_topic/, /data/ for data files, and other sub-directories for images or scripts.
I also use an \Admin directory. It contains the syllabus and grading information. Do not push grading information to GitHub and doing so may create an issue under FERPA. Use a .gitignore file to keep grading files from being controlled by Git.
5.2 Student Content Directories
Different directories contain information distributed to students.
/class_notes/has the same sub-directory structure as the/Lectures/folder without the subdirectories for the lecture content.- This is where lecture notes, scripts, and output generated during each class period are saved.
- This directory is its own Git repo. However, it is linked to an upstream repo in the “Semester” organization, not the “Course” organization.
- This repo is added to the Student’s team in the class organization so students can see it.
- Students should clone this repo to their local computers.
/zAssignment_repos/contains the student versions of each assignment repo in their own sub-directory structure, however, it is NOT a repository. Each assignment’s sub-directory is its own GitHub repo which is pushed individually to the Course organization.- The student assignnment repos do not include any solutions.
- Each of these student assignment repos gets designated as a “template” repo on GitHub so it can be used to generate copies of itself.
- As each student assignment repo is updated for a given semester, tit is forked to the Semester organization where GitHub Classroom can find them.
/zStudent_repos/contains each student’s repos. It will have eventually have a sub-directory for each assignment with all the student repos for that assignment.- When a student accepts an assignment, GitHub Classroom creates their repo for that assignment in the Semester organization with a name that combines the assignment name and the student GitHub ID.
- Use the GitHub Command Line Interface to clone the assignments this this directory (see Section 7.2).
This next section assumes one has successfully completed the actions in Section 5.
There should be two organizations (Course and Semester) in your GitHub account with corresponding local directories and repositories.
The Semester organization should be linked to a corresponding semester classroom in GitHub Classroom.
6 Workflows
The following workflows help manage a course using Git, GitHub, and GitHub Classroom:
Manage course content within and across semesters
Share Lecture Notes and References with students
Issue individual assignments to students
Issue group assignments to students
Review/Grade student assignments
Prepare for a new semester
6.1 Manage Course Content
Lectures and Assignments can be updated in the local directories and pushed to the GitHub Course organization repositories after rendering.
Lectures and Assignments are each a single repo. If you update content in different folders (different topics/dates), you can commit and push all updates from different folders at once if you choose.
- To adjust the assignments to be different for different semesters while keeping the originals, suggest saving the file with the semester on the end of the name, e.g.,
_24F.qmdand moving old assignments to azArchivedirectory
Instead of creating two different files for exercises or assignments (so you have one with and one without solutions), you can use a single .qmd file and control what goees into the output using a YAML parameter for knitr.
Create a single file with all of the potential content.
- Create an assignment file with the instructions, the rubric, the questions and then all the code or and or text to answer the questions.
- For text answers, use a code chunk with
blockas the engine so it responds to code chunk options
- For text answers, use a code chunk with
- Use a YAML parameter to control the knitr code chunk options such as eval, echo, and include.
Both Quarto and R Markdown render with {knitr} so you can use custom YAML parameters to control the code chunk options for the file when it is being rendered.
My .qmd files have a YAML parameter called
solutionsto control the output or evaluation of code during rendering.The
solutionsparameter is a logical variable which is then used within the code chunks for specific options to control the evaluation or output for the chunks.YAML parameter for solutions set to true
params:
solutions: true- You can use a set up chunk to set the defaults using the parameters
{r setup, include=FALSE} knitr::opts_chunk$set( echo = params$solutions, eval = params$solutions, include = params$solutions, fig.align = "center", fig.height = 5, fig.width = 6.5 )
- {Knitr} uses only logical variables for many code chunk options but Quarto allows for some non-logical variables, e.g., echo: fenced.
- Quarto will pre-process the file before passing to {knitr} to convert them to logical variables.
I manually change the solutions parameter value prior to rendering the file to HTML to either create a version with solutions or without solutions.
- With
solutions: true, I rename the output file to add “solutions” to the file name. This one is used by instructors and TAs. - With
solutions: false,the output for the assignment does not contain any solutions and I rename it to add “_student”.- This HTML file has the instructions, the rubric and all the questionss and whatever content you choose to share with the students. You can control the code chunk options to include output such as plots without sharing the code that generates them.
- This version is distributed to students.
- Since the files will overwrite each other with successive rendering, recommend rendering the solutions version first with the parameter set to
trueand renaming the .html file to include “_solutions.html”, then change the parameter tofalseand knit the non-solutions version for sharing with students.
params:
  solutions: true # or false for no solutions.
You can create a setup chunk to set the defaults and then adjust individual code chunks.
- As an example:
```{r}
#| label: setup
#| include: false

knitr::opts_chunk$set(
  echo = params$solutions,
  eval = params$solutions,
  include = params$solutions,
)
```6.4 Issue Individual Assignments to Students
Assignments should be created/revised in the \Assignments\ directory and pushed to the GitHub Course Assignments repo as the baseline.
- The folder for each assignment contains the .qmd file with the instructions and solutions as well as rendered HTML files with and without solutions and sub-directories as needed for data, etc..
Requiring students to create their own .qmd file means they have to recreate the numbering and instructions which can lead to inconsistent documents for grading.
- HTML does not always copy and paste well either
An alternative is to create a starter file for the students to use.
Once the assignment .qmd file is complete, copy it into a
_starter.qmdfile.Edit it to remove necessary YAML lines, especially the parameters and the setup code, and remove code chunks with solution code.
- You may also want to remove introductory or explanatory information such as the rubric tgat you do not need for grading. It is still in the HTML student file already.
Depending upon the question’s intent, it may be appropriate to leave some code chunks in.
- At times there is code that is not part of the solution but is necessary for it to run.
- For some questions you may want to copy the code chunk and rearrange the lines or remove some of them so you can ask students to order them correctly and/or add in missing lines of code.
Save it as
hw_xx_starter.qmd
In the assignment instructions
- Tell the students to copy
hw_xx_starter.qmdand change the name with the homework number and their name and use it for their solutions. - Remind them to look at the HTML file for any instructions, the rubruc or images of plots they need to recreate.
Using a starter file for students can make it much easier to grade student assignments as it helps preserve the numbering and questions.
6.4.1 Create the Repo for the Student Version of an Assignment
References: Create an individual assignment
Since all of the assignments are in a single repo/Rstudio project, you cannot use them as a template repository for a GitHub classroom assignment repository.
- GitHub classroom requires you to use individual repos for each assignment and they must be designated as “Template Repos” in their settings on GitHub.
To issue an assignment, it must be in its own repo both locally and on GitHub.
- Create a folder for the assignment in your local
/zAssignments_repos/folder. - Recommend starting the name with something like
hw_01_,hw_02_, etc.. - Copy the non-solution student HTML file, the
hw_XX..starter.qmdfile if present and any data or other sub-directories from the localAssignments/hw_...folder into the new repo. - Make sure the HTML
..._solutions.xxxfile is not included.
Recommend against copying the entire assignment folder. If you do, be sure to delete the original .qmd file, the _solutions.xxx file and the .R history file.
- Once all files are in place, initialize the directory as its own Git repo.
- Create a corresponding repo under the GitHub Course organization and push to that organization.
- Keep it as a Private repo to reduce potential sharing outside of the class.
- Go into the settings for the new repo on GitHub and check the box for
Template Repository(right under theRepository Name). - Fork the repo to the GitHub Semester organization.
6.4.2 Create the Assignment in the GitHub Classroom Classroom
The repo now exists in the GitHub Semester organization. The next step is to create the assignment in the GitHub Classroom semester Classroom so it can be distributed to students.
Go to GitHub Classroom and then to the Classroom for the course and semester.
Click on
New Assignment.Fill in the title using the appropriate prefix, e.g.,
hw01. The names must be unique across assignments.- Recommend keeping them short as they are the prefix for each student’s repo.
- I delete the
_between thewand0to make it easier to find.
Skip the deadline.
Select
Individual Assignmentand selectContinue.Click on the box under
Find a GitHub repositoryand start to enter in the name of the individual assignment repo in the GitHub Semester organization. After a few letters it usually finds it for you. (It is finding all public assignment repos that may be similariyt named from others.)Ensure the repos are
Private.Skip GitHub Codespaces and there is no need for an editor.
Click
Continue.Skip Add Autograding and Protected File Paths and select
Enable feedback pull requestsand then clickCreate Assignment.The assignment has now been created and has a unique URL Link for students, but students cannot see it.
GitHub Classroom changed its process for creating student repos from a template repo in July 2024.
They have updated the documentation but older references may be incorrect.If you go back to the GitHub Semester organization repositories you will now see an additional repository as a result of the new GitHub Classroom workflow.
- GitHub Classroom created a copy of your template repo, squashed all of the commits, and gave it a concatenated name.
This copy repo (with the long name) will be the template for your student’s repos.
- Students do not have read privileges to this copy repo which means they cannot see it.
- However, if you make changes to it and generate a pull request, they can see the pull request and accept it, even after they have accepted the assignment.
If you make changes, you may generate merge conflicts if students have started editing their files.
In the event you have to update your assignment repo files, suggest the steps below (Section 6.4.2.1) to minimize the chance of merge conflicts.
6.4.2.1 Update an Assignment Repo after Creation (if required)
Reference Making changes to assignment starter code.
If no students have accepted the assignment yet, you can update both the original assignment repo and the copy repo with worrying about merge requests as no student repos have been forked.
- However, if any student has accepted the assignment, recommend not editing the copy of the starter code directly (as in the reference) and using the following to minimize any issues.
1. Update the files for the assignment as required and add to the GitHub Classroom-generated Copy Repo
- Update the file in your
Assignmentsdirectory with any corrections or revisions you want to make and push to GitHub to keep your baseline updated. - Copy the updated file to the
zAssignmentsrepo with a different name. Push to GitHub to update that repo baseline.- Recommend adding a paragraph at the top describing the location and nature of the changes that were made so the students can find them easily.
- Go to the semester organization and to the homework repo.
- You should see it is behind one commit. Select
Sync forkand thenUpdate branchto update your forked copy from the Course organization repo.
- You should see it is behind one commit. Select
- Now go to the Copy repo (with the long name).
- There is no link between the original homework repo you just updated and this copy (with the long name) so GitHub does not know there is an updated file in the original repo repository. Thus you cannot sync.
- However, you can “Add” the new file that you created from your local
zAssignments/hw_...repo.
- Navigate to the directory where you want to add the new file, e.g.,
/Analysis. - Select
Add fileand thenUpload file. - Drag and drop the file from your local
zAssignments/hw_.../Analysis/directory onto the box on the page or selectChoose fileto upload the file. - Enter a comment under
Commit Changesor accept the defaultAdd files via uploadand selectCommit changes. - Your updated file should now be in the copy repo from which the student repos are forked copies.
2. Generate a Pull Request for the students
Even though the copy repo has been updated, the student forked repos do not have Read privileges to the copy repo so they cannot see it to generate a pull request.
- You have to generate a pull request for the students to access the updated files.
You can use GitHub Classroom to detect the changes and generate the pull requests.
- Once you have updated the assignment copy repo (with the long name), go to GitHub Classroom and select the Assignment you have updated.
- Select the button with
Synch assignments. - It should generate a pop-up with how many assignments are out of date. Select the pop-up.
- You should get a message saying the pull requests have been generated for the affected students and you can see them in the roster below.
- Students will now see a new pull request on their repo.
3. Students Must Merge their Pull Request.
- Students should go to their repo and select the
Pull requestsoption on the menu bar. - They should see a new pull request called
GitHub Classroom: Synch Assignmentwith the following comments.
This pull request was automatically generated by GitHub Classroom to sync with the upstream assignment repository.
Merge this pull request to sync your assignment repository with your instructors latest changes.
If you have any questions or concerns, please contact your instructor.
- The pull request should state
This branch has no conflicts with the base branch. - Tell students to select the green button
Merge pull requestandConfirm merge. - Their repo should now have the updated files in it.
Students can review the files for any changes and update their files as appropriate.
You can also go into each student repo and run the pull request. If students have not started work on the assignment or there are only minor changes in the instructions that might be fine. However, it also might generate merge conflicts that the student would have to resolve.
6.5 Issue the Assignment to Students
To issue the assignment to the students requires distributing the URL link created by GitHub Classroom to the students so they can “accept” the assignment.
6.5.1 No LMS
If you are not using an LMS for the course, you can copy the link and e-mail it to the students.
When each student clicks on the link, GitHub Classroom will create the student’s assignment repo (from the appropriate copy template repo) in the GitHub Semester organization.
- Only the student, the TA, and you will be able to see their repo.
Students should clone their repo to their local machine. As they complete the assignment they should stage, commit, and push to GitHub so you can see their work.
6.5.2 Using the Canvas LMS
If you are using an the Canvas LMS for the course, create an assignment to distribute the URL link created by GitHub Classroom.
- Go to Canvas and create a new assignment.
- Edit the assignment instructions and add an external link by copying and pasting the URL from GitHub Classroom into the Canvas assignment instructions.
- If you are editing a previous assignment, e.g., you imported a canvas course or assignment, be sure to change the link to the new one provided by GitHub Classroom for the current semester.
- In the assignment instructions, tell students to click on the link to accept the assignment.
- Make the Canvas
Submission Typeto beOnlineand justText Entry. - Include point values and rubrics, etc., as desired.
- Choose the date you want to assignment to be visible, and the due date.
- Save and publish.
If using Modules, add the assignment to to the appropriate module, publish the assignment, and ensure the module is published.
- Students will not see the link until the assignment (and module) is published and the date-time for visibility arrives.
Here is a sample set of Canvas Instructions (adjust for assignments without a starter file):
To accept the assignment, click here.
Instructions
1. Clone the assignment repo to your homework directory as a new repo.
2. Rename the starter file under the analysis directory and replace ”starter” with your name and use this file for your solutions.
3. Edit the “author” field in the YAML header to use your full name.
4. Review the provided assignment HTML file for detailed instructions, the rubric, and any images to be replicated.
5. Stage and commit your quarto (.qmd) file each time you answer a part of a question, e.g. 1.1.
6. Render to HTML (no PDF or docx) and push to GitHub after each main question, e.g., 1.0 or 2.0.
7. Be sure to re-render to HTML prior to staging, committing, and pushing your final submission.
8. Check your output to ensure all images are present and there is no excessive data being shown.
9. Once satisfied the assignment is complete, stage, commit, and push to GitHub.
Submission Instructions when Assignment is complete and pushed to GitHub
1. Click “Start Assignment.”
2. Enter the phrase: “Assignment is completed, rendered, pushed to GitHub and ready for evaluation.”
3. Click “Submit Assignment.
Use Pull requests and or email to ask me any questions. If you email, please ensure your most recent code is pushed to GitHub.
Once the assignment becomes visible and students click on the link, their repos will be created and they can clone the repo to their local machine and start their assignment.
6.6 Issue Group Assignments to Students
Group assignments are issued in similar fashion as individual assignments.
You specify the name and criteria for the groups. GitHub Classroom then allows the students to create and name their own groups.
Go to the GitHub Classroom classroom and click New assignment.
- Enter the name using a prefix, e.g,
gp01_xxx. - Select
Group Assignment. - Name the set of Teams, e.g., “Group Projects”.
- Set the maximum number of team members and maximum number of teams.
- Select a template repository from the Semester organization and continue as before to
Create assignment. - Keep it
Privateand do not grant admin access. - Get the link and issue as a group assignment in Canvas.
- You will need to create the Canvas Groups separately or use the Canvas functionality to allow students to select their groups.
As students click on the link in Canvas, GitHub Classroom will invite them to join an existing group or create a new group (if they don’t see their group).
- If a new group, the first student to click will select the name for their group repo.
GitHub Classroom will create a repo for each group and a team for each group in the GitHub Semester organization.
- Each group/team will have access to their repository.
7 Review/Grade Student Assignments
This section assumes one has successfully issued an assignment to students using GitHub and GitHub Classroom as described in Section 6.5 and students have accepted it and begun work.
7.1 Student Repos
When the students accept an assignment, a repo is created in the GitHub Semester organization with the name you assigned to the assignment followed by -student_github_id.
- Note: Students can be quite creative when choosing their GitHub ID so you will probably want to create a reference somewhere to map their IDs to their names, especially for large classes.
As soon as students do their first push you can start looking at their code. You can review it in GitHub or you can clone the student repos to your local machine.
If you checked the Enable feedback pull request when you created the assignment, you will also get a pull request for each student. This will allow you to link directly to their code like a normal pull request to provide feedback if they have questions.
7.2 Using the Github Command Line Interface to Clone Assignments
The GitHub Command Line Interface (CLI) provides access to many git commands and more for working with GitHub from your terminal pane command line.
- Install the GitHub CLI by going to Take GitHub to the command line for install instructions and the manual.
There is an extension to the GitHub CLI which provides additional capabilities for working with the GitHub Classroom.
See Using GitHub Classroom with GitHub CLI for information on using CLI with GitHub Classroom.
To install the GitHub Classroom extension, go to the terminal window and run
gh extension install github/gh-classroom.You should get a response for a successful install.
Once the extension is installed there are multiple commands for working with classrooms and assignments.
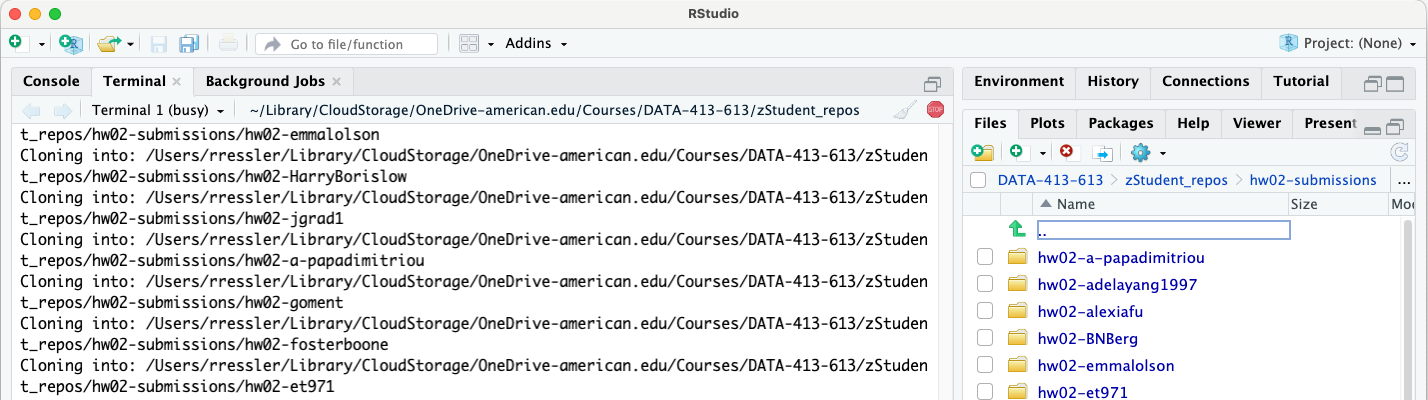
- As an example, to clone all the students repos for an assignment do the following.
- Navigate in the terminal window to the directory where you want the new directory to be created, e.g.,
zStudent_repos. Note the directory may be empty in the RStudio Files tab.
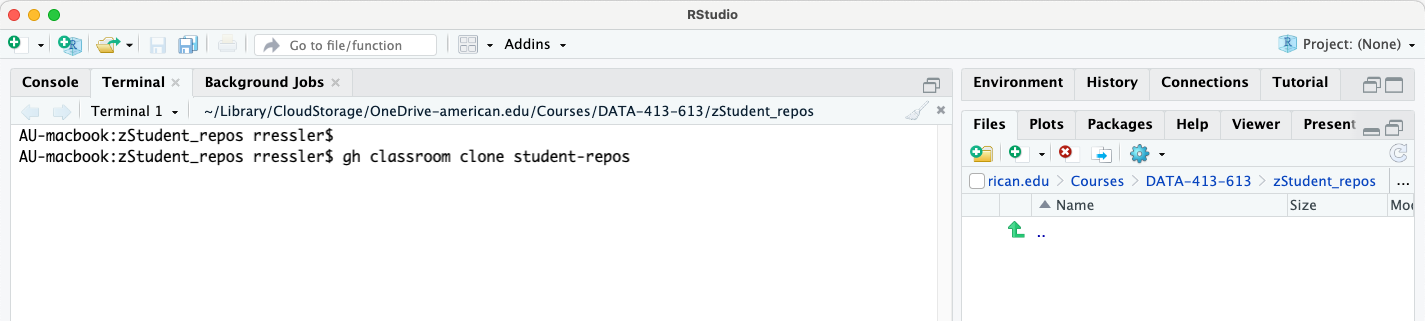
zStudent_repos.- Enter the command
gh classroom clone student-repos. This will return an interactive list of your available GitHub classrooms. Use the arrows to move down/up the list to select the classroom of interest.
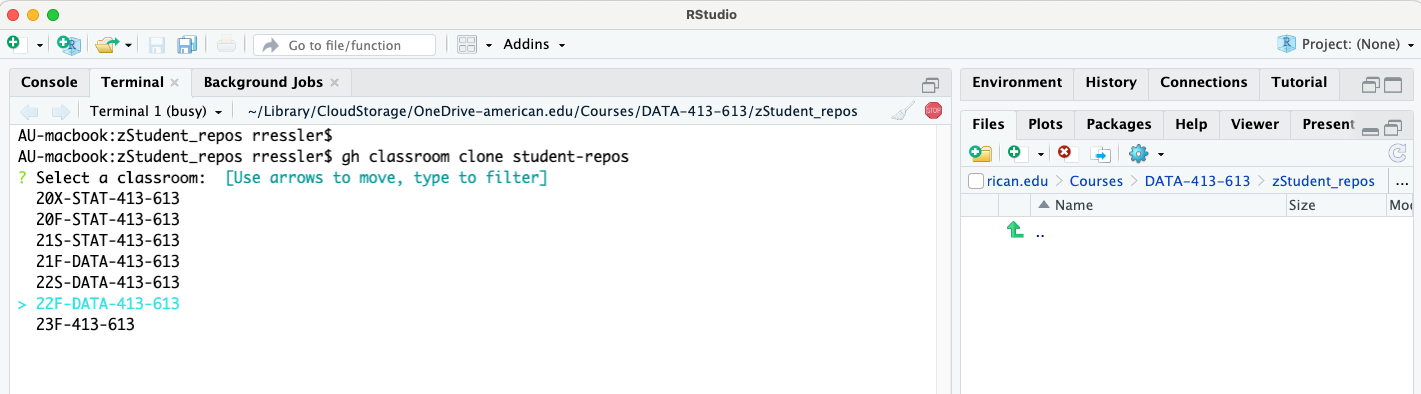
- Once the classroom is selected, GitHub will return an interactive list of available assignments in the classroom. Use the arrows to move down/up the list to select the assignment of interest.
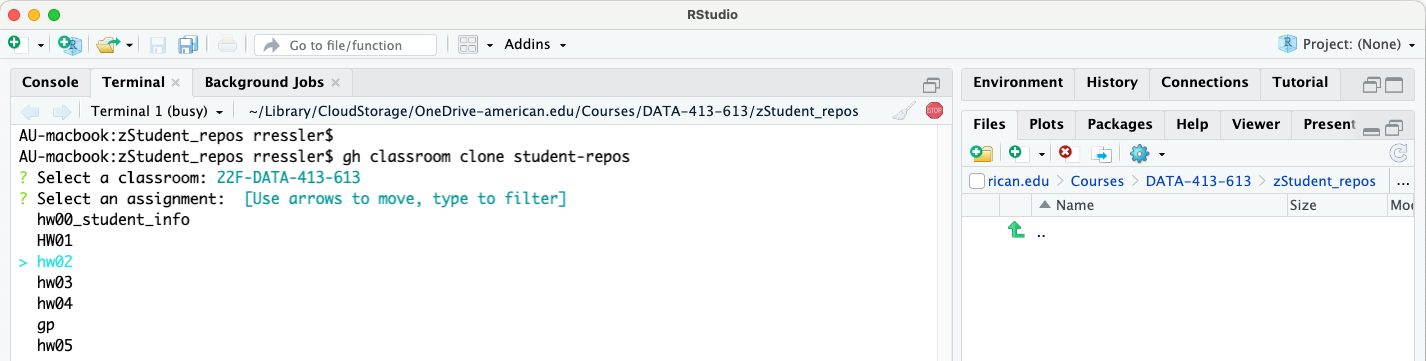
- Once you select the assignment, GitHub will create a new directory for the cloned repos and begin cloning each repo.
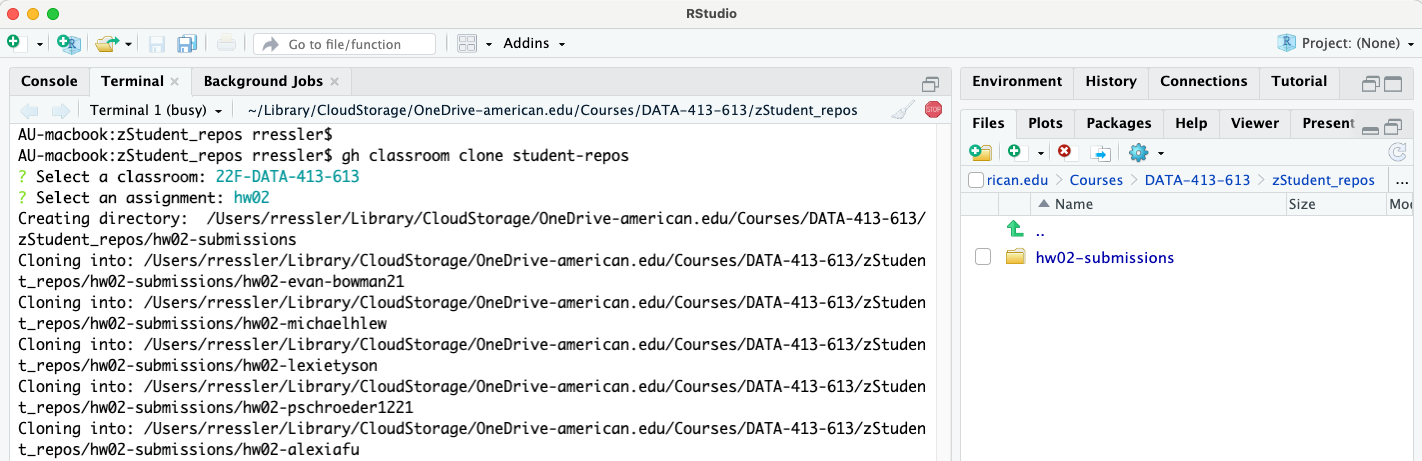
assigment name-submissions.- Once the cloning is complete you can navigate to the new directory to see the individual repos.
The CLI expects there to be no directory with the same name as it will create. If there is, it will stop and tell you why.
- If there is an existing directory, e.g., you already cloned the student submissions for office hours, you can choose to rename the existing directory or delete it.
- Then run
gh classroom clone student-reposagain and select the assignment.
7.3 Grading an Assignment
I use a shared Excel workbook (on OneDrive) to facilitate grading with a TA.
Typically the TA has cloned the repos and done an initial review of them without making any changes or comments on the repos or in Canvas. The TA enters their comments on the shared Excel Spreadsheet (OneDrive).
The spreadsheet has the rubric for each assignment and columns for grades and comments. The TA colors the “Total” row cells yellow when they have completed with a student.
Once the TA is complete, you should use the CLI to clone the repos to ensure you have the latest version.
Once the repos are updated, you can use the RStudio Files pane to go repo by repo to grade each student’s work.
You can use the pull request or create a new branch called instructor and then switch to the branch to run the code and make comments or troubleshooting changes. You can do it with RStudio or with the terminal with:
`git branch instructor`
`git switch instructor`
`git push origin instructor` to create the branch on GitHub.
This way the students can see their original code and any changes or suggestions you make once this gets pushed.
I record my grades and summary comments in the Excel spreadsheet shared with the TA. This allows me to see all of the comments and grades across all of the students to review for consistency (since there are usually common errors).
7.4 After Grading is Complete
Once all grading is complete, I copy the grades and comments from the spreadsheet into each student’s Canvas assignment, one-by-one, using Canvas Speed Grader.
8 A New Semester
This section assumes you have completed a semester of teaching a course per the previous workflows.
To prepare for a new instance of a course consider the following steps:
- Copy your existing Course directory on your computer to an Archive directory.
- Delete the student assignment repos and clean out any admin grading files.
- Create a new semester organization on GitHub along with the Team for students.
- Use GitHub Classroom to create a new classroom for the semester.
- Upgrade both the organization and the classroom for the educational discount (may need to re- validate your status with GitHub).
- Change the upstream repo for the
Lectures_Classrepo to the new Classroom Organization.
9 References
- This is out of date in many ways but still has some good ideas. Jacob Fiksel, Leah R. Jager, Johannna S. Hardin & Margaret A. Taub (2019) Using GitHub Classroom To Teach Statistics, Journal of Statistics Education, 27:2, 110-119, DOI: 10.1080/10691898.2019.1617089 DOI Link